Thursday, June 30, 2022

Curly Ribbon Crafts

 Rock your party with curly ribbon party lights! 

        It's almost time for a firecracker Fourth of July celebration, so let's get our red, white and blue craft on and create a few simple party lights to light up the night!  Here's a couple of ideas to start with...


Here's what I used:
  • Gwen Studios Curly Ribbon - Red, White & Blue
  • Gwen Studios 3/8" Grosgrain Taffy Stripe ribbon - Red & White
  • Double-sided Adhesive Tape
  • Glow Sticks
  • Solar Light Mason Jar Lid
  • Small Crystal Mason Jar
  • Scissors
  • 3 Small wood beads - 2 Red & White
  • Empty plastic bottle - Small
  • 12" Bakers twine, or jute (to hang)

Glow-Stick Light


1. Cut about 2" off the bottom of the plastic bottle. Make sure to include about 1/2" of the flat side of the bottle.

2. Use the point of your scissors to make a hole at the center of the bottom of the bottle. Tie one end of the twine to the glow stick cap then thread the other end through the hole up from the inside. Thread the beads onto the other end then make a loop at the top to hang. This will be the top of your light.


3. With edges aligned, adhere the double-sided tape around the cut edge.

4. Cut equal numbers of each color of curly ribbon into 15" lengths then curl each piece by carefully running the length of ribbon between your thumb and the blade of your scissors.  You will need enough pieces to go around the edge of the bottle. Adhere the end of each curled piece to the adhesive tape around the edge of the bottle. 

5. Adhere grosgrain ribbon around the edge to cover the ends of the ribbon and, if desired,  tie a small bow around the hanger at the top of the beads. Trim the lengths of ribbon as needed then push the glow stick into the top and hang.  Remove the glow stick to activate then replace. 


Mason Jar Solar Light

        You probably have a mason jar, but you may need to purchase the solar light lids. I purchased mine from Amazon.


        This is quick'n EZ to make. You don't even need to use a mason jar since the fairy lights will simply hang down from under the solar lid among the strands of curly ribbon. All you need to do is adhere the double-sided adhesive tape around the edge of the lid, add the curled pieces of ribbon then cover the ends with the grosgrain ribbon to finish.  Note: The wire ring of the hanger that comes with the solar lid, is sized to fit around the neck of a jar. You will need to make an adjustment to it if you plan to use it around the lid if you don't use a jar.

Time to light up the decorations! 


        There are so many other colors of curly ribbon to choose from and with glow-sticks in abundance at different times of the year, I can imagine glow-stick lights with white curly ribbon and google eyes as ghost lights for Halloween in Fall, shades of blue, green and a little pink would make a fabulous jelly fish! What would you make?

Enjoy!

Yours truly,
Julie 💝

KEEP CALM AND CARRY ON CRAFTING!

Curly ribbon used in my projects was provided by Gwen Studios. It is available in a variety of colors at Walmart and online at Walmart.com  All other supplies were purchased by me. 

Look for more curly ribbon projects on the Designer Crafts Connection blog


Tuesday, June 28, 2022

Etched Slate - Aloha Summer!

Wherever you live, celebrate the joys of Hawaii at home with this etched slate plaque!


You will need:

etchall® crème

etchall® etchmask and transfer paper

Slate, 5” x 7”

Squeegee

Pik tool

Swivel blade craft knife, or a digital cutting machine

Pattern


1. Download the pattern onto your computer, then either print, or upload to your cutting software.


2. Cut the pattern from etchmask using your digital cutting machine, or cut around the traced design with a swivel blade craft knife. It is only necessary to cut the vinyl, not the backing paper.


3. Use the pik tool (or the point of a craft knife) to remove the areas of the design that will be etched. Insert the tip of the knife into the vinyl away from the cut edge, then lift gently.


4.   Once all areas to be etched have been exposed, cover the top of the etchmask with transfer paper.  Press firmly onto the etchmask, then carefully peel the backing sheet away from the etchmask.


5.  With the transfer paper facing up, position then press the etchmask firmly onto the slate then remove the transfer paper.  Make sure that all areas of the slate not to be etched are completely covered. Use pieces of transfer paper on the edges or corners as needed.


6. Cover the open areas liberally with etching crème. NOTE: etchall etching crème is reusable, so you cannot use too much. Use the squeegee to spread the crème across the open areas on the slate.  After 10 minutes, use the squeegee to move the crème around a little being careful not to touch the slate surface. 


7. After an additional 5 minutes, scrape the crème back into the container then rinse the slate and remove the etchmask to reveal your etched design.


NOTE:  etchall etching crème creates a permanent etch on slate, glass, ceramic, mirror, porcelain and other glazed surfaces. Please read directions thoroughly. Do not rinse over a porcelain sink, or work on a glazed countertop (granite, etc). Even a small amount of etching product will permanently etch any of these surfaces. 


        Use etchall etching crème and dip to customize glass, mirror, china, or slate pieces for your home, or to give as a gift. You can also use stencils to create the designs of your choice!  Search "glass etching" in the search bar on my blog for more project ideas.  Enjoy!


Yours truly,

Julie 💝


KEEP CALM AND CARRY ON ETCHING!


etchall® products were provided by B&B etchall.  Check their website for the full product range.


Use code  BELLA622  for 20% off your order

The slate was purchased from my local Michaels store. Some surfaces are also available online.

  I receive a small endorsement fee for featuring my etched projects on my blog.

Friday, June 24, 2022

Party Lights with K&S Precision Metals

         Summer is here! Time to think picnics, cookouts and pool parties!       

        On a recent trip to the annual arts & crafts show I was excited to find a new product with amazing craft potential! A colored metal, aluminum foil that was easy to work with and held its shape - believe me, this is not your mother's aluminum foil found in most kitchen drawers. Industry designers were offered samples to work with and a few weeks later these arrived on my doorstep. There are 5 colors on one side of each 12" x 24" roll and silver on the other.


         I love summer and all the fun things that come with sunshine and warm weather.  Living in Texas usually means a house with a pool - the perfect spot for outdoor fun and celebrations. Decorations were a big part of any kind of party of course. We would hang strings of lights and decorate with lanterns, so I was always on the lookout for a sturdy material to make my own......   


            The best thing about making your own lanterns is that they can be any size and you'll probably have most of the other supplies needed in your craft stash and around the house.  

Here's the list of what I used for the basic lantern:
  • 12' x 24" Roll of blue K&S Metal Aluminum Foil
  • Paper trimmer
  • Double sided adhesive tape
  • Scissors
  • Embossing tool/stylus
  • Flameless candle with remote
  • Empty plastic/soda bottle cut to the height of the candle (or taller if desired)
  • 1/8" Hole punch
  • Small brads


1.  Cut a custom sized rectangle of metal foil 

    Width = measure around (diameter) the soda bottle 

    Height = height of the bottle plus 1-2".

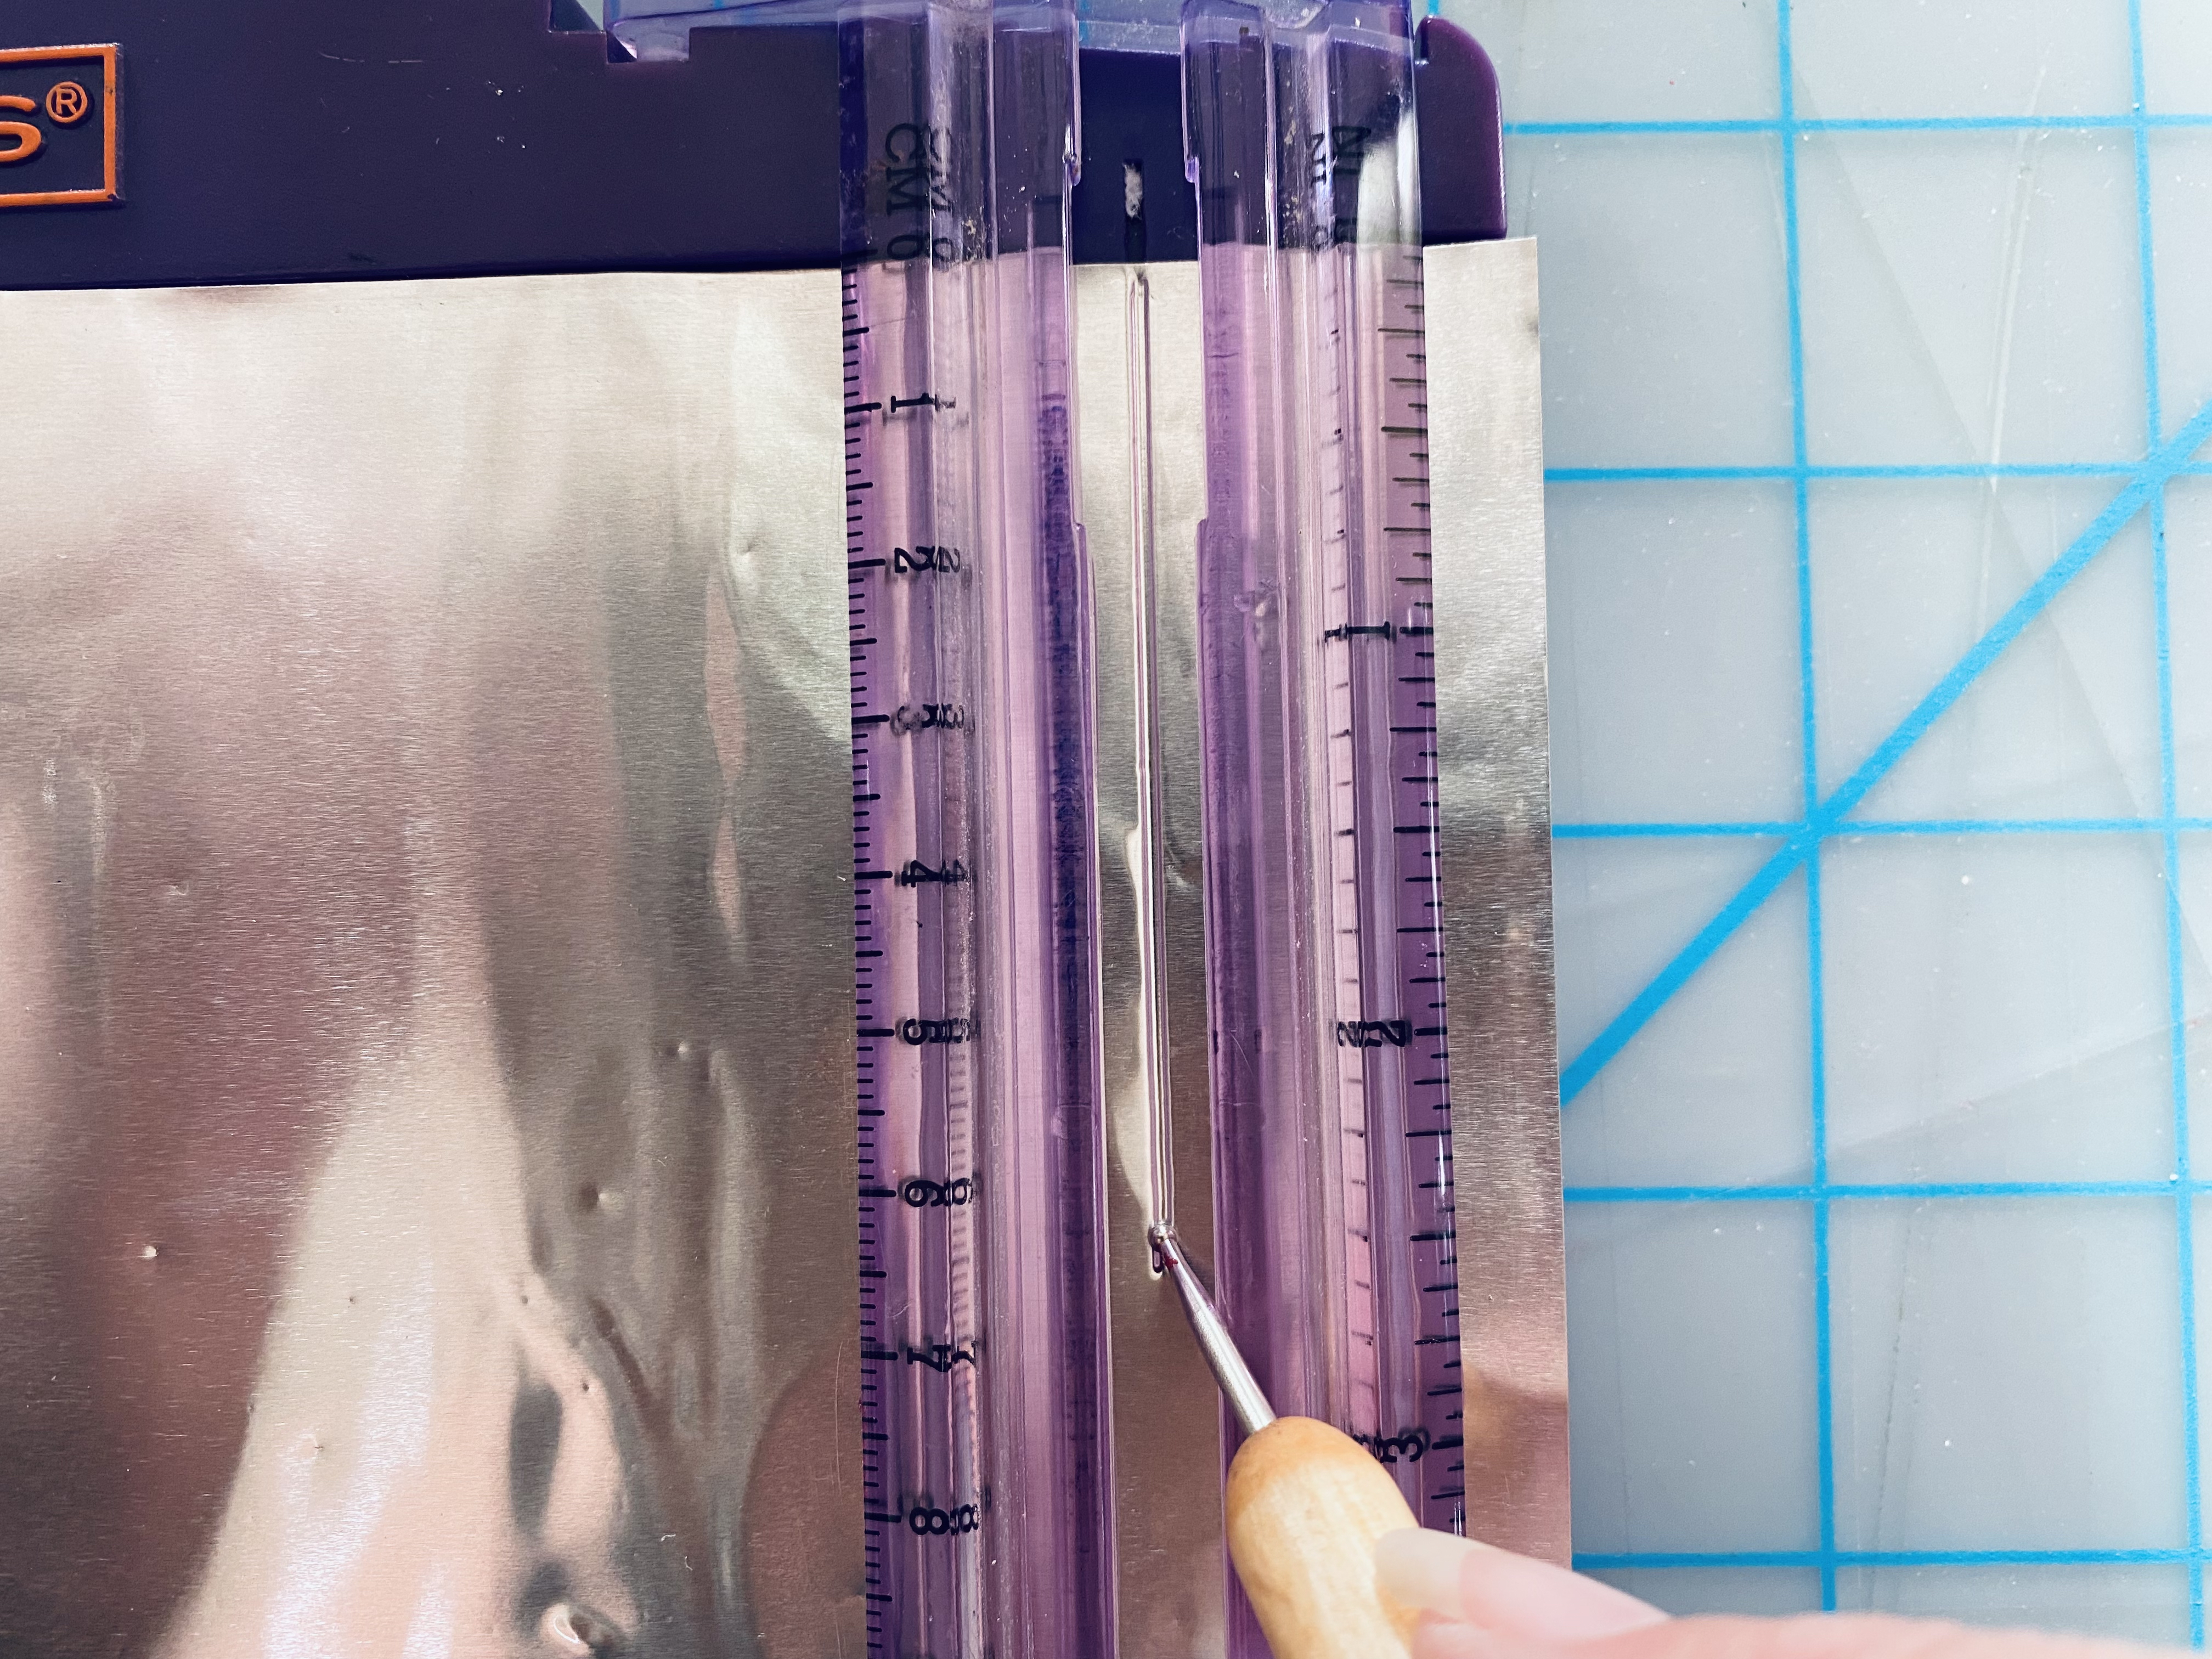
2.  Starting 1/2" from the edge and 1/2" from the top edge, cut to within 1/2" of the bottom edge.  Make 1/2" wide, top to bottom cuts along the width of the metal foil.

Note: I like using this particular trimmer because of the marks on the blade which show starting and stopping points on the ruler. 

3.  Cut two, 1/2" strips of metal foil the same length as the width of the foil piece PLUS 1"

4.  With one end aligned with one side, use double sided adhesive tape to adhere one strip along the top and the other along the bottom with the silver side facing up.  


5.  Fold the edges upwards along the inside edge of each strip then place over the curve of the candle*, or other round surface. Press the foil gently around the candle to curve.  (*The plastic bottle is too soft.)


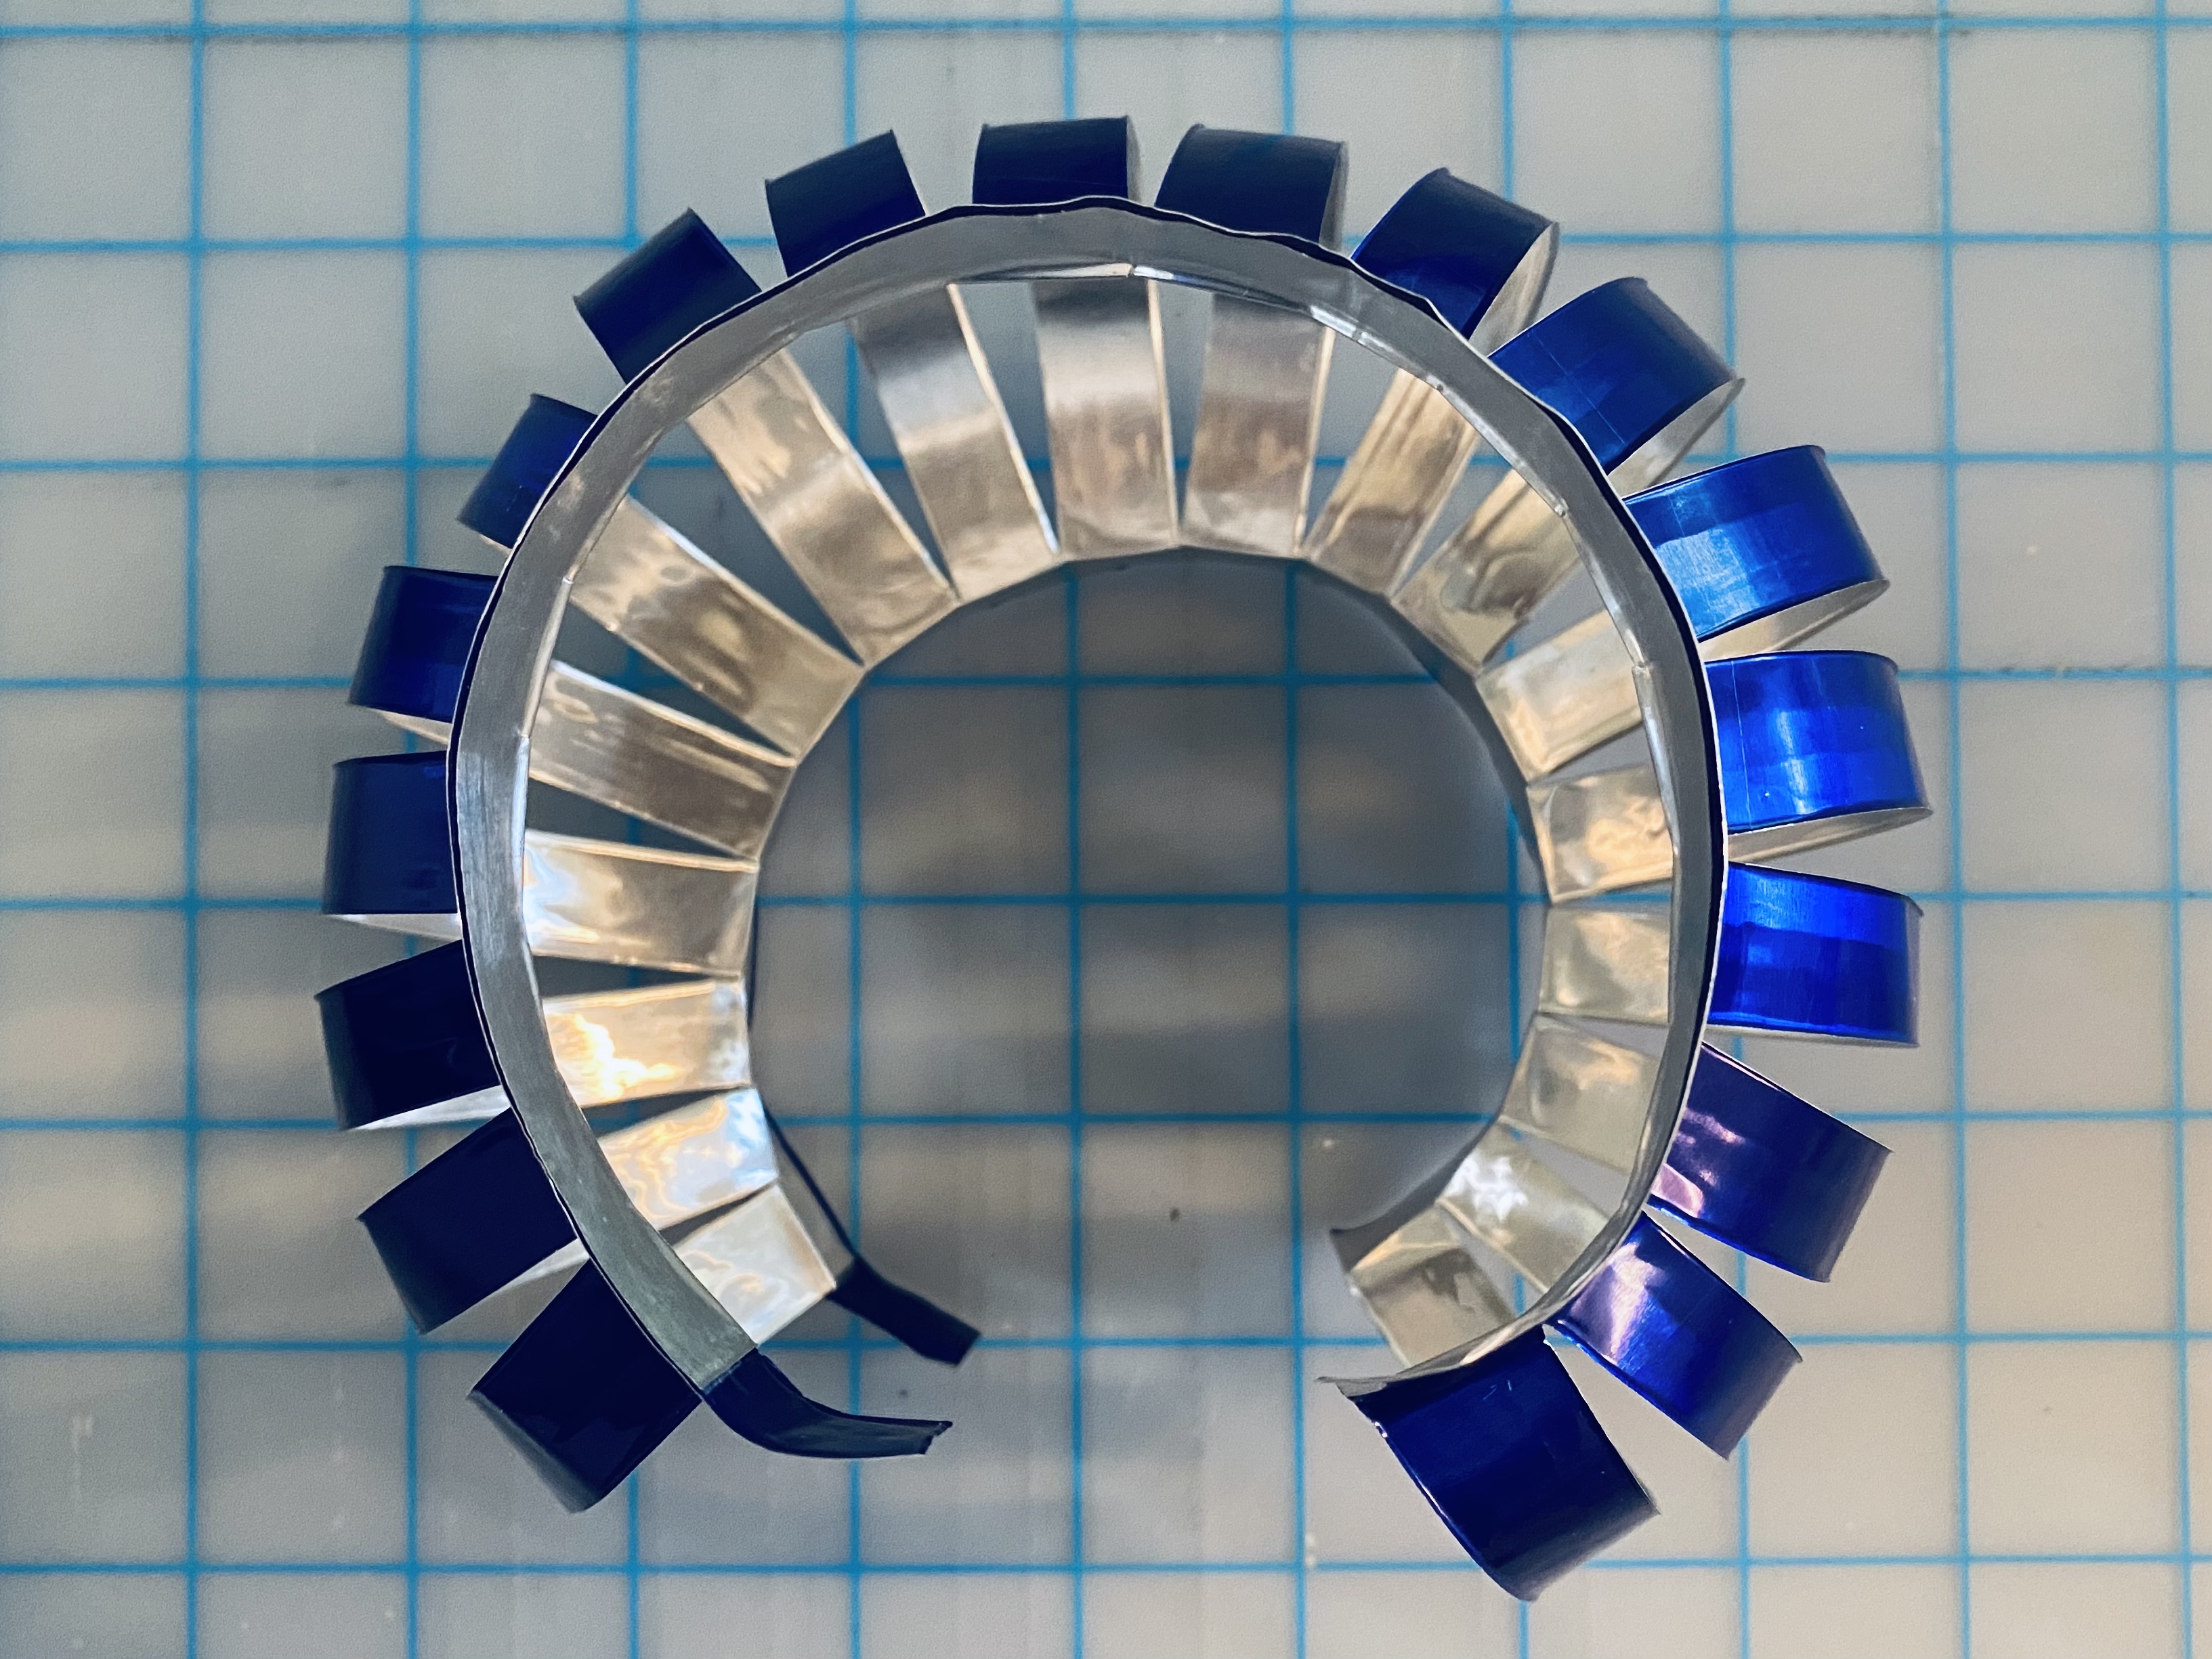
6. Curve the metal foil around into a circle so the strips at the top and bottom overlap. Use double sided adhesive tape to secure. Place upright on a solid surface then gently press down on the top so the sides curve outward.  Place the plastic bottle inside then adjust the top of the lantern so the top edges are even.


7.  Make a Handle:
     Using an embossing tool and the cutting channel in the paper trimmer as a guide, emboss a line about 3/8" from the edge of a 10" piece of metal foil (any width), then a second line 1/2" away from the first line.  Cut the foil about 3/8" from second embossed line to create a 10" x 1 1/4" strip. Using the embossed lines as guides, fold the outer edges inwards and overlap to create a strip for a handle. 


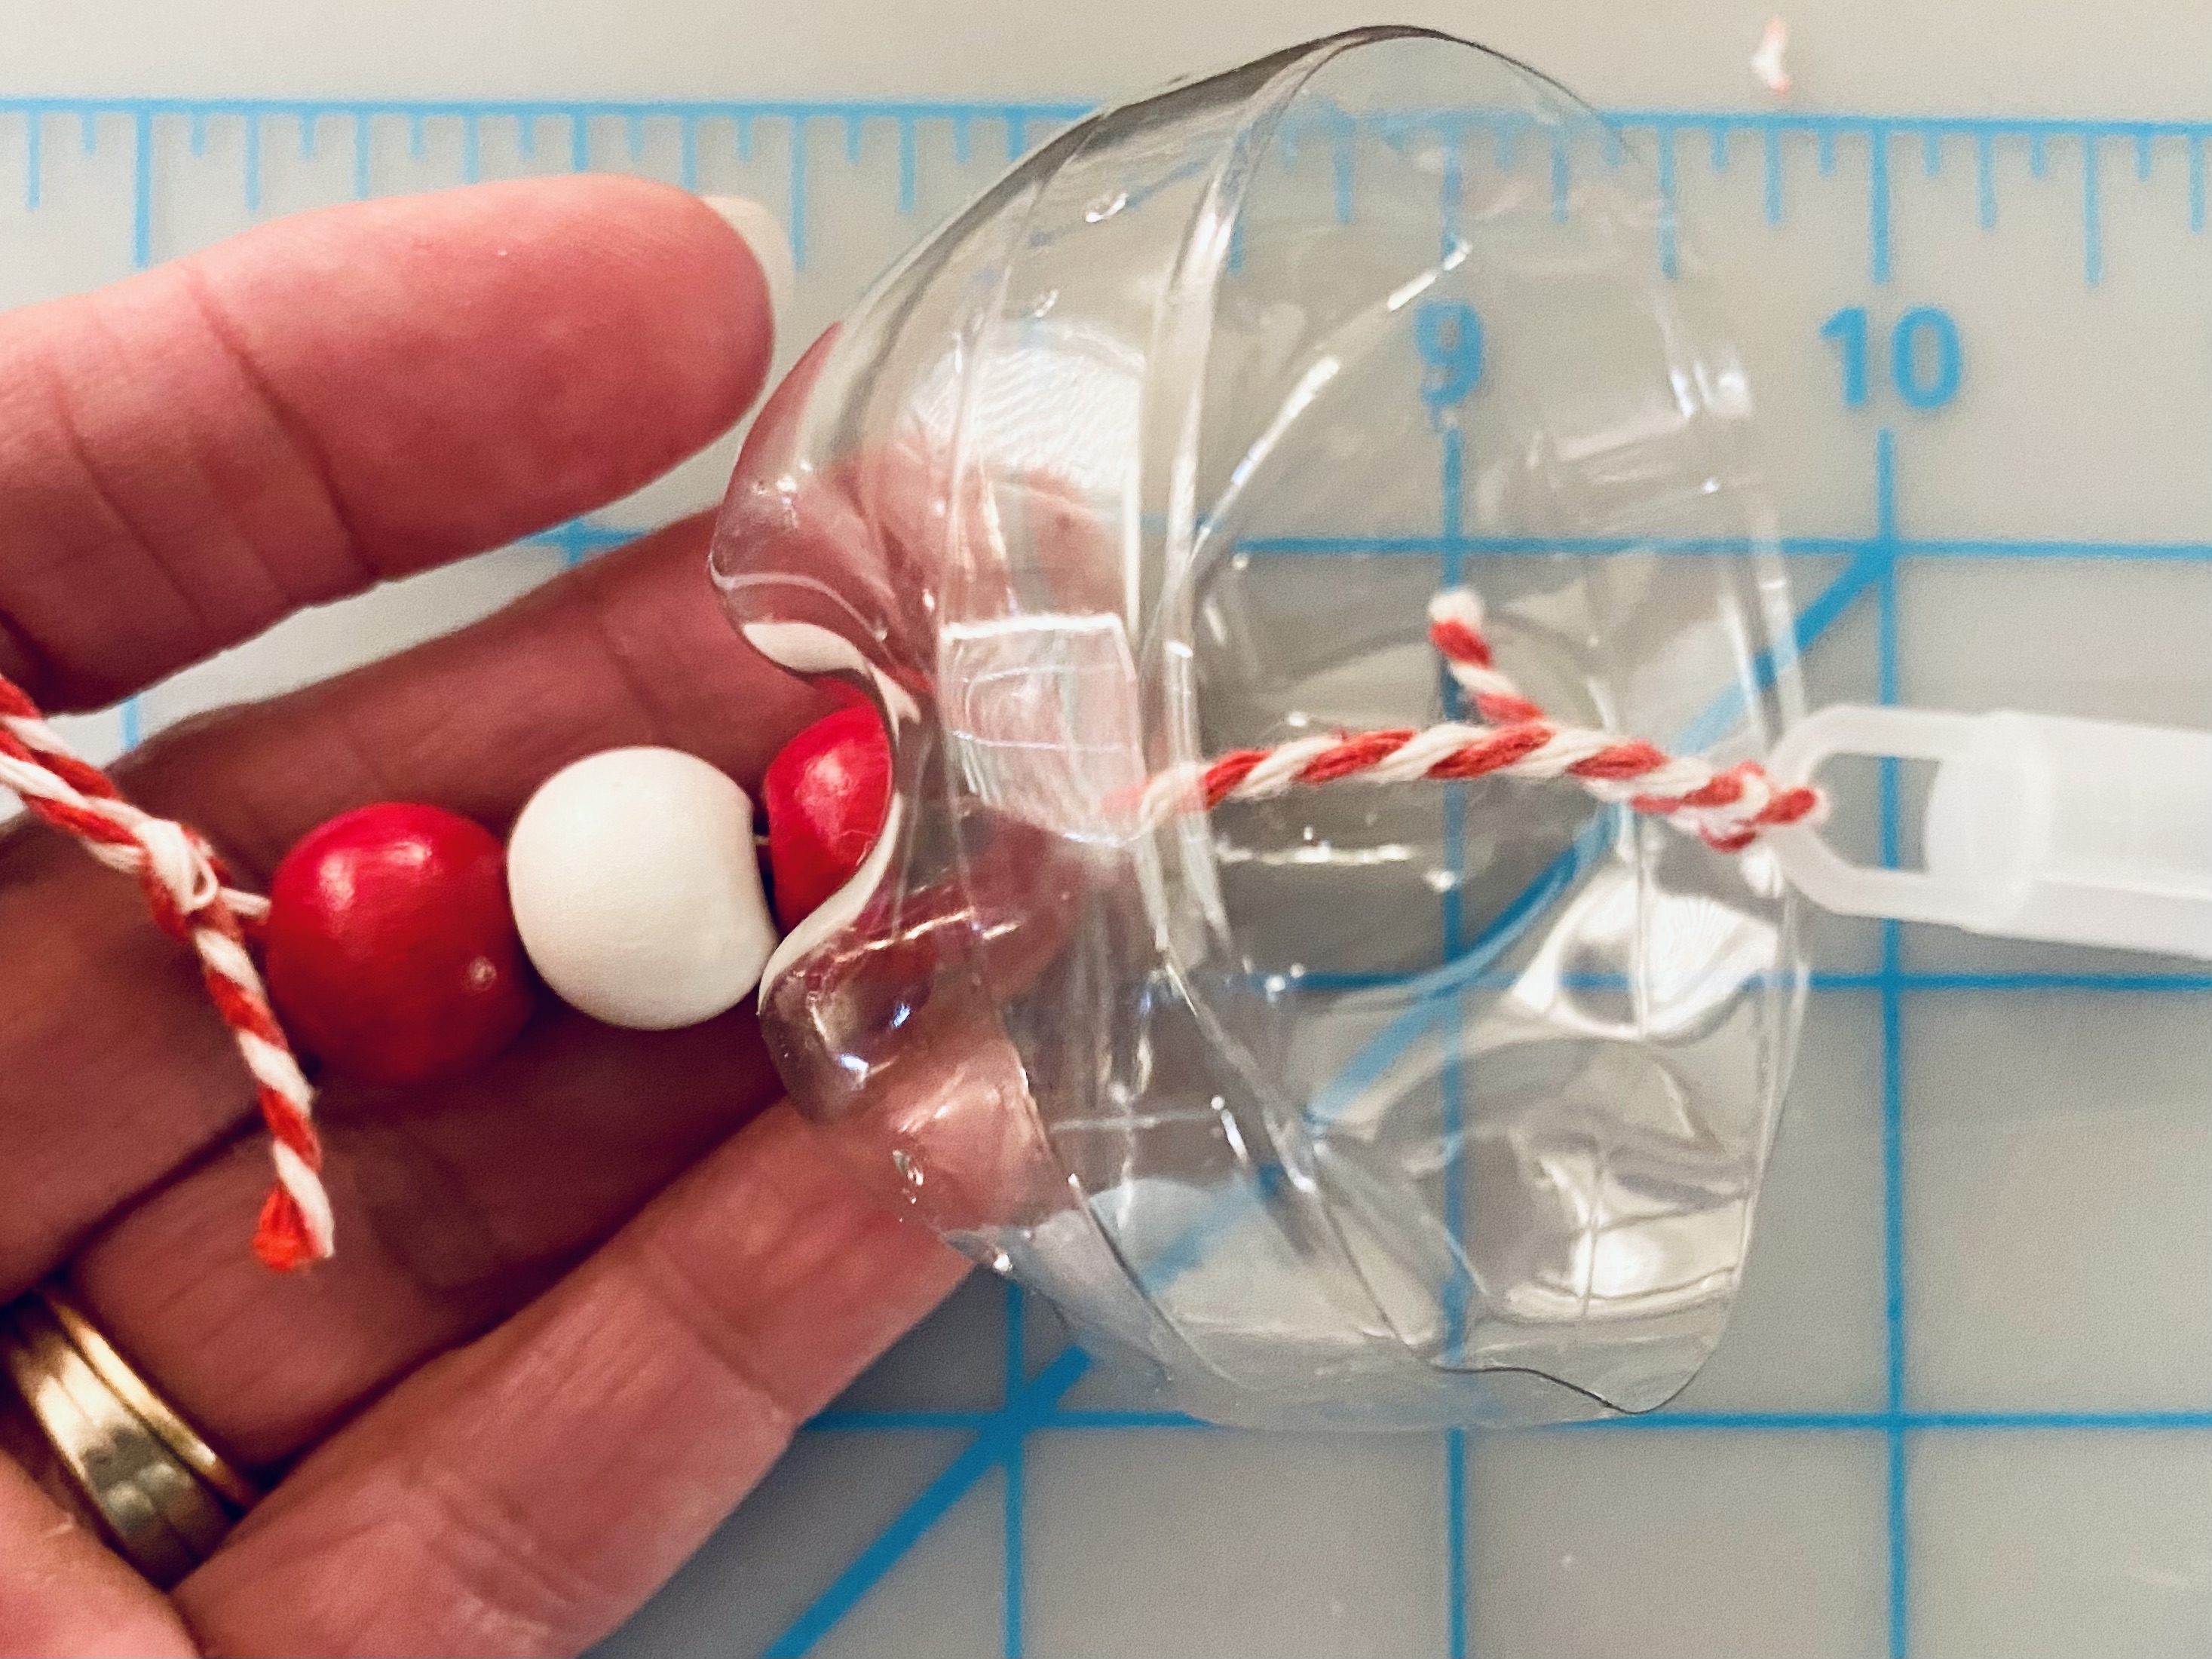
8.   With the top edge of the lantern even with the top edge of the bottle, punch a hole thru the bottle and lantern.  Punch a hole about 1/2" from one end of the handle. Line up the holes then secure the handle to the inside of the bottle with a brad. Trim the length if necessary then secure the other end of the handle at the opposite side.


9. Slide the candle into the plastic bottle then place on a table, or hang from a tree branch. This flameless, flickering candle came with a remote, so it can be switched on and off as needed without having to be removed from the lantern.


        Of course I didn't stop there! With so many kinds of lights and sizes of votives to choose from it was easy to make lanterns in a variety of sizes.  I had small and medium plastic bottles to hold smaller votives and candles, plus tea lights, puck lights and even a solar mason jar lid with fairy lights. The rest was easy. 


Using the basic instructions above I made the following using the solar mason jar lid with fairy lights:

        Cut metal foil 6-8"H x the diameter of the lid. Cut the foil same as above then attach the top of edge around the lid with double sided adhesive tape. Charge in sunlight then use indoors as a night light. 


        Tea lights with or without small plastic bottles are perfect for small lanterns. Cut the top off the bottle then attach the lantern following instructions in the feature project above, or simply adhere the bottom of the lantern around the tea light with double sided adhesive tape (see photo below).  Since tea lights are so small, I cut the sides of the lantern every 1/4".


        Now that you know how to light up your party with  lanterns I'd be remiss not to add that there is SO MUCH MORE that you can do with this product: 

        I've pictured a few of the  things I have on hand that I've been playing with and have so many more ideas to share.  Add texture with crimpers, cut with a digital cutting machine, dies, punches, decorative scissors, emboss with stencils and a stylus, embossing envelopes and I haven't even started to list the number of things you can use on the surface. 
 

        You can find more inspiration from other designers who received samples of the metal foil. Their projects are featured on the Designer Crafts Connection blog.  Enjoy and party on! 

Yours truly,
Julie 💝

KEEP CALM AND CARRY ON CRAFTING!