Showing posts with label etching creme. Show all posts

Tuesday, October 18, 2022

Etched Jack O'Lantern Slate Coasters

         I love being able to customize holiday, or special event accents for the home. Everyone loved the smoked Jack O'Lantern glasses, so thought I'd use the same designs for a couple of slate coasters...  YES! You can etch slate with etchall® etching crème.  They're pretty cool looking, right.........

Here's what you'll need
  • etchall® reusable etching crème
  • Stencil cut pick knife, or pick tool
  • Squeegee 
  • Etchmask, stencil or vinyl for creating stencils
  • Slate coasters  (I got mine from Plaid, but you can also order from Amazon)
  • Jack O'Lantern patterns 
  • scissors 


1. Drag the above patterns from here onto your desktop then upload into your cutting software*, or print onto printable vinyl and cut with a craft knife.  Each face is about 1.5-2" wide, but you can adjust the size to fit the size of your coaster.    *I used my Cricut Joy® machine to cut the stencils.
    
2. Using the pick tool, carefully weed (remove) the areas to be etched from the vinyl then press firmly in place at the center of the slate. Since this is a small and simple design, I didn't find it necessary to use transfer tape.  


3.  To prevent accidentally etching the uncovered areas of the slate, cover with scraps of vinyl.


4. Cover the open areas with etching crème and leave for 15-20 minutes. Refer to directions on the container. *NOTE: Etching crème is off white when you first open the container, but it will eventually darken over time. The color does not effect the effectiveness of the product.


5. After 15-20 minutes, use the squeegee to scrape the etchall back into the container! Don't forget, etchall etching crème is reusable.


6. Rinse away any remaining crème with water. DO NOT RINSE OVER A PORCELAIN SINK TO AVOID ACCIDENTALLY ETCHING YOUR SINK!! Use a plastic bowl if necessary. Discard the vinyl and dry the surface of your slate.


7. These will make a perfect gift together with a couple of matching, etched wine glasses and a bottle of wine!


You've been boo'ed! Enjoy! 
Yours truly,
Julie 🎃

KEEP CALM ANC CARRY ON CRAFTING!


Tuesday, July 31, 2018

Pineapple Welcome Slate

You're slated for success when you create a 
"Welcome" sign with a slate and etchall® etching crème!


You will need:
etchall® etching crème
etchall® etchmask and transfer paper
8" x 12" slate*
etchall® Pik tool and squeegee
Stencil pattern (vinyl)
*Not all slate will etch. Check a small area on the back before starting your design.

Instructions:
1. Cut the stencil with a digital die cutting machine.  


NOTE: You can cut the stencil across the center, separate the two halves then add a stencil for the word "WELCOME" in the space between. If you have access to Cricut Design Space, you can find the complete stencil design here


2. Cover the stencil with transfer paper. Press firmly in place then lift the stencil from the mat and remove the backing paper.


3. Position on the slate then use the squeegee to press firmly in place.  Remove the transfer paper.


4. Cover the open areas of the stencil with etching crème.  Use pieces of the transfer paper to cover the slate not covered by the stencil to prevent accidental etching. Don't skimp - etchall crème is re-usable.


5.  Leave the crème on the stencil for 15 minutes then scrape as much as possible back into the container.  Rinse away any residue with a soft sponge in a bucket.  Do not do this over a porcelain sink to avoid accidental etching.  


6. Peel away the stencil then rinse the slate once more. Let dry.  Do not dry with a towel, or paper towel to avoid leaving bits of residue on the slate's rough surface.


Enjoy!  Y'all come back now.........

Yours truly,
Julie

KEEP CALM AND CARRY ON CRAFTING!


Friday, March 16, 2018

Etched Chalkboard Slate

This project was created for the etchall® & StencilGirl blog hop.  Each designer received product to create a project using etchall re-usable etching crème and stencil spray together with their choice of stencils from StencilGirl. 

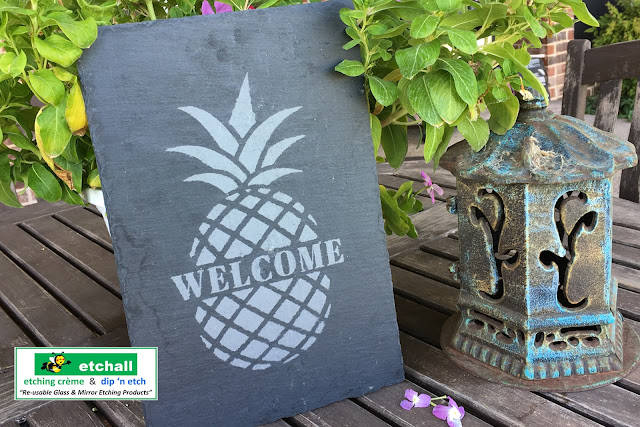
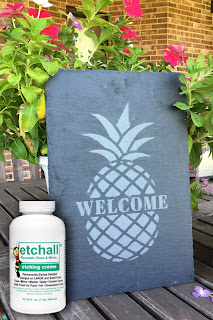
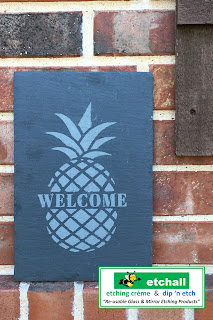
Most people think of glass, or mirror as a surface for etching, so I thought it would be fun to show how etching creme can also be used to etch designs on slate...


You will need the following supplies:
  • etchall® etching crème
  • etchall® reposition/reuse stencil spray
  • etchall® squeegee
  • StencilGirl Stencil
  • Chalkboard
  • Waverly chalk paint - White
  • 18 gauge wire - 15"
  • Folk Art glitter paint - Unicorn
  • Foam brush
  • Painters/masking tape

Instructions:

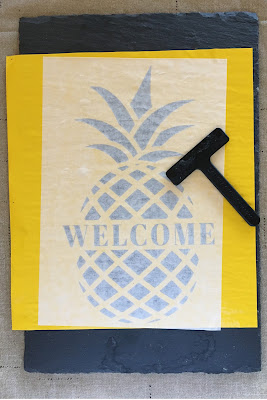
1. Following directions on the container, spray the back of the stencil with stencil spray. Place inside a box to avoid overspray, or spray outside, weather and temperature permitting.  Let dry for a few minutes.  The stencil will become tacky.

2. Position the stencil on the chalkboard then press firmly in place using the squeegee. Tape around the edges of the stencil and cover exposed areas of the chalkboard.


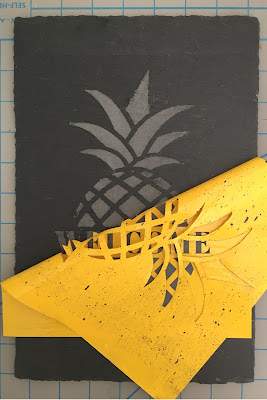
3.  Pour etching creme onto the painters tape above the stencil, then spread over all open areas with the squeegee. Let sit for 15 mins.


4.  etchall etching creme is reusable. After 15 mins, scrape the creme back into the container.  Remove any remaining residue with a damp paper towel, or cloth then remove the tape and stencil. Wipe over the slate one more time if needed.


5.  Position tape on top of the slate along the inside edge of the frame, then paint the frame with chalk paint. Chalk paint requires no prep, so you can paint directly on top of the wood. When the paint is dry, remove the tape. 


6.  Spread glitter paint sparingly on top of the frame to create a sparkly, frosty look. Let dry then make two holes at the top of the frame; one in each corner.  Use a small screw and screwdriver to make the hole. Push the tip of the screw into the wood then use the screwdriver to turn the screw thru to the opposite side.  Back the screw out of the wood.


7.  To create the hanger, wrap one end of the wire around the foam brush handle to curl. Push the opposite end thru the hole in front of the frame, curve then push thru the hole from the back to the front at the other corner.  Curl the end.  Option: Place a small washer over each opening, so the curled wire doesn't scratch the paint.


8.  Use colored chalk to write the word "Winter" at the top of the slate and the month and day at the bottom.  My granddaughter also thought it would be fun to dot the letter "I" in Winter with an adhesive acrylic jewel and we also added one to each button.

This side of the frame is for the Winter season, which ends on March 20th. The other side can easily be decorated for Spring and a second chalkboard can be decorated for Summer and Fall.

Stencils are a great way to add custom, etched designs to many surfaces using etchall® etching crème. This project is one of many created for the StencilGirl & etchall blog hop.  A list of all the participating blogs is below featuring some wonderful projects. I hope we've inspired you to try some of these ideas for yourself - Time to get your creativity on!


GIVEAWAY
One lucky winner will receive an etchall® Glass Etching Bee-ginner Kit,
reposition/reuse stencil spray
AND a $25 Gift Certificate to StencilGirl Products!

Enter to win by leaving a comment below.
Then be sure to visit the other blogs in the hop and comment to win.
The more blogs you comment on, the more chances you have to WIN!
One winner will be chosen at random from all blog comments!
(One comment per blog please.)
You have until Tuesday, March 20th at 11:59PM Central Time to leave your comments.
Winner will be announced on
StencilGirl's Facebook page and etchall’s Facebook page on Wednesday, March 21.

Can't wait to get started?  Then this is for you!

 30% off BlogHop Code

Y'all come back now........

Yours truly,
Julie

KEEP CALM AND CARRY ON CRAFTING!

Wednesday, December 13, 2017

Subway Tile for Home Dec

Not just for a kitchen or bathroom, single subway tiles can be used to create unique Home Dec items for your own home, or to give as a gift...


You will need the following supplies:
  • etchall® etching crème
  • etchall® etchmask and transfer sheets
  • etchall® pik tool and squeegee
  • 3" x 6" white subway tile
  • Rub'n Buff
  • 5" x 7" Frame
  • 6" x 8" scrap of burlap
  • White glue

1.  Cut the word "Believe" in a script font from etchmask using an electronic die cutting machine.  Size to fit inside a 3" x 6" rectangle. Tip: I placed "Believe" inside a 3" x 6" cutting line, so the finished stencil would fit the tile with the word centered.  Option: Multi-purpose stencils can be applied to the tile with etchall Reposition/Reuse Stencil Spray.


2.  Weed the design and outline from the etchmask while still on the mat.  Cover with a 3" x 6" piece of transfer paper then lift the stencil from the mat.


3.  Remove the waxy backing from the stencil then with the edges of the stencil aligned with the edge of the tile, adhere the stencil.  Use the squeegee to flatten securely then remove the transfer paper.


4.  Cover the design with creme.  Leave for 15 minutes then scrape the crème back into the container.  Rinse away any remaining residue.  DO NOT rinse over a porcelain sink. Etching creme will remove many types of glaze it comes into contact with.  If you haven't used etching creme before, please read all the directions on the container and previous posts on this blog.  You can also find video tutorials at www.etchall.com


5.  Remove the stencil then buff the tile dry with a soft cloth.  Look carefully and you can see how the glaze has been removed, but the design can be enhanced with Rub'n Buff.


6.  Squeeze a small amount of Rub'n Buff onto a soft cloth then rub onto the etched design.  The color will adhere to the etched areas, but will rub off the unetched surface of the tile.  Work quickly to remove the excess from around the letters.  Use two or three coats as needed to deepen the color.


7.  Decorate with the tile as is, or place in a frame.


8.   Remove the glass and backing from the frame.   Cover the backing with a piece of burlap then push back into the frame.  The glass is no longer needed.  Glue the tile to the front of the frame.


Subway tiles are inexpensive and readily available at local home improvement stores.  They are so easy to personalize, especially if you have the ability to cut your own stencils with an electronic shape cutting machine.  They are easy to make,  economical and perfect for a housewarming gift for friends and family......  Enjoy!  Y'all come back now.........

Yours truly,
Julie :)

KEEP CALM AND CARRY ON CRAFTING!   

Thursday, July 30, 2015

Etched Glass Seashell Frame

Sand, sea, sun and seashells - all the ingredients of perfect summer memories captured forever in this photograph and frame....


 My sister took this awesome photo of our grand children at the beach this summer. It's definitely one of my favorites and needed a special frame.
 
This is what I used:
etchall® Glass & Mirror Etching Creme
etchall® etch mask and transfer paper
Pik tool
Squeegee
Sponge brush
Double Glass frame
    *etchall® products for me to use were provided by B&B products.

Note:  Before starting the project, remove the pieces of glass from the frame and wash each piece thoroughly.

1. I drew artwork for the shells and starfish then re-sized and arranged them to create the border design to etch on the double glass frame.  I then uploaded my design to Cricut Design Space and cut the design from etch mask on the Cricut Explore.  The glass size was 8" x 10" so I sized the cut line round the edge of the design to measure 7" x 9". 


2.  After cutting, remove the outer border from around the edge then cover the etch mask with transfer paper.


3.  Remove the etch mask and transfer paper from the Cricut mat, then remove the backing sheet from the back of the etch mask.  Center the etchmask on the glass. There will be a 1/2" border of glass around the etch mask on all 4 sides.  Press securely in place with a squeegee, or old credit card. 


4.  Remove the transfer paper from the top of the etchmask then, using the pick tool, remove etch mask from the design areas to be etched. Set the transfer paper aside to use later; do not discard.

5.  Weed all areas around the edge of the etch mask.


When weeding make sure to pull the etch mask from the center of the piece, not the edge.


6.  Place strips of transfer paper around the edge of the etch mask to protect the exposed glass edge.


7.  Pour etching creme onto the center of the etch mask then spread thickly over the design areas around the edge. 


8.  Leave for 15 minutes.  etchall is re-usable, so scrape the creme back into the container.  Further instructions are available on each container and at www.etchall.com

9.  Thoroughly rinse the remainder of the creme from the glass, then remove the etch mask and transfer paper.  Use a scraper if necessary to remove any remaining small pieces. Dry the glass.

10.  Assemble:  Place the etched piece of glass in the frame then the wooden spacer.  Attach the photo to the center of the second piece of glass then place it in the frame at the back on top of the spacer.  Cover with a solid piece of cardstock (I used dark blue) then secure with the frame tabs to finish. 

I enjoy creating my own designs to etch, but there are lots of stencil designs available at www.etchall.com as well as your local arts & crafts retail store.  Enjoy!  Y'all come back now......

Yours truly,
Julie :)

KEEP CALM AND CARRY ON CRAFTING!