Showing posts with label National Craft Month. Show all posts

Thursday, March 3, 2016

National Craft Month - Mystery Box

Wow, lots of stuff happening this month.... clocks move forward, First day of Spring, it's St. Patrick's day on the 17th, Easter Sunday is on the 27th and to top it all, March is also National Craft month. SO much to do!

When I think of Spring, spring cleaning immediately comes to mind, so to get National Craft Month off to a good start, I thought I'd fill a box with some crafty tools and product and have a bit of fun. One lucky person will win the box and everything inside it, but you have to let me know what you think these items are by commenting....... not here, but on the Designer Crafts Connection blog. Comments won't be published until the last day.....

To get you started, here's a photo of the box with one item already in it.  Each day this week I'll add a photo of another item which will go in the box. Let me know what you think these items are in the comments section of the DCC blog and someone will win the mystery box.  Winner must have a shipping address in the US or Canada.


You don't need to guess what this third item is (it's pretty obvious), but you do need to tell me what brand: "Handmade ---------"  fill in the blanks.  Y'all come back now, I'll be adding more items tomorrow thru Sunday, March 6th.  Good luck!

Yours truly,
Julie :)

KEEP CALM AND CARRY ON CRAFTING!

Tuesday, February 16, 2016

Lucky Leprechaun Light

When Irish eyes are smiling, you know St. Patrick's day is coming up and it's time to put on the green and pull out the shamrocks because it's an opportunity to be creative, decorate and celebrate!


This lucky leprechaun was created from a green mason jar. I love working with glass and this makes the perfect party light.  Read on, and you'll see why.  Hint: he's keeping a secret under his hat.

You'll need the following supplies:


Green Mason Jar
etchall® dip'n etch (glass etching liquid)
Smoothfoam™ Cupcake shape
DecoArt® Gloss Enamels - Burnt Orange & Black
DecoArt Black Paint Marker
Paint daubers 1/2" round
Beacon 3 in 1 Glue
Wiggle Eyes
Button (nose)
Empty soda bottle (1 liter) or plastic container for dip
Sponge brush
Puck Light (optional)

1.  Remove the mason jar lid then fill the jar with glass pebbles/coins, etc (so it won't float when placed in dip'n etch glass etching liquid).

2.  Place the jar inside a plastic container. An empty soda bottle works well. Cut off the top part of the bottle. The top can be used as a funnel and the base is large enough to hold the mason jar. I used a container from the deli store this time since it is just a little larger in diameter than the jar.


3. Fill the plastic container with WATER up to the rim of the jar. (This step will show us how much dip'n etch we will need.)

4. Remove the jar and the water level will sink. Mark the water level on the outside of the container then empty and dry thoroughly. Dry the jar with a soft cloth.


5. Fill the container with dip'n etch up to the water level mark then replace the jar.  Leave for 15 minutes then remove the jar. Dry with a paper towel, remove the glass pebbles then rinse thoroughly. Use the funnel to pour the dip'n etch back into its container.  Don't forget, etchall dip'n etch is REUSABLE! Do NOT discard. 

6. Paint the Smoothfoam cupcake shape and the metal rim with black gloss enamel paint. You will achieve better coverage on both surfaces by dabbing the paint on, not stroking. Let dry, then glue the metal disc to the underside of the metal ring and the base of the cupcake to the top.

7. Use the round dauber to dab Burnt Orange circles in a "U" shape on the smooth side of the jar for the beard (see photo), then glue wiggle eyes and button in place. Draw a smile with the black paint marker. 


Option:  Glue a puck light to the underside of the lid to light up his smile!  He'll be sure to put a smile on your face too! 

Here's another St. Patrick's day project being featured on the When Creativity Knocks Winter series. It also features dip'n etch, Smoothfoam, DecoArt and Beacon products, but you'll have to tune in to find out why there's a pig involved.


Enjoy!  Y'all come back now.....

Yours truly,
Julie :)

KEEP CALM AND CARRY ON CRAFTING!

Wednesday, March 18, 2015

Connie Crystal - Designer Crafts Connection Challenge

As with most little girls, my granddaughter loves bling.  Me, not so much.  I've never been a "blingy" type person, but I DO love to challenge my creativity with products I wouldn't normally use on a regular basis.  That being said, I was really looking forward to receiving the samples from Connie Crystal.  They have these mesh sheets of crystal rhinestones, so they can be cut apart into a variety of sizes of squares, rectangles and strips.  I received two,  12" x 1.5" (this is not the size of a full sheet) samples of crystals, one on white mesh and one on black, and went to town.


I had already purchased a marquee letter "J" for my granddaughter's "boudoir" and was ready to decorate it.  I covered the outside with gold Duck tape and the inside with holographic silver card stock.  It goes without saying that it really sparkled when lit, but it needed a little something extra to make it sparkle during the day - strips of crystals of course!


Now it looks flashy all the time....!  I still had lots to play with so I added single strips to the outside of a Deflecto acrylic frame; just the bling it needed for said granddaughter's boudoir.  The rhinestones can be glued, or stitched to just about any surface.  I used 1/8" wide tacky tape for these projects.


Using tacky tape, I also glued a border of the black mesh rhinestones around the inside edge of a wood laser frame I'd painted black and used to make a clock.


Last, but not least, I had to make a piece of jewelry; after all, these are rhinestones.  I measured my wrist then cut a piece of the black mesh about 1/2" shorter.  I attached a bar fastener to each end then added a closure with a jump ring. It took me less than 20 mins to make and most of that time was spent looking for the jewelry findings I needed....


This is such a great product for adding a little fun and sparkle to your life! Hop thru the DCC Webring (using the blue logo in each sidebar) to see what crafty goodness the other designers are rocking out.  Enjoy!  Y'all come back now.........

Yours truly,
Julie :)

KEEP CALM AND CARRY ON CRAFTING!

Sunday, March 1, 2015

National Craft Month - String Art

March is National Craft Month so Designer Crafts Connection (DCC) members are sharing tips on how you can "make it yourself".   I can't begin to tell you how many times I've walked into a store, found something I like then thought, "I can make that".  If I end up buying it, it's usually because either, A I don't have time to make it, or B it would cost more to buy the supplies I don't already have.  Let's face it, I'm a frugal crafter.....

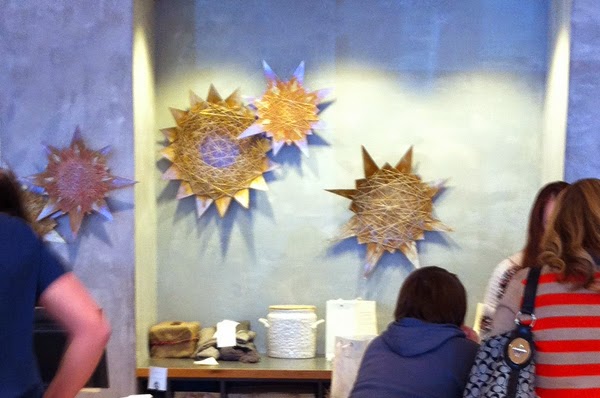
Pinterest is continually inspiring people to make it themselves, but you can also find inspiration on TV, in magazines and even from store displays.  For example, I love Anthropology for their unique store designs.  I snapped a photo of their string art display in December 2013 and, since I saw a lot of string art at CHA, I thought I'd share a few ideas on how you can make some of these yarn wrapped stars yourself - on a smaller scale of course.


These large stars would make great decorations for the holidays.  Cut some large, multi pointed stars from poster board then wrap with metallic yarn.  You can find string art instructions on a separate tab here on my blog.  They're for smaller shapes, but the technique for wrapping is the same. 

In the late 90's I used to teach classes on Spirelli, which is basically string art for paper crafting.  You can use punches, or dies for the shapes, but I cut mine on a digital die cutting machine.  You can always cut around the edge of circle shapes with decorative scissors to create the notched edge.  The technique has been around for years.  It's fun, easy and quite addictive.  Here are some of my projects featured on the cover of Paper Creations magazine with a close up of a layered Spirelli piece and a couple of samples on scrapbook pages.


 Technically, string art is a little different and usually thought of as a children's craft, but it popped up in a number of places at CHA as a home dec item.  Here are some of the photos I took on the trade show floor.  I can imagine you'll see some turning up in your local craft stores in the not too distant future.


What's not to love, right.....    and here are a couple of designs from a collection I created for a manufacturer a few years ago.


You can find inspiration everywhere, so next time you see something you like take the bull by the horns and "Make it Yourself".....   Enjoy!  Y'all come back now......

Yours truly,
Julie :)

KEEP CALM AND CARRY ON CRAFTING!


Friday, March 8, 2013

Buttons Galore!

Button, button who's got the button?  Answer:  Buttons Galore and More!  Buttons go waaaaay back in history and have been traditionally used to hold parts of clothing together, but, creativity knows no bounds so with all the amazing button designs at our disposal, buttons have become a staple craft product.  With so many colors and shapes to choose from, there's something for everyone, in fact I'll go as far as to say, a button is one of the most versatile embellishments for all your projects, whatever they may be.


As I said in my previous post, March is a very busy month, but the best part is that the first day of Spring always falls in March - the time to think about planting Spring flowers which make everything cheery and bright after a dreary Winter.

This is a very simple idea for an outdoor decoration. It could be used for a rehearsal dinner, a wedding, shower, or a simple table decoration for your patio.   After having decorated for 2 weddings, it's all about simple, believe me.  This table decoration can be made in 5-10 minutes.  All you need are the following supplies, plus scissors and a craft knife:


A small plastic bottle (from the recycling bin), burlap, glue (I used these 3D Glue dots, but a glue gun would work well too), and buttons.  I used a "Bee" button and an orange stitched button.  (The lime green stitched button would have looked really good too.)

Let's get started:

1.  Lay the empty bottle down on a flat surface and carefully cut off the top part with a craft knife, so that the bottle is the same height as the width of the burlap.
2.  Cut a piece of burlap long enough to wrap around the bottle overlapping the ends about 1/2". Glue in place.
3.  Cut a 4" piece of burlap, pinch together at the center then secure with a twist tie for a "bow".  Fray the ends by removing 3-4 strands from each end.
4.  Fray the top of the burlap around the bottle by pulling strands from the edge.  Thread one of these strands up thru a hole from the bottom of a large button, thru the shank of the bee button then down thru a second hole in the large button.  Tie the ends together at the back to secure.
5.  Glue the burlap "bow" to the front of the bottle, then glue the buttons to the center of the bow.  You're done! EZPZ Quick'nEZ.
  
TIP: Take the top part of the bottle (which you cut off), turn it upside down and insert it inside the top of your "vase".  This will act like a "frog" and help hold the flowers in place.  You might also want to fill the bottom with small pebbles to weight it down in case it's a bit windy - after all, it is March!

Here's a quick bonus project:


Everyone seems to be handing out rubber bangles.  They come in all different colors and you can buy them at the party stores and lots of other places too, I'm sure.  My granddaughter loved this one because it was pink.  To jazz it up a bit I stacked some silk flower shapes together with a button on top to make it more secure then sewed them onto the bangle.  It took all of one and half minutes - her smile was priceless!   I even added a self adhesive pearl to the center of the button.  You can also place the decorated band around the metal ring on a mason jar for a quick decoration, then remove it afterwards so the jar is re-usable.....  gotta think ahead!


Using the blue, DCC logo in the sidebar you can hop forward thru Designer Crafts Connection blogs for more ideas.  You can also visit the Buttons Galore blog for more designer ideas and details of the PRIZES to be won!  Enjoy!  Y'all come back now........

Yours truly,
Julie :)

KEEP CALM AND CARRY ON CRAFTING!

Monday, March 5, 2012

Ribbon Roses

I presented a seminar at the CHA show in January on how to make your own online videos as professionally as possible.  After presenting projects on TV for almost 20 years, 14 of them as a TV Host, I had a lot of tips to share on preparing the projects as well as the actual presentation.  One of the main points I wanted to get across to the audience was "if I can make a video anyone can" and to prove this I made a video specifically to share at the seminar.  Thought you might like to see it too.


You can also watch this on YouTube here:  http://youtu.be/xYRidzlNd3I

Enjoy!  Y'all come back now.............

Yours truly,
Julie :)

Sunday, March 4, 2012

National Craft Month!

Wow, this month is going to be a blast - as far as crafting goes anyway!  They say March comes in like a lion and goes out like a lamb; not sure how true this is, but I do know that it is busy, busy, busy!  As well as being National Craft Month, it's my grandson's birthday this week, St. Patrick's day is on the 17th (not that I'm Irish, but it's a good excuse for a green beer), March 21st is the first day of Spring AND, the worst part, we put the clocks forward.  I just hate losing that extra hour........  Tuesday, March 6th is also craft day on HSN.  You should not miss this!  Check out the schedule at HSN.com.  Both Brenda Pinnick and Claudine Hellmuth will be featuring their kits.  You can watch on TV, or via live streams on your computer.  You can find some great products and great prices there!

I was ready to post a fun, Spring project for Designer Crafts Connection's First Monday project, but decided to share this instead:


I've hosted a scrapbook show on TV for 14 years, but, as some of you already know, I'm also a decorative painter.  Well, guess what, I like to make jewelry too!  This necklace (which I actually made to wear at CHA) is featured in the April issue of Bead Design Studio.  I really enjoy all kinds of crafts, except papier maché, I hate messing with wet stuff..... I like to knit, crochet, sew (things I learned years ago) and love embroidery and smocking.  There isn't enough time in the day to do it all, but every once in a while I'll put out knitting needles, or a crochet hook and see what I can come up with.

Don't forget to hop the DCC blogs this month.  There are a lot of giveaways and, since Spring heralds "Spring Cleaning" I'm sure I'll be pulling out some things for a giveaway in a week or two!   Y'all come back now...........

Yours truly,
Julie :)

Wednesday, March 2, 2011

Designer Crafts Connection


This might be a long post, so grab a cup of tea, or a glass of wine, put your feet up and enjoy.  This is going to be fun and really worth reading!

    Introducing the Designer Crafts Connection.................


 Look for this logo on your favorite blogs.  You'll see it on my blog in the sidebar on the left.  Click the "hop forward" button and it will take you to another designer's blog.  There you will find the same logo.  This logo is your ticket that will take you from blog to blog to discover projects, tips and techniques from some of the Arts & Crafts industry's premier designers.  If you start here and keep going forward you will end up here again.  Each month you will find projects created from different mediums with a central theme.  This month's theme is Weddings.  On March 13th, you will have the opportunity to check out a wide variety of projects suitable for weddings and anything connected with weddings - just in time to inspire William & Kate!

Tomorrow, March 3rd is the date for the official start just in time for National Craft Month and to celebrate I am giving away a Cricut Expression.


This is how you enter to win.  As you hop from blog to blog you will see this logo on 9 of them:


Make a note of the name of the blog where you saw the logo then list these names in the comments section of this post on my blog.  The winner will be announced here on March 14th.  (Please note: Due to shipping charges and customs regulations, I can only ship to a US address.)  Followers automatically qualify to enter, but if you leave a comment, you can be entered twice - just let me know you're a follower.   If you're not already a follower, you can sign up and be entered twice too!

I hope you enjoy your treasure hunt and all the exciting blogs you'll visit on your journey.  Be patient with each of us - sometimes the logo is easily seen at the top of a blog and sometimes it's at the bottom, but it's there and if you don't find  9 "Cricuts" the first time around, check again in a day or two.  Time gets away from us sometimes......    If you happen to get "stuck" somewhere click on the DC Connection button and it will take you to a list of all the blogs in the ring.  Skip over the one where you just got  "stuck" and click on the next on the list.  Designers are busy, busy, busy and blogging has to take a backseat sometimes, but we will have something special to share with you each month and......there will be a giveaway!  Not a Cricut each time, but something I hope you'll enjoy.  So, y'all come back now........  and tell your friends!

Yours truly,
Julie :)

MARCH is National Craft Month!


I'm kicking off National Craft Month with a very special giveaway!  If you haven't already heard, it's a Cricut Expression!  Details tomorrow - 03.03, so ya'll come back now!

Yours truly,
Julie :)