Showing posts with label Smoothfoam. Show all posts

Tuesday, February 16, 2016

Lucky Leprechaun Light

When Irish eyes are smiling, you know St. Patrick's day is coming up and it's time to put on the green and pull out the shamrocks because it's an opportunity to be creative, decorate and celebrate!


This lucky leprechaun was created from a green mason jar. I love working with glass and this makes the perfect party light.  Read on, and you'll see why.  Hint: he's keeping a secret under his hat.

You'll need the following supplies:


Green Mason Jar
etchall® dip'n etch (glass etching liquid)
Smoothfoam™ Cupcake shape
DecoArt® Gloss Enamels - Burnt Orange & Black
DecoArt Black Paint Marker
Paint daubers 1/2" round
Beacon 3 in 1 Glue
Wiggle Eyes
Button (nose)
Empty soda bottle (1 liter) or plastic container for dip
Sponge brush
Puck Light (optional)

1.  Remove the mason jar lid then fill the jar with glass pebbles/coins, etc (so it won't float when placed in dip'n etch glass etching liquid).

2.  Place the jar inside a plastic container. An empty soda bottle works well. Cut off the top part of the bottle. The top can be used as a funnel and the base is large enough to hold the mason jar. I used a container from the deli store this time since it is just a little larger in diameter than the jar.


3. Fill the plastic container with WATER up to the rim of the jar. (This step will show us how much dip'n etch we will need.)

4. Remove the jar and the water level will sink. Mark the water level on the outside of the container then empty and dry thoroughly. Dry the jar with a soft cloth.


5. Fill the container with dip'n etch up to the water level mark then replace the jar.  Leave for 15 minutes then remove the jar. Dry with a paper towel, remove the glass pebbles then rinse thoroughly. Use the funnel to pour the dip'n etch back into its container.  Don't forget, etchall dip'n etch is REUSABLE! Do NOT discard

6. Paint the Smoothfoam cupcake shape and the metal rim with black gloss enamel paint. You will achieve better coverage on both surfaces by dabbing the paint on, not stroking. Let dry, then glue the metal disc to the underside of the metal ring and the base of the cupcake to the top.

7. Use the round dauber to dab Burnt Orange circles in a "U" shape on the smooth side of the jar for the beard (see photo), then glue wiggle eyes and button in place. Draw a smile with the black paint marker. 


Option:  Glue a puck light to the underside of the lid to light up his smile!  He'll be sure to put a smile on your face too! 

Here's another St. Patrick's day project being featured on the When Creativity Knocks Winter series. It also features dip'n etch, Smoothfoam, DecoArt and Beacon products, but you'll have to tune in to find out why there's a pig involved.


Enjoy!  Y'all come back now.....

Yours truly,
Julie :)

KEEP CALM AND CARRY ON CRAFTING!

Sunday, December 13, 2015

Merry Christmas and Happy New Year Twinkling Wreath

It's almost Christmas day and New Year's day arrives exactly one week later. Not much time to make a whole new set of decorations, so here's one that will take you from Christmas to New Year's Eve in the blink of an eye.  We'll start by making a tinsel wreath for Christmas


then on New Year's Eve, we can remove the red ribbon and add letters to the center to spell out "Cheers" and 2016 with Joy 3D embroidered letters.


Here's what you'll need:

Joy letters and numbers
12" Smoothfoam™ wreath - flat not rounded.
16" Disposable silver party platter
2" Wide silver, wired ribbon
1 1/4" Red wired ribbon
Silver tinsel garland
Floral Pins
Decorative LED lights for crafts
Lo-temp glue gun
Silver sequin pins


1. Cut a length of silver ribbon long enough to go around the wreath. With the edge of the ribbon aligned with edge of the foam wreath, wrap the ribbon around the wreath, securing at intervals along the edge with sequin pins.


2. Holding both ends, carefully pull the wire along the upper edge of the ribbon to gather. Pull as tightly as possible, then twist the ends together to secure.  The gathered edge will automatically overlap the front of the wreath.


3. Cut a piece of tinsel to go around the outer edge of the wreath then thread thru the coiled light strand. Pull the lights so the ends reach the ends of the tinsel.  Wrap around the wreath and secure with the floral pins.  Lights are optional, but they do add an extra sparkle.


4. Cut a 1" slot in the edge of the silver tray then glue the wreath onto the tray with the end of the  wire and battery box at the back of the tray.  Glue the battery box to the back.   
Note: The wreath should fit snugly within the rim of the tray.


5. Add a bow to the top of the wreath for a Christmas decoration, then glue the letters and numbers in place for New Year's Eve!  Enjoy!  Y'all come back now...................

Yours truly,
Julie :)

KEEP CALM AND CARRY ON CRAFTING!

Thursday, July 23, 2015

Christmas Crafts!

Christmas is coming!  In 155 days!  Are you ready?  I never am.  Each year I tell myself I should start earlier and be more organized, but it hasn't worked yet.......  This year I'm getting an early start by participating in a Christmas in July blog hop with the Robin's Nest and Smoothfoam..


I received Smoothfoam shapes and product from the Robin's Nest for their Christmas in July blog hop with DCC members. Our challenge was to create something fun. 


 and this is what I made.... 


Okay, I admit, this isn't quick, but it is pretty easy and it's different.  I love LED lights and my goal was to create something that would light up our home for the holidays.

There's also a giveaway, so if you'd like to win some Robin's Nest and Smoothfoam product and get a head start on your holiday decorating, all you have to do is comment on the participating blogs  - one entry per comment, so the more you comment, the more chances you have to win!

These are the products I used:
Large Smoothfoam Snowflake
6" Smoothfoam Disc
Christmas papers and DewDrops from Robin's Nest
PLUS
Tacky glue
Paper glue
Clear crystal glitter
Craft Knife and/or sharp paring knife
Paper Trimmer
Stylus
Versa Tool (Walnut Hollow)
Battery operated string of 20 LED mini lights

1. Coat the top surface of the snowflake with glue, then sprinkle with glitter.  Set aside to dry.
2. Mark 20 dots about 1" apart around the disc about 1/2" from the edge then use the tip of the blade holder in the heat tool to make holes in the ring for the lights.


Quickly push the tip straight up and down and work on a tempered glass surface. The tip will not go all the way thru the disc, so turn the disc over and open up the holes from the opposite side.


3. Cut a 4" circle from the center of the disc to create a ring, 1" wide.  Use a slow up and down motion when cutting for a smooth cut edge. Use a regular craft knife, hot wire foam cutter, or the knife blade in the Versa Tool. This is a HOT knife so use with extreme caution. Tip: A fabric softener sheet is great for cleaning up small crumbs of Smoothfoam on your work surface after cutting.


4. Glue a 1" wide strip of card stock around the outside of the ring.  Tip: Use a rubber band to hold in place until the glue is dry.
5. Glue dew drops on top of the ring to decorate.  Let dry.


Make a Rosette for the center:
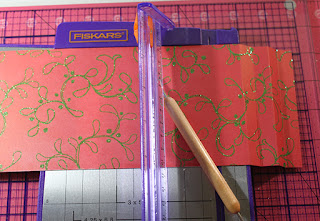
1. Score a 4" wide strip from 12" card stock at 1" intervals. Tip: I use my paper trimmer and score along the cutting channel with a stylus.


2. Cut the strip in half to create two, 2" x 12" strips.  Accordion fold each strip then glue the ends together to create a circle.


3. Squish the folds together and push down in the center to flatten. Glue a 1.25"circle of card stock over the center on each side of the rosette to secure. Decorate the circle on one side with dew drops, or a star shape.  This is double sided paper, so you can display either side.


Assemble:
1. Push each LED bulb into a hole in the ring from the back.  If the hole is a little large and the bulb doesn't fit snugly, shim with a small strip of card stock inside the hole. To keep the wire straight, leave 4 or 5 holes between each bulb.


2. Secure the ring to the center of the snowflake, making sure the wire and battery holder/switch are at the back of the snowflake.  Smoothfoam is very dense, so I secured the ring by pushing quilt pins diagonally thru the inside of the ring into the snowflake.


The holder can be left loose at the back, or you can glue half a 6" disposable plate at the back to create a pocket to hold it in place.  It's important to be able to reach the switch to turn the lights on and off if there isn't a timer setting. 


3. Push the rosette into the center of the ring to finish.

 
Look for more projects from DCC designer members by hopping thru our webring using the blue DCC logo in the sidebar on our blogs.  You can also see a full selection of projects from The Robin's Nest design team on the DCC blog and the Robin's Nest blog.  Enjoy! Y'all come back now........ 

Yours truly,
Julie :)

KEEP CALM AND CARRY ON CRAFTING!

Wednesday, July 8, 2015

Vacation Crafts

A vacation isn't a vacation unless we go to the beach.... I love the sea, sand, sunshine and shells.  I rarely leave without a pocketful.  When I get home, I wash and store them carefully in a shoebox.  I've been collecting shells for over 60 years and love to create with them, but more often than not, I end up using special shells from the craft store.  One day I'll make a Sailor's Valentine with my collection, but doubt that will be any time soon.

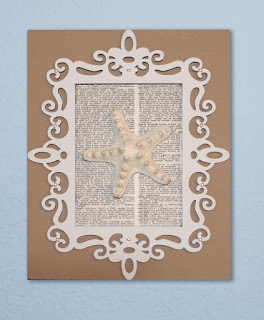
Here's one of my recent projects that hangs in my craft room.


It is really quick'n EZ to make.  I cut a piece of Smoothfoam™ the same size as the 5"x7", wood laser frame purchased at Michaels then, using a sponge brush, I painted it with light brown acrylic paint.  I used Smoothfoam because its smooth surface is easy to paint without any kind of prep and it's lightweight.

The laser frame was painted white.  I wanted to feature the Helmet starfish at the center, but needed some kind of backing.  Spring cleaning to the rescue.... I had saved an old dictionary, so I tore out the page with the definition of "Starfish" and trimmed it to fit the frame opening.  It was then glued to the center of the painted Smoothfoam and the frame glued on top.  I glued the starfish to the center and a few sea pearls to the frame to finish.  It only took about an hour, including drying time.  Now I don't feel so bad when I look up and see stars......  LOL

You can find more projects on the Smoothfoam blog.  Enjoy!  Y'all come back now........

Yours truly,
Julie :)

KEEP CALM AND CARRY ON CRAFTING!


Monday, February 23, 2015

FaveCrafts Blogger Event at CHA

Each year Prime Publishing (FaveCrafts) holds an event for CHA designer and blogger members.  This is where we gather to get to know each other and generally have a wild and wonderful time!  Not just for networking, manufacturers attend this event to introduce designers to their products.  After the show each one of us receives a "goodie box" of sample product so we can add a sprinkle of our own creativity -  after all, a product is only a product until a designer shows us what we can be made with it.  We're all about creativity and inspiration!

It's like Christmas when the boxes arrive on our doorsteps! Our mission now is to create something with what we received.  I had a wide assortment of products to work with, but was immediately drawn to a bag full of product from Little B, especially since there was a sample of their award winning Pull Flowers.


I'm sure you know by now, that anything to do with "flowers" has my immediate interest.  We all love quick'n EZ PZ, so you'll understand why these were such a hit at the show.  All you have to do is cut a length of the ribbon then pull the thread on each end and voilà you have a flower.  They are so pretty!  Now I need something that is just as easy to put them in and here is what I came up with - perfect for Easter and Mothers' Day.


Here's what you'll need:


1. Pull flowers from Little B
2. 3 half inch Smoothfoam™ balls
3. 3 Craft picks
4. 3 Green Straws (the bendy ones)
5. Yellow Flower Soft™ Sprinkles
6. White glue
7. Cool temp glue gun
8. Glass bottles
9. DecoArt® acrylic paint - your choice of colors
10.  etchall® Dip'n Etch etching liquid. (Enough to fill the inside of the bottle.)

And this is what you do:

1.  Prepare the glass bottles following instructions on the container of dip'n etch.  Pour the etching liquid into one bottle.


Let sit for 15 minutes, then pour the liquid from the first bottle into the second oneAfter 15 minutes pour the liquid from the 2nd bottle into the 3rd.  Let sit for 15 minutes then return the liquid to the container.  This product is REUSABLE, so you can etch a lot of glass with it.

2.  Rinse each bottle thoroughly then dry with a soft cloth.


 3.  Now let's add some color.  Because the glass is etched on the inside, it now has "tooth" (a rough surface), so you can use regular acrylic paint for this technique.  I poured about half of the paint into the bottle then carefully, holding the bottle on its side, I turned it around slowly until the inside was completely covered.  Pour the excess paint back into the paint bottle.  I love to experiment, so I used Patio Paint to color the blue bottle.  Patio paint has a thinner consistency, so it was easy to work with. The pink and yellow bottles were coated on the inside with regular acrylic paint. This paint had a much thicker consistency, so I thinned it with a little water before using.  Both paints worked well.  Let the paint dry at least 24-48 hours and DO NOT fill with water.  These are intended for decorative purposes only.  In case you're wondering, I tried glass paint with this technique on unetched glass, but the coverage wasn't quite as even as I would have liked.


Now that you've colored the bottles, set them aside to dry while you make the flowers.

1.  Cut 18" of each color of ribbon.  Pull the thread from both ends to gather then tie the ends together in a simple overhand knot.


2.  To make the center, push the end of the craft stick into each of the Smoothfoam balls.  Smoothfoam is very dense, so you may need to make a pilot hole with the tip of a craft knife first.
3.  Using the craft stick as a handle, coat the surface of the ball with white glue.  The surface is nice and smooth, making it easy to work with.  When the surface is covered, sprinkle with Flower Soft sprinkles.  Let dry.

 
4.  Push the craft stick thru the center of the flower, then secure with cool temp glue at the base of the covered ball.
5.  Trim the craft stick on the the under side of the flower to 1" then glue the end of the straw, over the craft stick, to the base of the flower.  The "bendy" part of the straw will allow you to position the flower if desired.


Really easy, right.....  I was going to add a "collar" of the corrugated cardboard trim around the bottle and a bakers' twine or jute bow around the neck, but sometimes less is more and I like the way they look just like this.


If you like my project, you can vote for it here: www.favecrafts.com/contest/blogger-contest  Thank you!

I have so many other ideas using these techniques, I'll have to do another blog post, so y'all come back now..............  Enjoy!

Yours truly,
Julie :)

KEEP CALM AND CARRY ON CRAFTING!

Thursday, February 5, 2015

Offray Ribbon Blog Hop

Ribbons and roses and trims, oh my! 
What a wonderful way to add texture and excitement to all kinds of projects!


I LOVE working with ribbon.  I think it's one of the most versatile products available for needle workers, crafters, makers and do-it-yourselfers.  From a simple embellishment to an item made entirely of ribbon, there's no end to creativity.

Last month, members of the Designer Crafts Connection (DCC) each received samples of Offray ribbon to work with.  I was excited to receive 2" wide "gauzette" ribbon in pink and orange together with 3/8" 100% polyester ribbon.  I've always loved the orange/pink combination and, since these are my granddaughter's favourite colours, I decided to make a quick'n EZ valance for her bedroom window, by simply wrapping a 9" by 30" sheet of Smoothfoam with the orange ribbon, then embellishing it with coiled ribbon roses.


Supplies are minimal: Ribbon, Smoothfoam sheet and a cool temp glue gun.  I also had a hot wire foam cutter to cut the Smoothfoam, but a utility knife (the one from the hardware store with a break off blade) works just as well.  I also had some quilt pins on hand to hold the Smoothfoam pieces together and the ribbon in place before gluing.


Here's a closer look at the border with the polyester ribbon along the bottom of the valance, embellished with the coiled roses.


Here you can see a close up of the rose.  They are so easy to make.  I used a 16" piece of ribbon, tied a knot about 1/2" from one end, frayed the end to look like stamens, then glued the knot in place on the valence.  To make the rose, wrap the ribbon around its center, twisting as you wrap, then glue the opposite end under the coils.  For an added touch of color to the center, I frayed a 1" piece of the orange ribbon, rolled it tightly then glued it in place.


I really love this gauze ribbon.  It reminds me of a more elegant form of burlap; perfect for home dec projects and a whole lot more.   

I've been a ribbon fan for many years and in the early 90's authored a book for Leisure Arts entitled "Ribbons & Trim".  I'm sure it's out of print now, but you can still find a wide assortment of Offray ribbon.  Here's a couple of projects featured in the book, together with a ring bearer's pillow I made for my daughter's wedding in 2003, and a stool I made for my MIL in the late 70's.  Told ya - I've been a ribbon fan for a long, long time!


Before you hop forward to the next blog (use the DCC logo button in my sidebar on the left), check out the Offray Ribbon site and sign up for their newsletter.  You'll receive 15% discount on any ribbon order and there's a whole gallery of inspirational projects to look at there too!

Enjoy!  Y'all come back now..............

Yours truly,
Julie :)

KEEP CALM AND CARRY ON CRAFTING!