Showing posts with label Julie McGuffee. Show all posts

Saturday, April 2, 2022

Spring Blooms

 It's Spring and flowers are the perfect “pick me up” to brighten anyone’s day.  Nothing says “I love you”, “Thinking of You”, or “You are Special” like a gift of flowers..


You will need:
  • Joy® Iron-on Embroidered 4” letters – O x 2, B L M
  • Kunin® Classic Felt, 9” x 12” – Baby Pink, Lemon Frost, White and Apple Green
  • Kunin® Premium Felt, 9” x 12” – Kelly Green 
  • Mod Podge® Ultra Spray - Matte
  • Zots® clear adhesive dots - singles
  • 12” x 16” Wood plaque*
  • 10” Embroidery Hoop*
  • Tacky glue & lo-temp glue gun
  • Canvas cloth (drop cloth)
*Choose a plaque to suit your particular needs and an embroidery hoop large enough to fit on top as shown.  Embroidered letters are also available in different sizes.


Instructions:

1.  Cut 4 pieces of canvas cloth to cover each section of the wood plaque then, following manufacturer’s directions, spray the wood liberally with Mod Podge Ultra. Press the cloth pieces on top then set aside to dry.  Rinse the spray nozzle when finished to avoid clogging. 

2. Glue the hoop in place on top of the covered plaque with lo-temp glue. Peel the backing from the embroidered letters to reveal the adhesive, then press firmly in place as shown.  TIP: Always start by placing the middle letter first, then adding letters to the left and right for even spacing.


3. Cut 7, 2" x 1" oval felt shapes for each medium rose and 7, 2 ½” x 1 ¼” ovals for a larger rose.  Cut 16, or more 2” and 2 ½” leaves from 2 shades of green using the pattern below. If you have a Cricut® Maker, you can easily cut the ovals using the shapes feature.  


Download/or print the leaf pattern here:


Make the Roses as follows:

4. Using adhesive dots, attach 7 ovals together in a slight curve. Press the felt firmly onto the adhesive dots.


5. Starting at one end, tightly roll the linked shapes together to form the rose.  To prevent unrolling, squeeze together at the base then secure by spreading lo-temp glue across the bottom.


6. Create rosebuds by tightly rolling 3-4 shapes together. Position roses, rosebuds and leaves on the plaque at the base of the hoop, then glue in place. With so many pretty colors of felt to choose from, you’ll be creating bunches of felt bloomers in no time! 


Happy Spring everyone! Enjoy......

Yours truly,
Julie 💝

KEEP CALM AND CARRY ON CRAFTING!

Joy® Iron-On embroidered letters, Kunin® felt and Mod Podge Ultra Spray products used were provided by the manufacturers.

Tuesday, March 15, 2022

Spring Forth with Ribbons

The theme for this month's Design Team ribbon project for Gwen Studios is Easter and Spring. 
 
        Spring has to be my favorite time of year.  After the dark and dreary days of Winter, Spring arrives with the promise of new life. Trees start to bud and flowers burst from the bleakness of Winter filling our world with color - nature's resurrection together with Easter heralding its own special promise of new life for us all....


To create this special project for Easter you will need the following:
  • Gwen Studios 3/8" x 36 yards Grosgrain Pastel Ribbon Favor Pack
  • Gwen Studios 5/8" Grosgrain Ribbon - White
  • Canvas Wrapped Frame.   6" x 9"  used here
  • Double Sided 1/4" Tape
  • Lo-Temp Glue Gun
  • Large Glue Dot
  • Scissors 


Step 1:
    Working on the back of the frame, cover the stapled edges with white, 5/8" grosgrain ribbon using double-sided tape. Secure the ends on the other side (front) with the glue gun.

Step 2:
    Using your choice of colors, glue one length of ribbon across the center of the frame, securing each end at the back with the glue gun. Add 3 additional colors on each side as shown below.


Step 3:
    Cut about a 4" piece of the 5/8" white ribbon. Wrap around the 7 strands of ribbon about 3" from the edge. Pull tightly to pinch the colored ribbons together then overlap the end and glue to secure. Trim away any excess ribbon.

Step 4:
    Using the same 4 colors of ribbon in the same order, wrap the ribbon around the frame across the first pieces of ribbon as shown. Secure each end of the ribbons at the back with glue. 

Step 5:
    Wrap the center with a piece of the white ribbon.  Overlap then glue the end to secure; trim away excess ribbon then roll the loop of ribbon around so the overlapped ends are underneath.

Step 6:
    Create a small bow of green, 3/8" ribbon then glue to the top of the white band, or simply thread the ribbon under the white loop and tie a small bow.

Step 6:
    Create a ribbon rose to add to the center of the bow as follows.  Tie a knot at the end of a 6" piece of 3/8" ribbon. Trim end even with the knot then push the knot into the center of a large glue dot. Twist/fold the ribbon over then push into the glue dot next to the knot. Continue folding the ribbon and pushing the edge into the glue dot all the way around the knot until the glue dot is covered. Carefully lift the edge of glue dot from the backing paper then tuck the end of the ribbon underneath. Trim away excess ribbon, remove the glue dot from the backing paper then adhere to the center of the bow.  If necessary, use the glue gun to ensure the rose stays in place.  See a how-to video here....


Step 7: (Optional)
For a neater finish, cut a piece of card stock slightly smaller than the size of the wrapped canvas and adhere to the back with double sided tape to cover the ends of the ribbons.

        Since Easter is a big part of our Springtime celebration, we'll also need to decorate some Easter eggs, so head back here in a few days for instructions on how to create this "beribboned" Easter egg! 


Yours truly,
Julie 💝🐣

KEEP CALM AND CARRY ON CRAFTING!

*Ribbon used in these projects was provided by Gwen Studios and can be found at your local Walmart and online at walmart.comWalmart.com


Look for more ribbon crafts featuring Gwen Studios ribbon here:


Tuesday, January 11, 2022

Valentine's Day Ribbon Wreath

Valentine's Day - the most romantic day of the year!
 
        Christmas decorations are packed away and the house is looking so sad and dreary - definitely time to give it some love with a splash of Valentine's Day color!

        I received a wonderful selection of pink ribbons from Gwen Studios for a delightful romantic look, but I'm a traditionalist at heart and couldn't resist pulling out leftover red and white ribbon I'd received for my Christmas crafting.....  the perfect pop of color my home needed for chilly winter days.....

        A wreath is always a good project to start with......


You'll need:
  • Gwen Studios double faced satin 7/8"ribbon - Red & White
  • Gwen Studios double faced satin 3/8" ribbon - Red
  • Gwen Studios gros grain 3/8" ribbon - White
  • Wire wreath form  8" 
  • Large dimensional/3D glue dots
  • Glue gun - lo temp glue sticks
  • Scissors, needle and thread
  • Mini clothespins, or quilt pins are helpful to hold ribbon in place before gluing, or stitching
  • Zip tie
  • Heart ornaments
NOTE
Gwen Studios grosgrain and/or single faced satin ribbon is okay to use for this project too. 


1.  Make a four-loop bow. Secure the loops at the center with a staple. Place at the center of a 12" length of 7/8" ribbon, then secure with a zip tie. Set aside.


2. Attach about 6" of 3/8"ribbon to the top of each ornament.  Secure the end with a knot then trim away excess ribbon. 


3. Wrap the wire wreath with 7/8" white ribbon to cover, then wrap with 3/8" red ribbon.


4. Attach the ornaments and bow to the top with lo-temp glue. Trim away excess ribbon ends.


5. Make a ribbon rose to add to the center of the bow as follows:  
        Tie a knot at the end of a 6' piece of 3/8" white ribbon. Pull the knot as tightly as possible then push firmly into the center of the 3D glue dot.  Fold the ribbon down with the edge next to the knot and push into the glue dot. Continue folding the ribbon and pushing the edge into the glue dot all the way around the knot. Cut the end and fold under the glue dot to secure. 


6. To give the center of the bow a little more pizzaz, I added a rosette ruffle around the outside of the ribbon rose as follows:
        Fold about 6" of the 7/8" ribbon in half then using a needle and thread, gather the edges with a simple running stitch along the edge. Gather until it is long enough to go around the outside edge of the rose. Glue to the center of the bow. 


        I just love how creative we can be with ribbon and this wreath is perfect to brighten up any corner of my home. It was a little small for my front door however, so I made a second one and placed it on top of a Smoothfoam® wreath I had made a few years ago by nesting 2 rings together then wrapping with burlap strips.  Of course I wrapped it with red and white ribbon and it looks wonderful either on my front door or on the mirror in my entryway!


            You can find more ribbon project ideas using Gwen Studios ribbon here on the Designer Crafts Connection blog.

            Gwen Studios ribbon is available at your local Walmart and online at Walmart.com   The wire wreath form and heart ornaments were purchased at my local Dollar Tree.

 Happy Valentine's Day everyone!  Enjoy..........

Yours truly,

Julie 💝

KEEP CALM AND CARRY ON CRAFTING!

Tuesday, November 2, 2021

Dress It Up with Ribbon!

        When life throws you a busy ball, but you still want to be creative, look for a simple surface at your local Walmart, or Dollar Tree and dress it up with ribbon! There are so many styles of holiday ribbons to choose from, it will make all your holiday decorating quick'n EZ.....  

        I was really excited to receive samples of die cut ribbon from Gwen Studios. I love all the little  intricate shapes and they can be used on pretty much anything!  Here are just a couple of ideas:

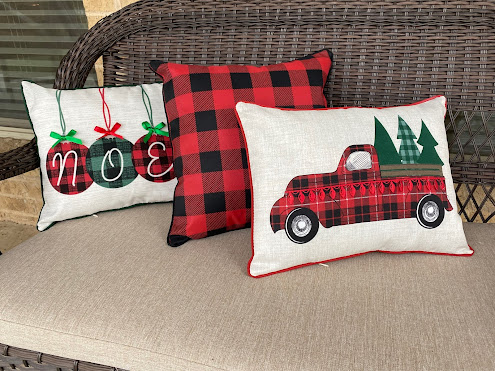
        I had some inexpensive outdoor pillows that I picked up earlier from the outdoor garden center at Walmart.  All I needed now was a little fabric glue to give them some added sparkle.  What a difference it made!

I added small, green and red bows to the top of each ornament and a length of the red Holiday Lights die cut ribbon along the side of the truck. See how much more festive the pillows look now!

        I also love to shop at the Dollar Tree and had purchased a simple wood shape for my Harvest decorating.  The back was plain, so with a quick coat of white paint, embroidered letters, a simple embellishment, and the gold reindeer holiday die cut ribbon on top of the red ribbon, I had a simple holiday flip for Christmas in no time at all!  


        You can find more inspiration on the Designer Crafts Connection blog.  What will you make? The  possibilities are endless! 

Yours truly,

Julie 💝

KEEP CALM AND CARRY ON CRAFTING!


Thursday, April 23, 2015

Decorative Trimmings Blog Hop!

Who doesn't like trim!  You can use it to update, upcycle, refresh and renew within minutes....  For example, I bought a cute dress for Easter Sunday - my daughter politely informed me it would be okay to wear over leggings, but even though I wore mini skirts in the 60's (as in the 1960's) it might not be quite so cool for a mum IN her 60's..... hmmmm.  Guess I need to get some lace (wide lace) and sew it around the bottom...

In the meantime I received a box of trim from Decorative Trimmings for this month's Designer Crafts Connection blog hop.  Designers love to play with new product and I am no exception.  Unfortunately I received white lace trim in my goodie box - I needed black to lengthen my dress, but at least I now know where to get some!

Spring is wedding season and nothing says "wedding" like lace, so I pulled some additional supplies together and set to work.


Weddings + lace + candlelight = romance, so I pulled out some tall and short LED candles and simply wrapped them with the lace.  There was additional narrow trim in my goodie box, so I wrapped that around the top edge of the lace on the tall candle, added a bow and a flower and voilà, a quick'n EZ candle decoration fit for the church and/or wedding reception.


I wanted to do something a little different with the shorter candle, so I added the narrow trim around the neck of a glass container I found at the dollar store then placed the shorter candle inside.


Simple, elegant and made in a jiffy.......  I think it looks great just like this, but you could also put it in the center of a floral candle ring.


Outdoor weddings are also popular this time of year and I've noticed a lot of burlap being used for that "country feel", so here are some additional ideas using the same lace and trim.


I covered a rectangular shaped glass container with burlap then added the lace and the trim along the top edge of the lace.  The table number is also burlap, decorated with the trim (and a little lace brad at each corner that I found in my stash of stuff).  I attached the burlap to a piece of acrylic (from an old frame I think) with double sided tape and the iron on number at the center with glue dots; (quicker than getting my iron out).  This was then glued to a bamboo skewer and placed between the flowers.  You could also prop it up against the container.


There are lots more ideas to look at.  Use the blue, DCC logo in my sidebar to hop thru the webring to see them all, then don't forget to check out our post on the DCC Blog.   Enjoy!  Y'all come back now....

Yours truly,
Julie :)

KEEP CALM AND CARRY ON CRAFTING!