Showing posts with label dip'n etch. Show all posts

Monday, August 28, 2023

Upcycle with etchall®!

Don't throw empty perfume and/or cologne bottles away when you can pretty them up with etchall® dip'n etch!  Dip'n etch is a liquid that makes etching glass so EASY.....


You'll Need:
  • etchall® dip'n etch
  • Clear plastic container a little larger than the item you want to etch 
  • Permanent black marker

1. Cut off the top of an empty plastic bottle and set it aside to use as a funnel. 

2. To determine how much dip'n etch liquid you'll need, place your item inside the plastic container. Fill with water up to the area you do not want etched. (I used my new bottle of cologne to photograph this step, since the old one was empty and would float. If you are etching something that would float/bob up, put something heavy on top, or fill with rice for example so it is weighted down.)
  
PLEASE NOTE:  
I colored the water with food coloring to make the water levels easier for you to see.


3. Remove the item and the water level will sink. Mark the level on the outside of your container with a marker, or tape.


4. Empty the container then dry the inside thoroughly.


5. Fill the container with dip'n etch up to the mark then carefully add the item you want to etch.  Let sit for at least 15 minutes then remove your item. Rinse thoroughly then dry.

6. Etchall etching products are reusable, so using the top of the plastic bottle as a funnel, pour the dip'n etch back into its original container.  How easy is that!!!


7. Decorate if desired. I used a simple piece of ribbon and sand dollar charm for mine.


         I love etched glass... it reminds me of sea glass and I love anything that has to do with the beach and ocean. 

PLEASE REMEMBER- Etching products remove glaze, so....
Do not rinse your etched items over a porcelain sink
Always work on a safe, non glazed surface, or use a mat  
Do not store etching product in cold, or hot areas
Always read directions on container!

        Look for more etched projects - including slate! - using the "search" tab here on my blog. There's also lots of inspiration, tutorials, videos and more on the etchall website.

Enjoy!

Yours truly,
Julie 💔

KEEP CALM AND CARRY ON CREATING!

Friday, August 31, 2018

Glass Etching Quick'n EZ

From boring to brilliant in literally minutes!

I love this set of glass bottles I recently found at my local craft store, but thought they needed a little extra oomph....  


so, I filled each one with dip'n etch.... wrapped a little jute around the neck


and now they look like this......


Perfect for my bright and cheery sunflowers....


and it took less than an hour!  Here's how....

You'll need:
etchall® dip'n etch
Plastic container, large enough to hold the bottle
Pebbles, marbles, or coins 
Jute
Scissors

1. Clean the outside of the glass bottles thoroughly then wipe with vinegar to make sure it's squeaky clean. Dry thoroughly.

2. To determine how much dip'n etch you'll need, fill the bottles with the pebbles (so they don't float) then place one bottle in the plastic container. Fill the container with water up to the place where you want the etching to stop. 


3. Remove the bottle and the water level will sink.  Mark the water level then empty the container.  Dry the container and the bottle thoroughly.


4. Pour dip'n etch into the container, up to the water level mark, then place the bottle in the container. Leave for 15 minutes.


5. After 15 minutes remove the bottle. Rinse the outside thoroughly and dry. Set aside and place the second bottle in the same container of dip'n etch. Repeat the process until all 3 bottles have been etched. DO NOT rinse over a porcelain sink. Etching product may accidentally etch the glaze.


6. Wrap the neck of each bottle with jute, while the other bottles are being etched. After the last bottle has been etched, pour the dip'n etch back into the container.  (I cut the top off a plastic soda bottle to use for a funnel.) 
NOTE: etchall® crème and dip are re-usable. 


Leave as is, or add your favorite flowers and enjoy!


You can find lots of glass containers in craft, thrift and dollar stores and easily turn them into home dec treasures in minutes.  Enjoy!  Y'all come back now...

Yours truly,
Julie

KEEP CALM AND CARRY ON CRAFTING!  


Thursday, June 21, 2018

Light Up Your Parties!

Add a few tea light mugs to your party table,
made even more special with StyleTechCraft® vinyl accents and etchall® etching dip'n etch!


You will need:
StyleTech Transparent Vinyl - one sheet each of red and blue
2 Tea light glass mugs
etchall® dip'n etch glass etching liquid
Transfer paper 
Paper trimmer, or craft knife and metal edge ruler
Digital cutting machine, or star punch
Painters tape


Instructions:
1. Remove the lid and tea light fitting from each mug then wash and dry the mugs thoroughly. Fill one mug with dip'n etch. Following directions on the container, let sit for 15 minutes then carefully pour the liquid from the first mug into the second.  After 15 minutes, pour the liquid back into the container to be used again.  Rinse the mugs thoroughly.  


Note: Place painters tape around the inside of the top of the mug to prevent the liquid from etching that area as you pour out the dip'n etch. 


See the difference that etching makes!


2. Using a paper trimmer, cut four, 1/2" wide strips of red vinyl. Trim to the length needed to fit around the outside of the mug.  Peel away the backing from each strip, then with the strips spaced about 1/2" apart, adhere to the outside of one of the mugs.


3. Using a digital cutting machine, create a 3" wide border of 1/2" stars, 1" apart as shown on the blue vinyl.  While the vinyl is still on the mat, weed (remove) the stars.  Note: Measure around the glass to determine how long the star border strip needs to be.  This strip measured 3" x 10".


4.  In order to place the border on one of the glasses, cover the border with transfer paper then remove  from the mat.


5. Remove the backing from the blue vinyl then, with the blue vinyl against the glass, carefully position around the glass mug, starting at the handle.  Press in place making sure there are no creases, then remove the transfer paper.


Replace the tea light fittings, add tea lights and the top - Time to party!


StyleTech vinyl is available in a variety of styles and colors.  Check their website @ StyleTechcraft.com for more information.

I received these samples of vinyl and etchall dip'n etch at no charge from the manufacturers to create a project to share with my readers.  Check the DCC  links to see more projects created by Designer Crafts Connection members featuring StyleTech vinyl.  Enjoy!

Y'all come back now.........

Yours truly,
Julie 😊

KEEP CALM AND CARRY ON CRAFTING!

Monday, June 29, 2015

Celebrate Red, White and Blue!

We live outside city limits and as long as there isn't a burn ban, which isn't likely this year because of all the rain, we'll celebrate the "Fourth" in style with hot dogs and fireworks!  We'll decorate too of course, and I recently picked up some red, glass votive candle holders.  My friends at etchall know how I love to decorate my patio in summer, so they recently sent me some spiral hangers for glass votive candle holders.  They're designed to be placed inside a wine bottle (with the bottom cut off), but I had a different idea.  Apart from the fact that I didn't have any colored, glass wine bottles, I kinda liked them hanging alone.  Need to add here that you can use empty plastic soda bottles instead of glass bottles. Just cut the bottom off with a pair of scissors, so you can add the votive candle holder like this.


I really love this look too, but I think I'd etch designs on the outside of the wine bottle, but that's a post for another day....... after I find an empty bottle.....  maybe after the Fourth.... wink, wink...

So here's my red votive candle holder.  

 
I use LED lights and they look really festive hanging around the patio, but I prefer a diffused look, so I etched the inside of each glass by filling each one with etchall® dip'n etch  


and now they look like this.


It was SO easy.  I poured dip'n etch liquid into each candle holder, then let it stand for 15 minutes.  Dip'n etch is reusable, so always return to the bottle, so you can use it again and again then rinse and dry the votives.  I love that now you only see the glow from the candle and not the candle.


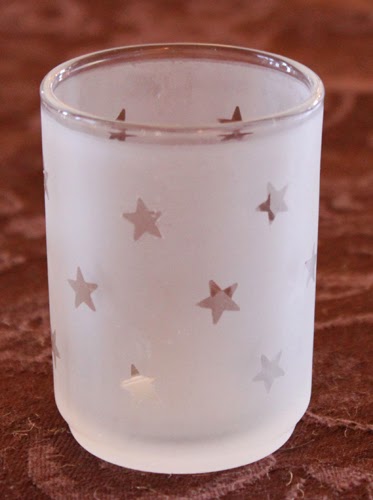
I have clear glass votives that I can also use to decorate, all I need now are some blue ones!  The one shown below was etched on the outside and I used star stickers for the design.


Hope y'all have a happy Fourth.  Stay safe, stay cool and, in case you're wondering, we have Fourth of July in England too, but we don't celebrate............ wink, wink......  y'all come back now.

Yours truly,
Julie :)

KEEP CALM AND CARRY ON CRAFTING!