Showing posts with label Etching. Show all posts

Monday, August 28, 2023

Upcycle with etchall®!

Don't throw empty perfume and/or cologne bottles away when you can pretty them up with etchall® dip'n etch!  Dip'n etch is a liquid that makes etching glass so EASY.....


You'll Need:
  • etchall® dip'n etch
  • Clear plastic container a little larger than the item you want to etch 
  • Permanent black marker

1. Cut off the top of an empty plastic bottle and set it aside to use as a funnel. 

2. To determine how much dip'n etch liquid you'll need, place your item inside the plastic container. Fill with water up to the area you do not want etched. (I used my new bottle of cologne to photograph this step, since the old one was empty and would float. If you are etching something that would float/bob up, put something heavy on top, or fill with rice for example so it is weighted down.)
  
PLEASE NOTE:  
I colored the water with food coloring to make the water levels easier for you to see.


3. Remove the item and the water level will sink. Mark the level on the outside of your container with a marker, or tape.


4. Empty the container then dry the inside thoroughly.


5. Fill the container with dip'n etch up to the mark then carefully add the item you want to etch.  Let sit for at least 15 minutes then remove your item. Rinse thoroughly then dry.

6. Etchall etching products are reusable, so using the top of the plastic bottle as a funnel, pour the dip'n etch back into its original container.  How easy is that!!!


7. Decorate if desired. I used a simple piece of ribbon and sand dollar charm for mine.


         I love etched glass... it reminds me of sea glass and I love anything that has to do with the beach and ocean. 

PLEASE REMEMBER- Etching products remove glaze, so....
Do not rinse your etched items over a porcelain sink
Always work on a safe, non glazed surface, or use a mat  
Do not store etching product in cold, or hot areas
Always read directions on container!

        Look for more etched projects - including slate! - using the "search" tab here on my blog. There's also lots of inspiration, tutorials, videos and more on the etchall website.

Enjoy!

Yours truly,
Julie 💔

KEEP CALM AND CARRY ON CREATING!

Thursday, March 16, 2017

Etching with etchall®

If you follow my blog, you'll know how much I love working with glass. I even took a class on glass cutting about 25 years ago, but soon realized that that wasn't for me. I think it had something to do with the band aid in the supply kit...

I first met "etchall Barbee" at the Arts & Crafts trade show in the early 90's. I also loved decorative painting and fell in love with the idea of being able to paint on an etched glass surface.  The prep work was so much easier and a lot faster than sanding and sealing wood.......   Since that time,  I've created a number of etched glass pieces, so I thought I'd share a variety of ideas and techniques to inspire and encourage your itch to etch.....   Most of them have been featured here on my blog, so if you'd like detailed, step by step instructions, enter "etched glass" in the search bar and they should come up.  Let's go!


1.  Let's start with some dip'n etch projects that are quick and easy.


I love colored glass, so I picked up some colored glass pieces from the dollar store and even found a couple on the clearance shelf at my local supermarket. You can also find them at your local craft store, but make sure you have a coupon.....   The challenge with some colored glass pieces is that it isn't colored glass at all. More often than not, it's clear glass with a colored coating on the outside - can't be etched - on the outside, but you can etch the inside!  You can tell if it's coated by looking at the bottom.  If the glass is color coated, the bottom will be clear.  If it's colored glass, the bottom will be colored too - like a wine bottle.  

Check out these glass pieces before and after etching them on the inside.  Always wash and dry glass pieces thoroughly first, then simply fill with dip'n etch liquid.  Leave for 15 minutes, then pour the dip'n etch back into the container.  Quick'n EZPZ....


And these were decorated with beads...  The mason jar is colored glass, so it can be etched on the inside or the outside, or both.


This painted vase was also etched on the inside, I simply filled it to the brim with dip'n etch.  

 
The pieces below were etched on the outside by immersing in a plastic container that was just a little larger than the pieces.  The heart shaped bottle looks like sea glass. I etched the milk bottle so I could paint the cherries on it.


The mason jars were also immersed in a container of dip'n etch.  (I used an empty soda bottle a little larger than the mason jar for this.)  The designs were created using a star punch and strips of etchmask™ used for creating your own stencils.  For the votives and wine bottle, I used Peel Off star stickers. The light comes from a light stick in the wine bottle.


Here are some more etched bottles using dip'n etch.  They each have an LED tea light under their hat.


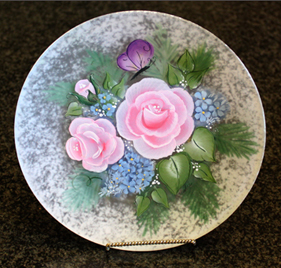
And here's a glass plate I etched so I could paint it with regular acrylic paint. This is just one of the projects featured in my book, Garden of Glassware, a decorative painting book by Leisure Arts.


2. These projects were etched with etching cream.


I designed and cut my own stencils for these using etchmask and my Cricut Explore. 


I etched the candlestick bases with star stickers (negative etch) then placed a small, multi colored LED tea light under the base of the candlestick. I loved how the stars reflected on the wall. You can see the base design on the second photo.  The top is a light shade kit, also from etchall.


The feathery look on the painted plate and the rim of the cookie plate was created by using a sea sponge to dab the etching cream onto the surface.


And here's etching on china. The pig was placed in dip'n etch and the letter M was etched onto the center of the plate with cream then enhanced with gold rub'n buff. The Aloha sign is etched slate.  The lantern has a different design etched on each side of each piece of glass which gave it a dimensional effect.


I used the same layering technique for the winter frame.  4 individual designs were etched on both sides of 2 pieces of glass which were then layered in a float frame......


I hope you enjoyed this round up of etched designs and will try some etching yourself.  You'll be amazed how professional your projects will look - perfect for your own home, or to give as a gift.  Don't forget to use the code on the Designer Crafts blog for a special discount.  Enjoy!

Y'all come back now............

Yours truly,
Julie :)

KEEP CALM AND CARRY ON CRAFTING!


Monday, April 25, 2016

China Plate - Mother's Day Gift

It's Mother's Day in less than 2 weeks, so when the grandchildren spent the weekend, we decided to make something special for mommie.

I had a white lacey china plate, which was already pretty, but I thought it would look nice with a monogram in the center. It was also a good way to show the grandchildren that etching creme can be used for china too!  It's SO simple and SO pretty and only took us about an hour to make.


1. The first step is to either use a stencil you already have, or create a custom monogram with a digital die cutting machine.  I have a Cricut Explore and I used a font that was in my font folder on the computer.  We cut the letter "M" from etchall® etchmask (adhesive vinyl) inside a 4" square.  TIP: Centering it in a square is helpful when centering it on the plate.

2. Cover the stencil with a 4" square of etchmask transfer paper, then remove the backing from the etchmask. Place the stencil at the center of the plate then carefully remove the transfer paper. 


3. Use a pik tool, or point of a craft knife to carefully remove the letter "M".  Do not push the tool in from the cut edge, since this may damage the outline. Always find a thick spot to insert the tip and lift from there.  Make sure the etchmask is firmly on the plate.  Smooth away any bubbles that may be around the opening, otherwise the etching creme may creep under the edge. 


4. We then covered the area to be etched with etchall® etching crème. I usually pour the creme onto a different area of my project, then spread it across the open area to be etched with a squeegee, but it was easier to let the children use a plastic spoon to dip creme from the container and place it onto the opening. They used the back of the spoon to gently spread it over the area to be etched. They were very careful not to get any creme on any other areas of the plate.  It would have been better to cover the rest of the plate completely with pieces of leftover etchmask and/or transfer paper, but we were excited to get to the etching part and we forgot.... silly Nana.  Luckily it worked out just fine.


NOTE: In case you are wondering why I am comfortable letting my grandchildren use this glass etching product, etchall® etching products are ACMI certified, which means they have gone through rigorous testing and meet strict requirements. A copy of the certification symbols are in my sidebar on the left. This product has no noxious, or harmful fumes and, as with other craft materials and tools, they are supervised.

5. We let the creme sit for 15 minutes, then used the spoon to carefully scoop it up and put it back in the container. I have to admit that I did this part, since they had gone on to other things at this point. Waiting is not a strong suit with 7 and 10 year olds..... even if it is only for 15 minutes.

6. I washed away the remaining residue, but left the stencil in place for the next step. Rub'n Buff is a great product for adding a gilded look to etched areas; you only need a little.  Following directions, massage the tube a little before opening to mix the product. It has a tendency to separate like some paints.  Squeeze a small amount onto a soft cloth, or paper towel then, using a circular motion, gently rub the cream over the etched letter.  (A stencil brush works well too.) There are a few colors to choose from, but I used gold for this project.


7. After coloring, remove the stencil to reveal your gilded monogram.


8. I'm sure mommie will love this plate, especially since the children helped to make it!

If you read my blog regularly, you'll have seen other etched projects here and know how much I love etching all kinds of surfaces. Etchall has kindly provided me with product to work with, so I can share my ideas with you.  Enjoy!  Y'all come back now...

Yours truly,
Julie :)

KEEP CALM AND CARRY ON CRAFTING!

Friday, June 14, 2013

Glass Etching

How do you add a little class to your glass?  Etch it of course!  I decided to turn this vase (as in "bars") into a vase (as in "base") using etchall® etching creme from B&B Products.  Look how classy this looks and it was SO easy.


What a great gift for a friend, or to brighten up your own home.  This is how easy it is:

    1.  Wash the piece of glass then dry thoroughly.
    2.  Cover any area you do not want to etch.  I created diagonal stripes on this vase using regular scotch brand tape. 


    3.  Make sure the edges of the tape are pressed down firmly onto the glass surface.
    4.  Cover one side of the glass with the etching creme.  Use the black spatula/squeegee to spread the etching creme thickly over one side of the glass (and yes, it will drip over the edge onto the next side).  Remember that this is etching creme and it will ETCH any shiny surface, so protect any surface you are working on.


    5.  After 15-20 mins, use the spatula to spread the creme over onto the next side.  Repeat for each side.   (This is a square vase so I did one side at a time.)  When you are finished, scrape the creme back into the bottle!!

ETCHALL® ETCHING CREME 
(AND DIP) IS RE-USABLE!!!!

Please note:  I used etching creme for this project, but it would have been much easier (and faster) to use etchall® Dip'n etch.

    6.  After all the creme has been scraped back into the bottle, rinse away the residue under running water then remove the tape.  Dry thoroughly then admire your glass with class.

There is so much to tell you about etchall® it would take me all night, so hop thru each of the DCC member blogs by clicking on the blue logo found in each blog sidebar to see how other designers used the product.  You can also find a wealth of information at www.etchall.com including "how to" videos and lots of inspiration.

As a decorative painter, I first used etchall® to etch glass plates! I loved painting on glass (it required no prep) and an etched piece of glass had "tooth" so the paint would stick.  Here are a couple of pieces that were featured in my book, Garden of Glassware published by Leisure Arts.


You can also personalize glass by etching.  On these two projects for example, I cut my own custom stencils using etchall Etchmask for the name "jennifer" and the title "Snow" using a digital die cutting machine and used them to etch this small glass bezel and a plain glass frame.  These samples are, of course, just scratching the surface (or should I say etching)..... imagine the possibilities!  Are YOU itching to etch yet? 


The "Snow" frame was featured on Scrapbook Memories, series 1300, so you can find the instructions @ http://www.scrapbooksouptv.com/projects/1300/1310/1310-5.htm

I know you're dying to start hopping, so hop to it and enjoy!  Y'all come back now.....

Yours truly,
Julie :)


KEEP CALM AND CARRY ON CRAFTING!