Showing posts with label Paper Crafts. Show all posts

Wednesday, October 21, 2015

Little B LLC Blog Hop

Just look at all this crafty goodness that arrived from Little B LLC...  I hardly know where to start. There are punches, dies, flower kits, washi tape in different widths, and lots of dimensional stickers. Each Designer Crafts Connection member received a different assortment - this assortment definitely said "baby"....


I had some Smoothfoam™ Fake Cake forms from a previous hop, so I decided to make a decorative cake for a baby shower.  I used the stickers, flower petals, washi tape and the border punch.


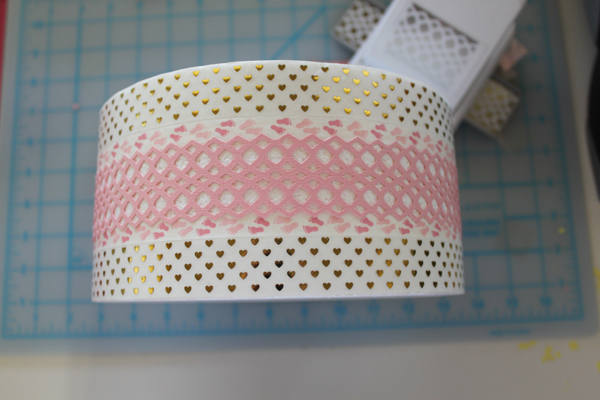
Step 1: I covered the sides of the cake form.  I used Washi tape with the tiny, gold foil hearts around the top and bottom edge, then added the 1/2" Washi tape with the pink baby feet design.

Step 2: To cover the open area between the washi tape, I punched a border from pink card stock as follows:
        Insert the paper into the punch with the edge of the paper aligned with the edge of the design on the punch lever.  Punch then slide the paper to the side until the punched paper is aligned with the pattern on the base.  Continue sliding the paper to one side and punching until you have a complete strip.  Cut enough strips to go around the cake form then adhere with glue dots.


Step 3.  Punch 3 additional strips of pink border paper.  Cut each strip in half lengthwise to create 6, narrow strips.  Using the pattern as a guide, accordion fold each strip, then run a length of cord through the bottom holes. Bunch the pleats together and tie tightly with the ends of the cord.


Fan the pleated strip into a circle, then glue the ends together with a small dab of tacky glue to create a rosette.  Make 6.  Adhere gold Washi tape on top of the punched strip around the cake form. Always overlap the ends of washi tape and add a little glue for extra security.  Push a quilt pin with a white, pearl head through the center of each rosette to attach to the sides of the cake form.  Add a baby shoe sticker to the area between the rosettes.


Step 4: Adhere the medium sized pink petals from the flower kit around the top of the cake form overlapping as shown.  Note, the petals already have an adhesive at the base of each petal. Cover the area at the center with a small, white doily.  Following instructions on the package, create a small flower from 4, white petal strips, then place (don't glue) on top of the doily.


 Step 6: Add stickers from the baby package as follows:

        a.  Adhere a craft pick to the back of the stork sticker for stability, then push the end of the pick through the center of the white flower and the doily into the center of the cake form. Cut 2, white, petal strips apart then adhere the individual petals around the doily. 

        b.  To make the banner, cut 2 bamboo skewers about 6" in length then wrap with narrow washi tape.  Push the skewers into the top of the cake form, one at each side of the doily then attach white cord across the top. Tie at each end then hold in place with the sock/clothespin sticker.  Hang the letter stickers on the cord and additional stickers at the base of each skewer to finish.


You can see even more inspiration using Little B products by visiting the Designer Crafts Connection blog and hopping thru our webring using the DCC logo in the sidebar,  plus there's a giveaway!  Just look at all this product! Valued at $150, there's enough product for you and a friend.

Enter to win using the Rafflecopter feature below. All you have to do is "like" Little B on Facebook and comment on our blogs. The more you comment the more chances you will have to win.  Open to residents of the US and Canada only.


a Rafflecopter giveaway

Enjoy!  Y'all come back now.........

Yours truly,
Julie :)

                                    KEEP CALM AND CARRY ON CRAFTING! 

Wednesday, May 23, 2012

Scrapbook Soup Online!

Scrapbook Soup began broadcasting online at scrapbooksouptv.com  effective April 6th.  A new show is aired each week starting a noon EST on Fridays.  The show is available until the following Friday.

Episode 107 is airing now.   Julianna Hudgins opens the show by showing us how to create a cut and embossed fall card featuring Spellbinders dies. Then Julie Fei Fan Balzer and I present a wooden Advent Calender on behalf of Kaisercraft.  I love this project, since it's all about dĂ©coupaging scrapbook paper onto wood then adding embellishments you might normally use for paper crafting projects. I think it's fun to be able to use all that neat stuff on other things besides cards and scrapbook pages!  Jo Pearson from Michaels Arts & Crafts stores shows us how to make a canvas wall hanging and at the end of the show Julie FFB shares an idea for using glue resist to embellish paper and fabric projects.

Photos and instructions for all the projects are on our website.  Select projects to download as many pdfs as you like.  You may also find projects from past episodes of Scrapbook Memories.  Just select a show to see thumbnail photos of all the featured projects.  Enjoy!  Y'all come back now!

Yours truly,
Julie :)

Tuesday, September 14, 2010

Popping Up!


I've been going thru some older projects and scrapbook pages for fun ideas to share. Rather than re-inventing the wheel with new techniques, concepts, etc. I decided that just because we're always on the lookout for something new, it doesn't necessarily mean that what we did in the past isn't a great technique for today's paper crafter. In fact, if you've just started to craft, all the techniques will be new. Granted, these projects will need updating with newer, more trendy papers, but let's not throw out the baby with the bathwater - let's focus on the techniques. Many of the paper crafting techniques we see are being touted as "new", whereas, in fact, many of them have been around, in some cases, for over 100 years. Paper piercing, is a great example. "Pin Pricked" paper samples have been found dating back to the 1800's......!

Here's an example of what I'm talking about. One of the "fun" techniques we explored in the late 90's was "Pop Up" pages. Pop-Up cards have been in a favorite in the UK for a long time. When you opened the card, out popped a bunch of flowers. I remember looking for these cards for my mum, when I was a little girl. They were always so pretty. They're really easy to make - you just need to know the technique then you can make all your projects "pop".

Here's an example of a pop-up page - I thought this would be appropriate for Halloween. This is an 8 1/2" x 11" pop up.


Open it up and voilĂ  - look what pops up!


The little ghost at the top of the grave stone on the left is also a tab, so when you pull it down, even more photos are revealed.


Making pop ups is easy. You just have to remember that the part that pops up has to go across either a fold, or, as in this sample, across two adjoining pages. Here's the basic technique:

1. Cut a rectangle from cardstock, about 8" x 4". It doesn't really matter what size, or color. Fold in half, then fold about 1" up from the bottom. (Fold on the black lines.)


2. Make a small cut from the bottom, up the center fold to where the folded paper intersects.


3. This is your basic platform to which you can glue anything you want to "pop up". It can be much shorter, or you can cut it into a half circle, or a half circle on either side.


4. Fold the bottom flap upwards, then fold the paper in half with the backs facing.


5. Glue across either a fold (for a card), or two pages. The pop up base on the sample below is outlined in green. As you can see, this was just an 8" by 2" rectangle, folded in half lengthways, then again in half.


The only thing you have be careful about is the height of the pieces you glue to the base. They cannot be taller than the distance between the point where the center fold of the base is glued and the bottom of the pages. If the pieces are taller than this, they will stick out at the bottom when it is folded flat.

Enjoy......... y'all come back now!

Yours truly,
Julie :)

Monday, September 6, 2010

License to Craft


I really believe that creativity, or the desire to be creative, is inherent in most people. Not everyone, however, is a crafter. Creativity comes in many different guises. My mum, for example, didn't think she was creative, but she made the most beautifully decorated cakes and sewed the prettiest dresses for me when I was a little girl. Creativity can be expressed in many different ways: Decorative painting, cake decorating, etc are pretty obvious, but how about things like cooking, or even the way you decorate a room, or write a letter. It's the desire to be creative that leads us to try new things and to search out and learn new techniques.

I have, what I consider to be, quite a number of creative outlets. I enjoy photography, decorative painting, jewelry making and all kinds of paper crafts and I'm always on the lookout for new techniques. I love to "play" and come up with my own techniques too, which is a big part of what I do as a designer in the Arts & Crafts industry. I love the challenge of having to come up with projects that I think others will enjoy. This was always a big part of what I did as a presenter on Shop at Home and HSN and the projects I created to feature on Scrapbook Memories. The obvious goal of Shop at Home and HSN is to sell product, but my job was to show cool projects that could be made with the product, so viewers would be inspired to buy. Scrapbook Memories, of course, is educational with a goal of bringing you new products and techniques.

What is YOUR favourite craft? Have you tried anything new lately? I'd love to hear what you like to do to be creative. Y'all come back now!

Yours truly,
Julie :)