Thursday, November 8, 2018

Etching with Dollar Store Glass

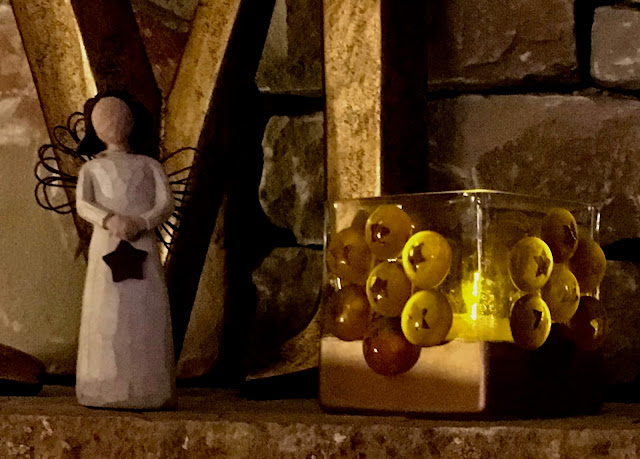
A couple of items from the local dollar store plus etchall® dip'n etch = a fun votive for Fall...

You will need:
etchall® dip'n etch*
etchmask™
Pick Knife
Glass Gems - Amber
Rub'n Buff*- Antique Gold
E-6000 adhesive
Square glass votive
Painter's tape
Star punch or digital shape cutting machine
Shallow plastic dish for etching
*Please read the manufacturer's directions if you haven't used these products before and always work on a protected surface.


Instructions:
1. Cut small star shapes from etch mask. I used my Cricut® Maker™ and filled a 9" x 7" piece of etchmask with 1/2" stars, spaced 1" apart. Peel away the outer area of etch mask after cutting and set aside. It can be used as an all-over star stencil for another project.    
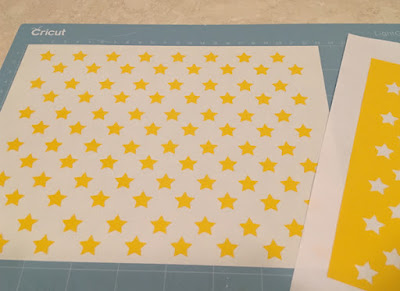

2. Using the pick tool, lift stars from the sheet then center on each gem. Press firmly in place.


3. Place the gems in a single layer in a shallow, plastic dish then cover with dip'n etch. Leave for 15 minutes. Place a funnel into the top of the dip'n etch container, (I cut the top from an empty soda bottle to use for a funnel) then place a sieve on top. Carefully pour the dip'n etch back into the container letting the gems fall into the sieve, then rinse the gems thoroughly.  NOTE: Do not rinse over a porcelain sink!  Drops of dip'n etch may etch the surface.


4. Remove the stars and let the gems dry. Depending on the number of gems you need to etch and the size of the dish, you may need to do this in two batches.

5. Etch the base of the votive. Fill the plastic container with dip'n etch about 1/2" deep then place the glass votive into the container. Leave for 15 minutes, then remove the votive and rinse. Pour the dip'n etch back into the container. This step is optional. You can also leave the base of your glass piece clear.


6. Dry the votive with a soft cloth then place painter's tape around the top edge of the etched border. Color the border with Rub'n buff then remove the tape. I apply Rub'n Buff with a soft cloth, or paper towel. Rub'n Buff will stick to the etched surface, but can be easily removed from un-etched glass. Always protect the surface you are working on and your fingers! This step is also optional. You don't have to color the base. My glass had some marks in the glass around the base I wanted to cover up. Don't forget, this will be your project and you don't have to do either of these steps.  


7.  Use E6000 to glue gems onto each side of the votive, one side at a time. 


8. Let the glue "set up" for at least an hour before turning, then hold the gems in place with painter's tape to prevent slipping.


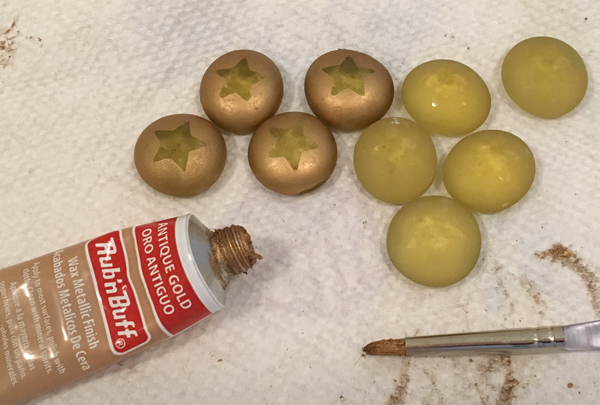
9.  As you can see, I didn't cover the sides completely, so I had quite a few gems left over to play with. Before putting supplies away, I covered a few with Rub'n Buff to create these gold, glass gems.....  not sure what I'll use them for yet, but they look pretty cool, so thought I'd share......  Enjoy!

Y'all come back now........

Yours truly,
Julie  

KEEP CALM AND CARRY ON CRAFTING!


Friday, August 31, 2018

Glass Etching Quick'n EZ

From boring to brilliant in literally minutes!

I love this set of glass bottles I recently found at my local craft store, but thought they needed a little extra oomph....  


so, I filled each one with dip'n etch.... wrapped a little jute around the neck


and now they look like this......


Perfect for my bright and cheery sunflowers....


and it took less than an hour!  Here's how....

You'll need:
etchall® dip'n etch
Plastic container, large enough to hold the bottle
Pebbles, marbles, or coins 
Jute
Scissors

1. Clean the outside of the glass bottles thoroughly then wipe with vinegar to make sure it's squeaky clean. Dry thoroughly.

2. To determine how much dip'n etch you'll need, fill the bottles with the pebbles (so they don't float) then place one bottle in the plastic container. Fill the container with water up to the place where you want the etching to stop. 


3. Remove the bottle and the water level will sink.  Mark the water level then empty the container.  Dry the container and the bottle thoroughly.


4. Pour dip'n etch into the container, up to the water level mark, then place the bottle in the container. Leave for 15 minutes.


5. After 15 minutes remove the bottle. Rinse the outside thoroughly and dry. Set aside and place the second bottle in the same container of dip'n etch. Repeat the process until all 3 bottles have been etched. DO NOT rinse over a porcelain sink. Etching product may accidentally etch the glaze.


6. Wrap the neck of each bottle with jute, while the other bottles are being etched. After the last bottle has been etched, pour the dip'n etch back into the container.  (I cut the top off a plastic soda bottle to use for a funnel.) 
NOTE: etchall® crème and dip are re-usable. 


Leave as is, or add your favorite flowers and enjoy!


You can find lots of glass containers in craft, thrift and dollar stores and easily turn them into home dec treasures in minutes.  Enjoy!  Y'all come back now...

Yours truly,
Julie

KEEP CALM AND CARRY ON CRAFTING!  


Tuesday, August 21, 2018

Keep Smiling

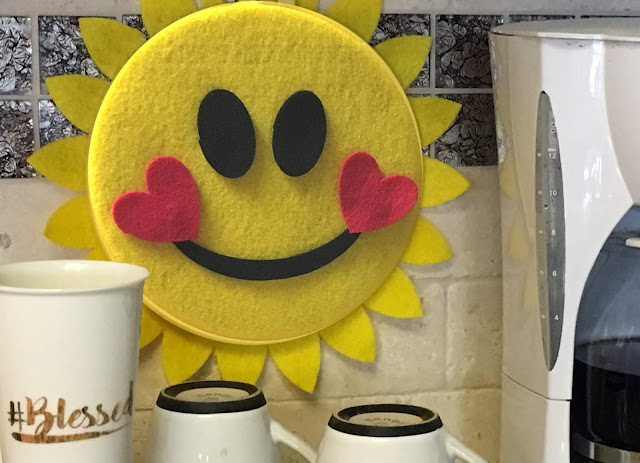
Create a mood ring to hang by your coffee, or tea pot as a reminder to start each day with an amazing smile!


You'll need the following supplies:
Kunin® Classic Felt 9” x 12” – Red, Black and Yellow x 2
Cricut® Maker™ with Rotary blade*
8” Embroidery Hoop
Tacky glue
Smile pattern


Instructions - Cutting the Shapes:

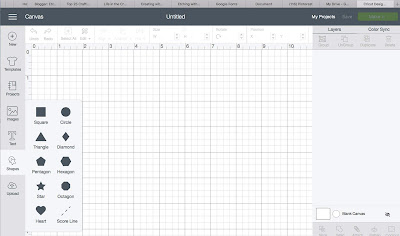
1. Using the “shapes” feature in Cricut Design Space, select then cut the following felt shapes, one color at a time:

1¼" x 2” Yellow Hearts - 24-32
2” x 2” Red Hearts - 2
9” Yellow Circle - 1
1¼” x 2” Black Ovals - 2   


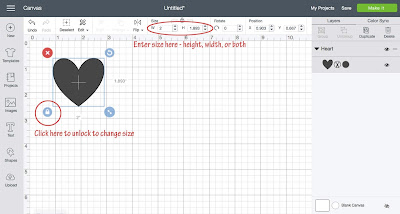
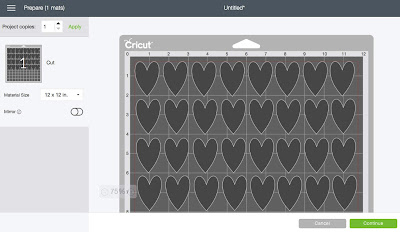
2.  Select the heart shape then size to 1¼" x 2”.  Copy and paste 24 hearts on the canvas making sure they fit inside the 9" x 12" guidelines, then select "Make It".


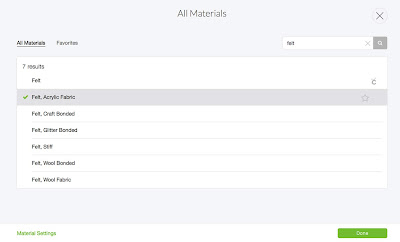
3.  Continue then select  “Browse all materials”.  Enter “felt” in the search field and select “felt acrylic fabric”.


4. On the next screen select Rotary Blade and "More" pressure. Place yellow felt horizontally at the top of your pink cutting mat, then cut.  


5. Remove the felt from around the cut hearts, then carefully lift each heart from the mat.

6. Clear the canvas then add and cut two, 2" x 2" red hearts following above directions.


7.  Cut a 9' circle from yellow felt.

8.  Download the "Smile" pattern, then upload to design space and place on a new canvas.


9. Add two ovals to the same canvas. Using the shapes feature, select the circle shape. Unlock, then size to 1¼” x 2”.  Place black felt on the mat then cut.


Instructions - Assembly:

1. Separate the hoop rings then center the felt circle on top of the small, inner ring. Place the large ring over the felt, sandwiching the felt circle between the 2 rings. Tighten the outer ring.


2. Arrange the the small, yellow hearts in a circle.  Spread the glue on the back of the hoop rings then place the hoop, glue side down on top of the hearts. Adjust the hearts as needed then flip the hoop over to prevent it sticking to the surface.  Let dry.

 TIP: Working on a mat with a 1” grid is helpful when arranging the hearts. You can also draw a circle on paper for a guide.


3. Depending on where you hang your hoop, the felt embellishment pieces will easily stick to the front of the hoop without glue, so you can re-arrange them every day.  If you need them to be more secure, add a small piece of the “hook” side of hook and loop tape to the back.


Have fun arranging the additional felt pieces to express your mood for the day and share a smile with everyone you meet!  And yes, you’re allowed to turn the smile upside down every once in a while, but no longer than 10 mins……

Enjoy! Y'all come back now........

Yours truly,
Julie 


KEEP CALM AND CARRY ON CRAFTING!  
-->

Tuesday, July 31, 2018

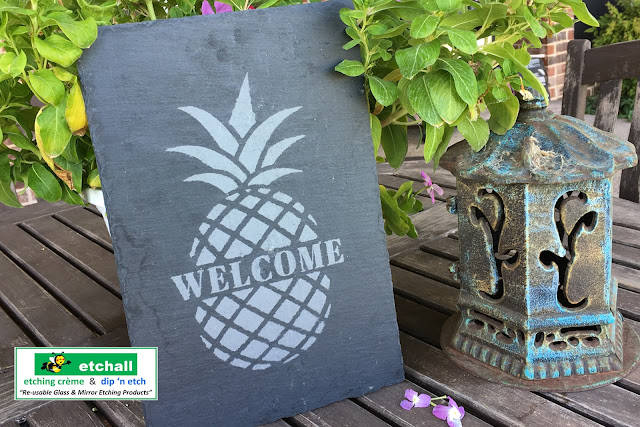
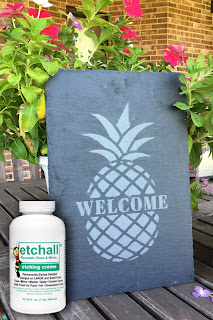
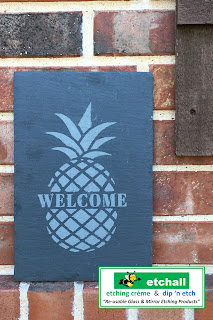
Pineapple Welcome Slate

You're slated for success when you create a 
"Welcome" sign with a slate and etchall® etching crème!


You will need:
etchall® etching crème
etchall® etchmask and transfer paper
8" x 12" slate*
etchall® Pik tool and squeegee
Stencil pattern (vinyl)
*Not all slate will etch. Check a small area on the back before starting your design.

Instructions:
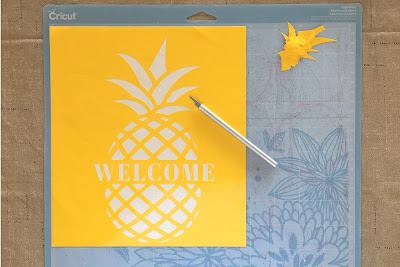
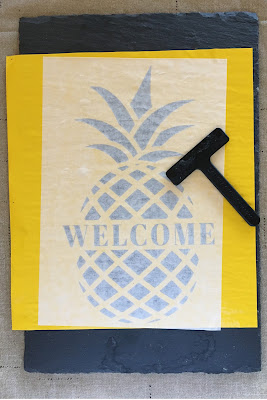
1. Cut the stencil with a digital die cutting machine.  


NOTE: You can cut the stencil across the center, separate the two halves then add a stencil for the word "WELCOME" in the space between. If you have access to Cricut Design Space, you can find the complete stencil design here


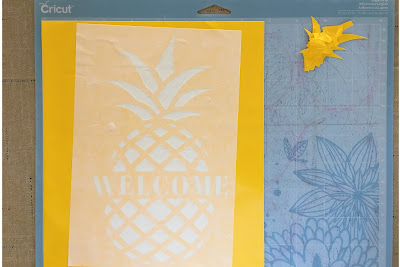
2. Cover the stencil with transfer paper. Press firmly in place then lift the stencil from the mat and remove the backing paper.


3. Position on the slate then use the squeegee to press firmly in place.  Remove the transfer paper.


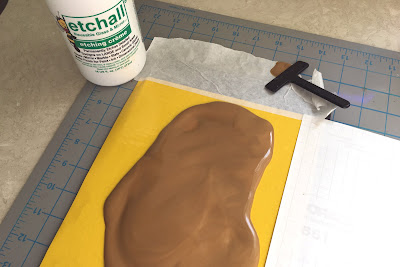
4. Cover the open areas of the stencil with etching crème.  Use pieces of the transfer paper to cover the slate not covered by the stencil to prevent accidental etching. Don't skimp - etchall crème is re-usable.


5.  Leave the crème on the stencil for 15 minutes then scrape as much as possible back into the container.  Rinse away any residue with a soft sponge in a bucket.  Do not do this over a porcelain sink to avoid accidental etching.  


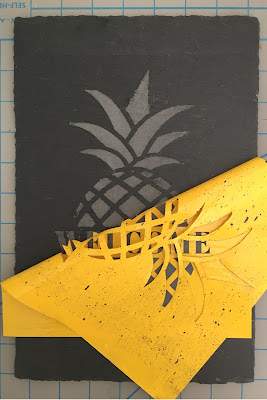
6. Peel away the stencil then rinse the slate once more. Let dry.  Do not dry with a towel, or paper towel to avoid leaving bits of residue on the slate's rough surface.


Enjoy!  Y'all come back now.........

Yours truly,
Julie

KEEP CALM AND CARRY ON CRAFTING!


Monday, July 2, 2018

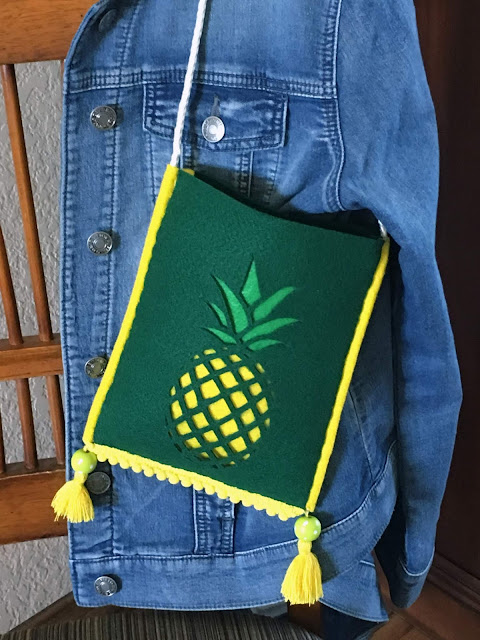
Pineapple "Purse"onality

Everyone needs a trendy purse for the summer!  
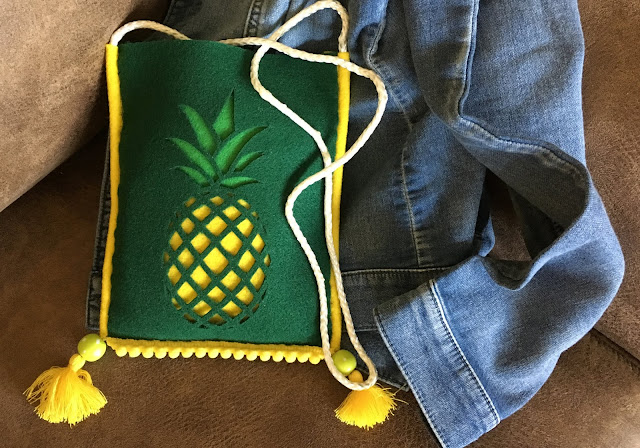

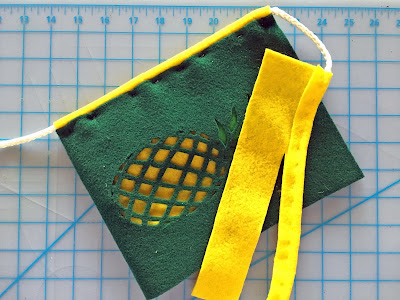
This one was made using felt I received from Kunin®, my Cricut® Maker die cutting machine and the following supplies:
  • Kunin® Premium 12" x 18" Felt - Kelly Green
  • Kunin® Classic 9" x 12" Felt - Yellow and Apple Green
  • Cricut® Maker & Rotary blade
  • Weeding tool
  • Cord (for strap) - 1 yd
  • 2 Tassels - Yellow
  • 2 Beads - 5/8" Green
  • Mini pom-pom trim (Expo Intl) - 7"
  • Felt glue or Lo-temp glue gun
  • Embroidery needle
  • Thread or embroidery floss - yellow and dark green
  • Pins
  • Scissors

1.  Download the pineapple design then upload to Cricut Design Space.


2.  Unlock the design by selecting the lock icon at the bottom left corner, then set the size to 3" x 7".


3.  Continue to the next screen then move design so it is 3" from the left and 1" from the top of the canvas.


4. Select material on the next screen. Browse "all materials",  search felt then select "Felt Acrylic Fabric" in the menu.  On the next screen select "more" under the pressure menu.

5. Place the 12" x 18" piece of Kelly Green premium felt on the pink mat, then cut.


6.  Weed the felt while still on the mat then carefully lift the felt from the mat.  With the design at the center trim the width of the felt to 7".


7.  Trim the width of yellow and green classic felt pieces to 6" then with edges touching, glue them behind the pineapple design - green at the top and yellow at the bottom.  Trim as needed.


8. With the design at the front, fold the bottom part of the felt upward to create the purse.

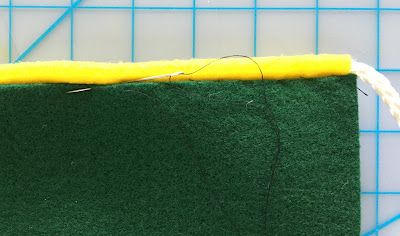
9.  To make the casing for the cord on either side of the purse, place the cord across the 9" width of the yellow felt about 1" from the edge. Fold the edge over, then secure with a simple up and down (running) stitch. Take care not to stitch thru the cord. The cord needs to move freely thru the casing.


10.  Cut away the excess felt from the casing then use this piece to create a second casing around the cord.  Sandwich the casing between the front and back at one side.  


11.   Pin in place then repeat on the other side with the second casing.  Stitch the sides together with the casing in between the front and back at each side of the purse.  Note: You can also glue together.


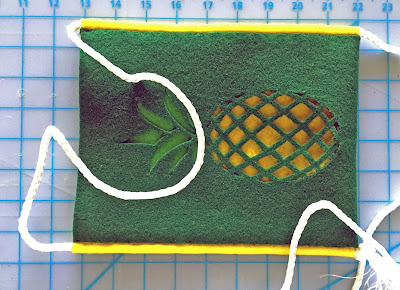
12.  Tie a knot at one end of the cord then pull the cord up thru the casing until the knot rests at the bottom (fold).  Adjust the length of the cord as desired, then cut the opposite end flush with the bottom of the purse.  Stitch the end of the cord to the casing to secure.  Cut the knot off the end of the cord on the other side then stitch.  


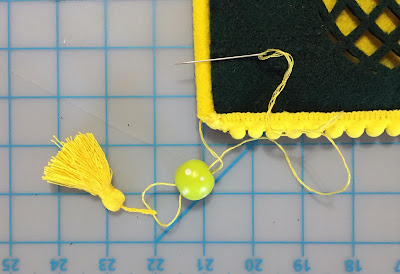
13.  Stitch, or glue the mini pom-pom trim across the bottom of the purse then attach a bead and tassel to each corner as follows:  Secure a length of yellow thread to the corner, thread thru the bead, thru the top of the tassel, then back up thru the bead.  Pull up against the corner, then stitch securely in place.


Add a cell phone, billfold, etc and you're good to go.....  


Enjoy!  Y'all come back now...........

Yours truly,
Julie 😊

 KEEP CALM AND CARRY ON CRAFTING!