Saturday, November 7, 2015

Handmade Holidays


It's that most wonderful time of the year when
we're making lists and checking them twice... 
remembering friends who have been really nice.... 
and racking our brains over the choice of a perfect gift. 

As I said in an earlier post this month, there is nothing more special than a gift you make yourself and it's the perfect way to share your talents with family and friends.  I love decorative painting so this is the time of year when I pull out my brushes and paint and get to work.  Before you start to feel inhibited by the thought of having to use a paint brush, this project is something you can do - I promise.

My sister-in-law loves cherries, so this vintage style milk bottle is for her.


I started with an inexpensive bottle


and supplies from the following sponsors:

Paint, paint markers, paint brushes and daubers from DecoArt,


 Bakers twine from the Twinery and buttons from Buttons Galore & More to embellish.


I also used a few general supplies from around the house - paper towels, toothpick, disposable foam plate, (or wax paper) for a palette, etc.

NOTE:  I love working with glass and DecoArt has a line of glass paint that you can use directly on a glass surface. For this project however, I wanted a "milk" glass look, so I etched the bottle by immersing in etchall® dip'n etch, a reusable glass etching liquid. For readers who don't know how easy and quickly this is to do, instructions are at the end of this post.  Because my bottle is now etched, I can use any of the DecoArt paint lines and chose Americana Multi Surface Satin colors.

STEP 1:  Pour a small puddle of  Red Hot paint onto a disposable plate, or piece of wax paper. Holding the dauber upright, dip the sponge end into the paint then press onto your palette and twirl to spread the paint evenly in the sponge.  Press gently onto the glass to create a circle.  Make 3 sets of 2 circles, evenly spaced around the center of the bottle, then an additional 3 sets around the bottom. 


STEP 2:  Pour a puddle of Dark Scarlet onto your palette then dip about half of the surface of the sponge into the darker color. Pat gently to blend then press on top of the original circle. The darker color will create a subtle shadow on your "cherry", so always make the shadow on the same side of each one.  Use a pencil to draw lines for the stems and make a simple outline for a leaf.


STEP 2: I used a liner brush to paint the stems Coffee Bean, but you can also use a glass paint marker, no problem.  


STEP 3:  Outline the shape of the leaf Apple Green with either a liner brush or marker, then fill in the center. Use white paint to make the highlights on the cherries. It's easy. Dip the end of a small paint brush handle into a puddle of white paint. Press on top of the cherry then drag to create the "swoosh". Practice on your palette first. Let dry overnight then use a dampened cotton swab to remove any visible pencil marks.


FINISH:  I wrapped black & white Bakers' twine around the neck of the bottle then used a lo-temp glue gun from AdTech to attach a cherry button to one side.  I think my sister-in-law will love it!


Thanks to DecoArt, The Twinery, Buttons Galore & More and AdTech for sharing their wonderful products with me.  I wish I could have created projects with supplies from all our amazing sponsors.

You can find even more Handmade Holiday projects by visiting the following blogs.  Be sure to visit all of them so you can enter our amazing giveaway of over $600 in craft supplies donated by our blog hop sponsors. 


Here are instructions for etching the glass bottle.

You will need:
    etchall® dip'n etch, re-usable glass etching liquid
    Empty soda bottle.  Cut the top off as shown, so you will also have a funnel.


Step 1.  Fill the bottle with water (so it doesn't float), then place it in the soda bottle, or other plastic container.  Fill the container with water up to the rim of the bottle. Remove the bottle. The water level in the soda bottle will drop.  Mark the water level then empty the soda bottle. Dry the inside of the soda bottle and outside of the glass bottle thoroughly.


Step 2.  Fill the soda bottle with dip'n etch up to the mark.  Fill the glass bottle with glass pebbles, or something to weight it down then carefully place it in the etching liquid. The liquid will rise, stopping at the rim of the bottle.  Leave for 15 minutes, then remove the bottle and rinse thoroughly. Pour the dip'n etch back into its container using the funnel you created when you cut the soda bottle.


Etched glass has "tooth" which makes it a perfect surface for acrylic paint and rubber stamping.  If you haven't etched glass before, please read the directions carefully. This product produces a REAL and permanent etch so don't use near porcelain sinks, granite or other glazed surfaces.  It will etch them permanently too.  If you're interested in glass etching, you can purchase dip'n etch and more at www.etchall.com Use the code JULIEMC to receive a 10% discount on your purchase. 

Happy holidays!

Yours truly,
Julie :)

KEEP CALM AND CARRY ON HOPPING!

Monday, November 2, 2015

Handmade Gifts

'Tis the season for gift giving and nothing says, "I was thinking about you", more than a gift that you made yourself.  When thinking about what to give, it's important to consider what you do best.  For example, I can do all kinds of things: knit, crochet, sew, embroidery, jewelry, sing - no not really, but my family and friends who really know me, know that I love to paint. I'm not what someone would consider to be an artist, by any stretch of the imagination, but I do love decorative painting with emphasis on the "decorative" part. In fact, my first book, published in the early 90's was Basic Steps to Painting. It was the first of many of my books to feature both decorative and craft painting skills and my goal in each one, was not to show how well I could paint, but to show others that they could paint too.  I was all about teaching techniques, so that others could be successful.

I've had a lot of projects featured in books and magazines over the past 25 years or so and I've kept a few favorites packed away in boxes, until the holiday season rolls around each year.  Here are some glass ornaments I've painted for friends and family over the years


and a wine glass and plate from one of my books, Garden of Glassware, published by Leisure Arts.


This is the base of the wine glass. One of my favorite techniques is to paint on the front and the back of the glass pieces.


If you're wondering why I'm sharing things I've painted in the past, it's to whet your appetite for a project I'll be posting on Saturday, Nov 7th as part of the annual Handmade Holidays Blog Hop. I think you'll enjoy the one I'm working on now - I promise it will be something you can do too!

Y'all come back now.........

Yours truly,
Julie :)

KEEP CALM AND CARRY ON CRAFTING!


Wednesday, October 21, 2015

Little B LLC Blog Hop

Just look at all this crafty goodness that arrived from Little B LLC...  I hardly know where to start. There are punches, dies, flower kits, washi tape in different widths, and lots of dimensional stickers. Each Designer Crafts Connection member received a different assortment - this assortment definitely said "baby"....


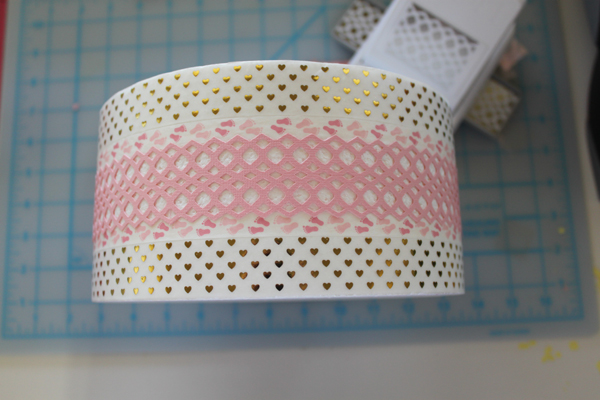
I had some Smoothfoam™ Fake Cake forms from a previous hop, so I decided to make a decorative cake for a baby shower.  I used the stickers, flower petals, washi tape and the border punch.


Step 1: I covered the sides of the cake form.  I used Washi tape with the tiny, gold foil hearts around the top and bottom edge, then added the 1/2" Washi tape with the pink baby feet design.

Step 2: To cover the open area between the washi tape, I punched a border from pink card stock as follows:
        Insert the paper into the punch with the edge of the paper aligned with the edge of the design on the punch lever.  Punch then slide the paper to the side until the punched paper is aligned with the pattern on the base.  Continue sliding the paper to one side and punching until you have a complete strip.  Cut enough strips to go around the cake form then adhere with glue dots.


Step 3.  Punch 3 additional strips of pink border paper.  Cut each strip in half lengthwise to create 6, narrow strips.  Using the pattern as a guide, accordion fold each strip, then run a length of cord through the bottom holes. Bunch the pleats together and tie tightly with the ends of the cord.


Fan the pleated strip into a circle, then glue the ends together with a small dab of tacky glue to create a rosette.  Make 6.  Adhere gold Washi tape on top of the punched strip around the cake form. Always overlap the ends of washi tape and add a little glue for extra security.  Push a quilt pin with a white, pearl head through the center of each rosette to attach to the sides of the cake form.  Add a baby shoe sticker to the area between the rosettes.


Step 4: Adhere the medium sized pink petals from the flower kit around the top of the cake form overlapping as shown.  Note, the petals already have an adhesive at the base of each petal. Cover the area at the center with a small, white doily.  Following instructions on the package, create a small flower from 4, white petal strips, then place (don't glue) on top of the doily.


 Step 6: Add stickers from the baby package as follows:

        a.  Adhere a craft pick to the back of the stork sticker for stability, then push the end of the pick through the center of the white flower and the doily into the center of the cake form. Cut 2, white, petal strips apart then adhere the individual petals around the doily. 

        b.  To make the banner, cut 2 bamboo skewers about 6" in length then wrap with narrow washi tape.  Push the skewers into the top of the cake form, one at each side of the doily then attach white cord across the top. Tie at each end then hold in place with the sock/clothespin sticker.  Hang the letter stickers on the cord and additional stickers at the base of each skewer to finish.


You can see even more inspiration using Little B products by visiting the Designer Crafts Connection blog and hopping thru our webring using the DCC logo in the sidebar,  plus there's a giveaway!  Just look at all this product! Valued at $150, there's enough product for you and a friend.

Enter to win using the Rafflecopter feature below. All you have to do is "like" Little B on Facebook and comment on our blogs. The more you comment the more chances you will have to win.  Open to residents of the US and Canada only.


a Rafflecopter giveaway

Enjoy!  Y'all come back now.........

Yours truly,
Julie :)

                                    KEEP CALM AND CARRY ON CRAFTING! 

Monday, October 19, 2015

Etched Glass Halloween Jug

Chug-a-lug, here's a jug
Of Witches Brew just for you!

Halloween is the perfect time for special tricks and treats - so how about etching a unique glass jug for your favorite spooky libations.


You'll need etchall® re-usable etching crème, etchmask (to cut your stencil), etchmask transfer paper, a Pik tool and a squeegee. IMPORTANT! Double check colored glass!  I purchased an amber colored cider jug to etch my design, not realizing that the color was only a coating on top of clear glass. Coated glass will NOT etch, so I went back to the store and purchased a clear one.


Step 1.  Cut your stencil.  I use an electronic die cutting machine and uploaded my own design. If you like it, you may use it for personal use only.
Step 2. Cut a piece of transfer paper large enough to cover your design, remove the backing paper then cover your stencil with the transfer paper. Lift the stencil and transfer paper from your cutting mat.  Remove the backing sheet from the stencil then transfer onto the side of the jug.  Smooth the stencil securely with the squeegee then remove the transfer sheet.  Use the pik tool to remove the areas from the stencil that you want to etch. The wording at the top of the design was going to fall right over the curve at the top of my jug, so I cut the words from the stencil and etched them separately to prevent wrinkles.


Step 3.  To prevent rolling, place the jug on a towel, bunching it up on each side under the jug, then attach pieces of leftover backing paper around the edges of the stencil folding them upward to create a barrier. You don't want the etching crème to migrate down the curved surface of the jug and etch uncovered areas.  Cover the open areas to be etched with a liberal amount of etching crème and spread gently with the squeegee. You can't use too much of this product - remember it's re-usable. Wait 15 minutes then scrape the crème back into the container.  Rinse away any residue then remove the stencil.  NOTE: You can find videos and tutorials at www.etchall.com for more detailed information on this process, or here on my blog.  Search "etched glass" in my sidebar.

Step 4. Now let's etch the wording.  While the stencil is still on the backing sheet, use the pik tool to remove the letters being careful not to lose the tiny pieces - dot for the "i", etc.  This process is known as weeding.  When you have finished weeding, cover with transfer paper, remove the backing paper from the stencil then position on the jug.  Carefully remove the transfer paper, making sure that the tiny pieces for your stencil are still in place.


Step 5.  Use your fingernail, or small craft stick to smooth away any wrinkles away from around the openings for the letters, otherwise the etching crème will seep under the edges.


Step 6.  Cover the edges with scraps of etchmask, or painter's tape.  I covered the etched design below with a large piece of backing paper, then taped and re-taped everything in place, making sure that only my lettering could be covered with etching crème.


Step 7.  Cover with etching creme then leave for 15 minutes. Scrape the crème back into the container, rinse away the residue, then remove the stencil, tape, etc.  PLEASE remember that this is etching crème - do NOT rinse in a porcelain sink!! It will etch the glaze......

Glass etching is a great way to upcycle inexpensive glass pieces.  You can personalize items for your home, for the holidays, for special occasions and to give as gifts.  It's easy to do, but if you haven't etched glass before, please read all the directions on the container and check the etchall website for more information before starting your projects.  You can also find lots of inspiration on Pinterest.  Remember that etchall® etching crème and dip is RE-USABLE, so it will last a long, long time.  Etchall provides the glass etching product for my etched glass posts, but you can order online directly from their website - use the code JULIEMC for 10% off.  Enjoy!  Y'all come back now........

Yours truly,
Julie :)

KEEP CALM AND CARRY ON CRAFTING!

Thursday, October 1, 2015

Halloween Lantern

It's almost Halloween so I've been working on a special treat and also have a few etching tricks to share.


This is a simple lantern I found on sale at Walmart. The four glass sides are removable, so I created a design for each side.  (Yes, that's a photo I took of the Blood Moon from our back yard in the background. I layered the photo of the lantern on top in Photoshop.)


I also used the following supplies:

etchall® reusable etching crème
etchall® etchmask and transfer paper
Pik Tool (for weeding)
Squeegee tool to spread creme and scrape back into container


I uploaded each design then cut the stencils with my Cricut Explore and etchall® etchmask. 


Cut the designs: I cut the two larger designs, Haunted House and Gnarled Tree from one sheet of etchmask and the Spider Web, Jack O'Lanterns, Crow and Ghosts from a second sheet.  

     TIP: Draw a black border around the design the same size as the surface you want to etch to help with placement.  For example. Each piece of glass measured 4" x 8", so I used this size for my image. I created the border around the edge of the image, then positioned the design inside the border. When the design is cut, the border will also be cut around it.

Transfer the Design:  Cut a 4' x8" piece of etchmask transfer paper, the same size as the design, remove the backing sheet then place the transfer paper on top of the design with edges aligned with the border. Press firmly in place with the squeegee.  Carefully remove the cut stencil; the backing sheet will remain on the cutting mat.  This is an easy technique to use for small designs.


Etching the Design. Place the stencil on the glass.  Press firmly in place with the squeegee.  Remove the transfer paper then use the pik tool to carefully remove the areas of the design to be etched.  Make sure all the edges of the glass are covered - use extra pieces of etchmask or the transfer paper.  Cover the areas to be etched with a liberal amount of etching crème.  Let sit for 15 minutes, then scrape the etching crème back into the container. Rinse thoroughly then remove the stencil and discard. Dry the glass with a soft cloth. 


For more detailed instructions and step outs for this process, refer to this earlier post here or check out the video on the etchall website.

Now here's the "trick" I promised to share.  I wanted the ghosts to appear as if they were flying out of the haunted house, so instead of making them part of the house design, I cut a separate stencil and etched the ghosts on the back of the glass.  As you can see, the bottom part of the ghost overlaps the top of the house since each design is etched on a different side of the glass.


To help with placement of the ghost designs, I removed the stencil from around the design with the transfer paper leaving the ghosts on the backing sheet.  The ghosts can be used on another project later.


With the etched side of the glass facing upward, position the piece of glass on top of the stencil. Turn the glass over, remove the transfer paper, cover the glass around the stencil, then etch the ghosts.


I etched a crow on the back of the glass etched with the gnarled tree in the same way. 


The spider web was etched at the top of the third piece of glass and the Jack O'Lanterns on the fourth. These pieces were then placed on opposite sides of the lantern.
 

I really love designing and etching the designs on to glass. It's a great way to upcycle so many glass pieces.  Etchall is my product of choice for many reasons, the first being that it's re-usable. It has no unpleasant odor and I like the creamy consistency which produces an even etch.  When using this product for the first time, read the directions on the container and check out the etchall website for more tips, techniques and lots of inspiration.  Happy etching...... Y'all come back....

Yours truly,
Julie :)

KEEP CALM AND CARRY ON CRAFTING!

Wednesday, September 23, 2015

Oly*Fun - Halloween Blog Hop

Designer Crafts Connection members are hopping again with product from Fairfield World.  It's a busy time of year, so here's a project you can make in 30 minutes, or less.


You'll need:
12" x 12" pillow form
 Oly*Fun Craft Pack - white
Joy embroidered 3D letters B O O
Joy embroidered 3D number 8
Krylon Glowz (Optional)
Tacky Tape and/or Lo-temp Glue Gun
2 small black buttons


1. Place the pillow at the center of a  20" x 28" piece of Oly*Fun.  Wrap as if you were wrapping a gift.  Glue ends in place at the back.

 
2. Tear 28" x 3" wide strips of Oly-fun. Wrap around the pillow in layers then overlap and glue ends together at the back.  


Note: Oly-fun is hard to tear.  Make a snip with scissors to start, then tear slowly.

3. Spray with glow in the dark spray, if using your pillow as a decorative accent outside.

4. Remove the backing from each letter to expose the adhesive then attach to the pillow. It isn't necessary to iron in place since this project is for decorative purposes only.

5. Place a small, black button behind each opening in the number 8, then place horizontally behind one of the layers for eyes.

Place your finished pillow either indoors, or outdoors and enjoy!

For more fun projects hop thru the DCC webring via the blue logo in each member's sidebar, then check the DCC blog for even more inspiration!

Yours truly,
Julie :)

KEEP CALM AND CARRY ON CRAFTING!

Tuesday, September 8, 2015

Preserving Memories

I've had a camera since I was 11 yrs old and have been taking photos ever since. I also kept them in a photograph album.  This was in the 50's before "scrapbooking" was invented and became a billion dollar business.  If you sense a note of sarcasm, you'd be correct.  I never understood what all the fuss was about when it came to scrapbooking.  I'd been doing it since the 1950's.  Of course it wasn't commercialized back then.  We didn't have any of the supplies and embellishments available to us now, but we could still be pretty creative.  My dad was a scrapbooker too.  I have his album from when he was in the RAF in the 1940's. He journaled and even painted on his pages! Its what we did.....

A few years ago, Fiskars issued a challenge and asked designers to create ways to display our photos using supplies found around the house.  Here are my projects:


Can you identify all the things I used?  Check back in a few days and I'll list everything for you. Let's see how many you found.  Enjoy!  Y'all come back now...............

Yours truly,
Julie :)

KEEP CALM AND CARRY ON CRAFTING!