Showing posts with label Christmas Crafts. Show all posts

Monday, December 5, 2022

Christmas Ornaments Upstyled with Ribbon!

 Just add ribbon to large, shatterproof ornaments and they'll go from boring to beautiful in minutes! 


You'll need:
White Satin and Rhinestone Trim Set*
Satin Ribbon*
Narrow grosgrain ribbon*
4 Pack of large, shatterproof ornaments
Small pieces of Christmas greenery to embellish 
Double sided adhesive tape
Lo-temp glue gun
Scissors
Zip ties - colored
*Ribbon was provided by Gwen Studios

A wide selection of styles and colors of Gwen Studios ribbon can be found online at Walmart.com and Michaels.com so there will be ribbon to match your own personal decorating style. I chose ribbon colors that I had on hand to match red ornaments: Red, green and white satin ribbon and several, narrow grosgrain ribbons.


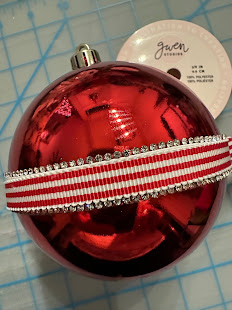
        I like sparkle when I'm decorating for Christmas, so I started by decorating each ornament with rhinestone trim which I added around the center using double sided adhesive tape. You can leave the trim as is, but the narrow, grosgrain ribbon is the perfect width to add over the center, making it easy to customize to match your color scheme.


I like bling however, so I added the narrow rhinestone trim over the center for added sparkle.


I also added a large, green satin bow to the top, made as follows:

        Cut a length* of ribbon. Lay on a flat surface then cross the ends over as shown below. Using your fingers, squish the ribbon together where it crosses then pull the center of the loop down and squish all together. Secure the "center" with a zip tie. (I used green to match the color of the ribbon.) 
*Length will be determined by how large/wide you'd like your ribbon to be.


        Thread a length of narrow ribbon thru the ornament cap to create a hanger. Attach the bow to the front with lo-temp glue, or simply place the end of the zip tie into the ornament cap. You can also add the bow by attaching it to the ornament cap with the zip tie, then thread a length of narrow ribbon thru the cap for a hanger.


        I embellished the center of this ornament with 2 rows of the wide, rhinestone trim.


The glitter ornament already had a lot of sparkle, so I added narrow grosgrain ribbon around the enter of this one and used a length of curly ribbon for a hanger.


Use a glue gun to add additional embellishments if desired then sit back and enjoy!


        I hope this gave you some ideas for quick'n EZ projects for your holiday decorating. Designer Crafts Connection members have also shared their holiday ribbon projects using Gwen Studios ribbon here:


Hope you all have a very happy and blessed Christmas season!

Yours truly,
Julie 💝

KEEP CALM AND CARRY ON CRAFTING!

Thursday, November 18, 2021

Sugar Plum Christmas Garland

 When visions of sugar plums dance in your head….. it’s almost Christmas1 


You will need:
  • Kunin® Classic™ 9” x 12” Craft Cuts – 1 each Lemon Frost, Baby Pink & Minty
  • Kunin® Premium 9” x 12” Craft Cuts – White
  • Joy® Embroidered iron-on letter sheet – White


  • Cricut® Maker™ with Rotary blade (optional. Shapes can also be cut with scissors.)
  • Cricut® Easy Press Mini, or iron
  • Mod Podge® Ultra – Matte
  • Crystal glitter
  • Glue gun & lo-temp glue sticks
  • Mini pom-pom trim – 3 yd spool
  • Bag of small craft pom-poms, or cut from pom-pom trim
  • Tacky glue or large, extra strength glue stick
  • Needle and thread
  • Scissors & wax paper

                    Instructions:

                    1. Using the “shapes” feature in Cricut Design Space, create:
                    ·               4” x 3” triangles - 5
                    ·               ½” circles - 15 
                    ·               ½” x 11” rectangles  - 3


                    2. Cut one set of shapes from each piece of felt - Lemon Frost, Baby Pink and Minty felt as follows: 
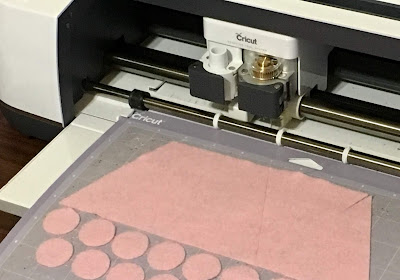
                                Place the felt horizontally across the top of the mat. Insert “Felt” in the “Browse all Materials” tab, then select “Felt Acrylic”.  Use the rotary blade to cut. After cutting is complete, pull the felt surrounding the shape from the mat, then carefully lift the shapes. Increase the size of the triangles to 4 ½” x 3 ½” then cut the shapes from white felt.


                    3. Place the colored triangles onto a piece of wax paper.  Spray with Mod Podge Ultra then sprinkle liberally with glitter. Allow to dry then shake off excess glitter.

                    4. Cover one side of each white felt triangle with glue then, with top edges aligned, center a colored triangle on top.  Press firmly in place.  Tip: Use a craft stick to spread an even layer of tacky glue on the felt, or use a glue stick. Premium felt is stiffer and an extra strength glue stick also works extremely well. *HAPPY (or MERRY) CHRISTMAS requires 14 pennants.


                    5. Cut the colored felt strips into ½” squares. For 14 pennants you will need 28 squares of each color. Alternating colors, loosely thread the squares, two of each color and one pom-pom onto a length of thread.  Stitch the end of the thread to the tip of the pennant to secure then glue a felt circle over the end at the back. Use a different color felt than the felt on the pennant for contrast.


                    6. Remove the letters needed for the garland from the embroidered letter sheet. Alternating pennant colors, iron one letter to each pennant. Position letters right side up, cover with a pressing cloth then iron in place. 


                    7. Place the pennants in order on a flat surface then use lo-temp glue to adhere the mini pom-pom trim across the top of all the pennants.  Leave a small space between each one and make sure to add extra trim at each end to hang your garland!


                     ENJOY AND HAVE YOURSELVES A VERY MERRY CHRISTMAS!

                    Yours truly,
                    Julie 💝

                    KEEP CALM AND CARRY ON CRAFTING!

                    Friday, December 8, 2017

                    Sprinkle Cupcakes for the Christmas Tree

                    “While visions of sugar plums” and cupcakes “danced in their heads”…

                    Here's a quick'n EZ project for last minute decorations. A box or basket of these would also make a sweet hostess gift!
                    You'll need:

                    1. Cover the top half of the ball with tacky glue, then add the white sprinkles. 
                    2. Glue the ball into a petit four cupcake paper. Use a low-temp glue gun to adhere a red pony bead at the top. 
                    3. Attach the jump ring to the pony bead then add a decorative ornament hanger. 
                    Now sit back and enjoy those cupcakes!  Each one has zero calories so you can make as many as you like!

                    Enjoy!  Y'all come back now.........

                    Yours truly,
                    Julie :)

                    KEEP CALM AND CARRY ON CRAFTING

                    Tuesday, November 21, 2017

                    Let's Celebrate Christmas!

                    I really LOVE Christmas - the decorations, the music, the food; even the somewhat corny Christmas movies.  The sad part is, we tend to get so wrapped up (pun intended) in Christmas shopping and all the excitement that surrounds us at every turn, it's easy to forget the reason for the season.  So, this simple project is a little reminder of why we celebrate....  Enjoy!


                    This is what you'll need:
                    etchall® etching crème
                    etchmask stencil and transfer paper
                    Squeegee
                    Craft Pik, or craft knife


                    5" x 7" Frame
                    Rinea™ Paper foil - blue
                    Tinsel
                    Double sided tape
                    Electronic shape cutting machine (I use a Cricut® Maker, or Cricut Explore)


                    1.   Drag the images from the "Images for Personal Use" page onto your desktop, then upload to your digital software.  NOTE:  There are two separate images.  One image will be etched on the front of the glass and the other on the back.  Each image should be about 4" x 6" to fit within the edge of the frame.

                    https://drive.google.com/file/d/1d0wYp6_pfhD8G3dyZFKYkFeJW5FY5r2m/view?usp=sharing


                    2.  Cut the designs from a sheet of etchmask.  While your stencil designs are cutting,  remove the glass from the frame then wash and dry thoroughly.

                    3.  Using the craft pik tool, weed* each design while still on the cutting mat.  *Weed means remove all the elements of the design to create the stencil for etching.

                    4.  Cover each stencil design with a piece of transfer paper then remove one stencil from the mat.  Remove the waxy backing paper from the etchmask to expose the adhesive, then center the stencil on the glass.


                    5.  Press firmly in place with the squeegee then carefully remove the transfer paper.  Check underneath the transfer paper as you lift to make sure all the etchmask is still in place on the glass.  Cover any areas of the glass not covered by the stencil with extra pieces of etchmask and/or transfer paper to prevent accidental etching on those areas.


                    6.  Cover the open areas of the stencil liberally with etching crème then leave for 15 mins.  You can find more comprehensive illustrations of this process in an earlier post here: https://juliemcguffee.blogspot.com/2016/12/winter-wonderland-etched-float-frame.html 


                    7.  After 15 minutes, use the squeegee to scrape the etching crème back into its container.  Remember! etchall crème and etchall dip are REUSABLE.  Rinse away any remaining residue then remove the stencil. Use a scraper if necessary.  Dry, then buff the glass with a soft cloth to reveal the etched design.  NOTE: Do not rinse in a porcelain sink!  The etching crème will etch the glazed surface. Use a plastic bucket, or other large plastic container instead.

                    8.  Etch the design on the other side of the glass in the same manner, positioning the stencil so the crib on the other side is centered between the two figures. The trunks of the palm trees can also be used as a guide.  I used a Cricut BrightPad™ (a large light box) to aid in placement.


                    9.  Cut a 5" x 7" piece of blue foil then adhere to the front of the frame backing.  Glue white tinsel to the inside edge of the frame for a "frosty" look if desired.  Place the etched glass in the frame then secure the frame back behind the glass to finish.


                    The frame also looks wonderful without the backing…  This frame has a square edge so it will stand on a table, or shelf without the backing.


                    Christmas decorating is just beginning, so y'all come back for more holiday projects!

                    Yours truly,
                    Julie :)

                    KEEP CALM AND CARRY ON CRAFTING!
                    Tuesday, December 6, 2016

                    Mini Pallet Tree

                    'Tis the season to bring Joy, Love and Peace into your home...


                    You'll need the following to make this mini pallet tree:

                     
                    • Joy iron-on letter sheet 
                    • Joy iron-on star
                    • 7 Paint sticks, or 1" x 9" wood slats
                    • Acrylic paint - Green and white
                    • Small hand saw, or utility knife
                    • 1" Sponge brush
                    • Round sponge pouncer
                    • Glitter glue
                    • Tacky glue
                    • String for hanger
                    1. Lay the paint sticks together as shown. Use a ruler to mark the center of the stick.  (Do not include the part of the stick with the cut outs.)  Make a mark 1/2" either side of the center mark.


                    2. Draw a line from each outside corner to the mark on either side of the center.  Cut each stick along the lines.


                    3. Paint the sticks with green paint thinned with water. Let dry then swipe across with the pouncer dipped in white. Let dry then re-paint with glitter glue.


                    4. Add the letters, overlapping two sticks, while the glitter glue is still wet, then glue each pair across the center stick.  Let dry then glue a loop of twine to the back of the center stick and the star to the front.


                    Happy Holidays everyone!  Y'all come back now........

                    Yours truly,
                    Julie :)

                    KEEP CALM AND CARRY ON CRAFTING!

                    Monday, December 5, 2016

                    Etched Mirror Vase

                    When the flowers have wilted in your floral arrangement it's okay to throw them away, but not the container! My mother-in-law often receives flowers and always saves the containers for me.  Look what I did with this one!

                     
                    This a square glass vase, mirrored on the inside - perfect for etching!  Here's what I used and how I did it:

                    • etchall® etching crème                              
                    • etchall® etchmask and transfer paper
                    • Squeegee
                    • Pik tool
                    1. Cut 4, 2"  snowflake designs from etchmask.  I used an electronic die cutting machine.


                    2.  Trim the etchmask to 1" wider than the snowflake design. Use the pik tool to carefully weed the design while it is still on the mat. Always pull from the center of an area to be removed, not the edge. It is easier to remove one section at a time.  Pull up one part of the snowflake then cut away with scissors.


                    3.  Once the designs have been exposed thru weeding, cover the etchmask with a strip of transfer paper.  Use the squeegee to press the transfer paper firmly in place. (Don't forget to peel the backing sheet from the transfer paper first.)


                    4.  Remove the stencil from the mat then cut apart.  Working with one piece at a time, gently peel the backing away from the back of the etchmask then press firmly onto one side of the glass vase.  Gently remove the transfer paper.


                    5.  Cover any exposed area around the etchmask with pieces of the transfer paper, or masking tape.


                    6.  Pour a liberal amount of etching creme onto the stencil.  Without touching the glass surface, spread the creme until there is a thick layer over the snowflake design.  Use the squeegee, or the back of a plastic spoon.  Let sit for 15 minutes then scrape the creme back into the bottle.  Don't forget etchall creme and dip are reusable!  Rinse away any residue then remove the stencil.  Buff dry with a soft cloth.  NOTE: Do not rinse over a porcelain sink!  etching products will also etch the sink - this is a permanent etch!  If you haven't used etching products before, please read the directions on the container. You can also find more information at www.etchall.com


                    7.  Repeat this process to etch the design on each side of the vase.


                    I love the look of etched mirrored glass.  The mirror reflects the etched design, giving it a 3-D effect and also reflects any color that's around it.  Fill with potpourri, nuts, candy, fresh or silk flowers then give as a gift, or use to decorate your own home for the holidays!  


                    Enjoy!  Y'all come back now......

                    Yours truly,
                    Julie :)

                    KEEP CALM AND CARRY ON CRAFTING!