Tuesday, November 23, 2021

Christmas Towel Ring

 Not just for embroidery, a wooden hoop is great for wreaths and even a guest towel ring for the bathroom!


You will need:
  • Joy® Embroidered letter sheets - Gold, Silver and Classic white monograms
  • 8" Embroidery Hoop
  • Tulip Color Shot - Gold, or other gold paint
  • Drop cloth* or small piece of tightly woven fabric - 12" x 12"
  • 1/4" Gold RicRac trim 
  • Craft iron
  • Glue gun & Lo-temp glue sticks
  • Small paint brush
  • Christmas greenery
  • Small Zip ties
  • Assorted ribbon & trims
  • *a drop cloth can be purchased at the hardware store for a few dollars, providing fabric for multiple banners and much more. 
  

Instructions:
1. Remove the small monogram letters from the sheet. Spray gold color shot onto a piece of wax paper, or paper plate, then using a small paint brush paint each letter - hold letters in place with a toothpick.  Let dry.


2. Cut a piece of drop cloth fabric about 12" x 12".  Iron to remove wrinkles. Separate the embroidery hoop then place the inner hoop on top of the fabric. Carefully remove gold and silver letters from the backing sheet then position on the drop cloth using the hoop as a guide for placement. Remove the hoop, cover the letters with a pressing cloth then iron in place.


3. Fold the top and bottom edges under, iron then position on top of the inner hoop. Place trim along the top and bottom edges. 


4. Push the outer hoop over the top then tighten the screw to hold in place. Trim excess fabric from the back of the hoop.


5.  Glue rope trim around the outside edge of the hoop. Measure then cut the length needed. Glue one end in place at the top, pull the rope tightly around the hoop then glue the opposite end in place.


6.  Attach greenery to the top of the hoop with small zip ties and gold ribbon loops/bow at the center.


7.  Add additional embellishments if desired. Small snowflake and adhesive jewels shown here.


8.  Use as is, or hang in the bathroom with a small towel for your guests!


May your holiday season be filled with love and joy!

Yours truly,
Julie 💝

KEEP CALM AND CARRY ON CRAFTING!

Thursday, November 18, 2021

Sugar Plum Christmas Garland

 When visions of sugar plums dance in your head….. it’s almost Christmas1 


You will need:
  • Kunin® Classic™ 9” x 12” Craft Cuts – 1 each Lemon Frost, Baby Pink & Minty
  • Kunin® Premium 9” x 12” Craft Cuts – White
  • Joy® Embroidered iron-on letter sheet – White


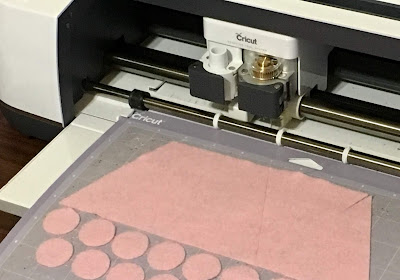
  • Cricut® Maker™ with Rotary blade (optional. Shapes can also be cut with scissors.)
  • Cricut® Easy Press Mini, or iron
  • Mod Podge® Ultra – Matte
  • Crystal glitter
  • Glue gun & lo-temp glue sticks
  • Mini pom-pom trim – 3 yd spool
  • Bag of small craft pom-poms, or cut from pom-pom trim
  • Tacky glue or large, extra strength glue stick
  • Needle and thread
  • Scissors & wax paper

                    Instructions:

                    1. Using the “shapes” feature in Cricut Design Space, create:
                    ·               4” x 3” triangles - 5
                    ·               ½” circles - 15 
                    ·               ½” x 11” rectangles  - 3


                    2. Cut one set of shapes from each piece of felt - Lemon Frost, Baby Pink and Minty felt as follows: 
                                Place the felt horizontally across the top of the mat. Insert “Felt” in the “Browse all Materials” tab, then select “Felt Acrylic”.  Use the rotary blade to cut. After cutting is complete, pull the felt surrounding the shape from the mat, then carefully lift the shapes. Increase the size of the triangles to 4 ½” x 3 ½” then cut the shapes from white felt.


                    3. Place the colored triangles onto a piece of wax paper.  Spray with Mod Podge Ultra then sprinkle liberally with glitter. Allow to dry then shake off excess glitter.

                    4. Cover one side of each white felt triangle with glue then, with top edges aligned, center a colored triangle on top.  Press firmly in place.  Tip: Use a craft stick to spread an even layer of tacky glue on the felt, or use a glue stick. Premium felt is stiffer and an extra strength glue stick also works extremely well. *HAPPY (or MERRY) CHRISTMAS requires 14 pennants.


                    5. Cut the colored felt strips into ½” squares. For 14 pennants you will need 28 squares of each color. Alternating colors, loosely thread the squares, two of each color and one pom-pom onto a length of thread.  Stitch the end of the thread to the tip of the pennant to secure then glue a felt circle over the end at the back. Use a different color felt than the felt on the pennant for contrast.


                    6. Remove the letters needed for the garland from the embroidered letter sheet. Alternating pennant colors, iron one letter to each pennant. Position letters right side up, cover with a pressing cloth then iron in place. 


                    7. Place the pennants in order on a flat surface then use lo-temp glue to adhere the mini pom-pom trim across the top of all the pennants.  Leave a small space between each one and make sure to add extra trim at each end to hang your garland!


                     ENJOY AND HAVE YOURSELVES A VERY MERRY CHRISTMAS!

                    Yours truly,
                    Julie 💝

                    KEEP CALM AND CARRY ON CRAFTING!

                    Sunday, November 14, 2021

                    Fall Splendor

                     Bring the colors of Autumn into your home with a quick'n EZ floral arrangement...


                    You will need:
                    • Joy® embroidered, iron-on letter sheet - GOLD
                    • Fall leaves and silk flower piks
                    • Mason jar (or other glass container)
                    • Glitter tulle - brown
                    • 2" Burlap ribbon - rust
                    • Zip tie
                    • Raffia
                    • Iron
                    • Cardboard roll (from paper towel)
                        

                    Instructions:

                    1. Cut a length of burlap ribbon long enough to wrap around the mason jar with an additional 1" to overlap.  Remove each embroidered letter from the sheet then position at the center of the burlap.
                    Suggestions:  F A I T H   H O P E   P E A C E   L O V E   J O Y   F A L L  and more! 


                    2. Following manufacturer's directions on the back of the package, cover with a cloth and press the letters in place.


                    3.  Place the cardboard tube in the jar, trim to correct height, then push the tulle into the jar between the tube and the glass. Option: You can also fill the area between the tube and the glass with yellow, or colored corn.


                    4.  Wrap raffia around the top of the jar and the burlap around the glass.  Mark where the burlap band overlaps, remove then secure with a staple at the top and bottom.  Slide the band back onto the jar.


                     5. Bundle a variety of silk flowers and leaves together. Secure with the zip tie then place inside the cardboard roll with the bottom layer of leaves resting on the rim.  Trim the stems if needed.


                    Enjoy!

                    Yours truly,
                    Julie 💝

                    KEEP CALM AND CARRY ON CRAFTING!

                    Thursday, November 11, 2021

                    Holiday Felt!

                               This is the month when I start to get serious about holiday projects: home dec, ornaments, gift giving, etc. so it seemed like a good time to join the Designer Crafts Connection blog hop with Kunin felt. I've created a number of projects for Kunin over the years, so I have a good supply of felt to work with.   

                            Felt is one of those materials that has been around for-ev-er........   I remember making an embroidery project and a doll with it in elementary school in the 50's, but felt is all grown up now, just like me, and definitely not just for elementary school projects any more.......   

                            Felt is so versatile, it wasn't easy to decide what to make, so I actually ended up with a technique with sticky felt that I think you'll really like,  and  two projects - a pillow wrap and a bottle gift bag!


                    You'll Need:
                    • Kunin® Classic Felt - 1 yd Tomato Red
                    • Kunin® Presto Felt - Kelly Green
                    • Gwen Studios Taffy Stripe ribbon - 3/8" & 5/8" Red 
                    • Gwen Studios double faced satin ribbon - 3/8" Green
                    • Gwen Studios double faced satin ribbon - 3/8" White
                    • Gwen Studios Snap tool
                    • Joy® Embroidered iron-on letter sheet - Green
                    • 1/2" pom pom - 4 red 
                    • Novelty yarn - white fur
                    • Jingle bells - 5 silver
                    • Glue gun and fabric glue sticks
                    • 1/4" double sided tacky craft tape
                    • Scissors
                    • Embroidery needle 
                    • Thin yarn, or embroidery floss - white

                    First things First...   let's make the Gnome embellishments!

                    1. Create a pattern from card stock as follows: 
                            Fold a 2 1/2" x 6" piece of card stock in half lengthwise. Starting about 1" from the bottom edge, cut a straight line from the outside edges across to the top of the fold. Starting at the same point, cut a curve to the bottom of the folded edge. Unfold the paper and it should look something like this.  It doesn't have to be perfect.
                     

                    2.  Trace the pattern onto the back of the Presto (sticky back) felt.  You'll need one for each gnome, so I cut 5. 

                    3.  Starting at the top, carefully peel the paper away from the felt about an inch. The adhesive is very aggressive so it's best to do this a little at a time.  Starting 1/2" from the top, layer the white satin and narrow striped ribbon across the sticky side of the felt, alternating the ribbons and peeling the paper back as you go. Let the ribbon pieces extend over each side. Place the last piece of ribbon about 1" from the bottom. Leave the backing paper in place.


                    4.  Flip over then trim the excess ribbon even with the edge of the felt. Flip back then remove the rest of the backing paper.  Starting at one edge below the ribbon, adhere the furry yarn along the bottom curve. Add a second piece of yarn above the first and press the red pom pom at the center for the nose. Press the bell onto the top of the hat.


                    NOTE: I used the narrow striped and white ribbons for 4 gnomes for the pillow wrap and the gift bag. The finished gnome shown below will be used as an ornament to hang on a tree, wreath, or garland, or over the neck of a bottle of "holiday cheer".  I alternated the wider striped and green ribbon for this one and added a loop of yarn at the top for a hanger, a red berry for his nose instead of a pom pom and I added a snowflake I'd cut from white Presto felt at the back. Presto (sticky) felt also comes in other colors, but it didn't matter what color I used for gnomes, since the tacky side is covered and they'll be glued to the pillow wrap and gift bag.  


                    Bottle Gift Bag

                            Nothing says "Happy Holidays"  better than a gift of wine, especially when placed in such an adorable gift bag!  


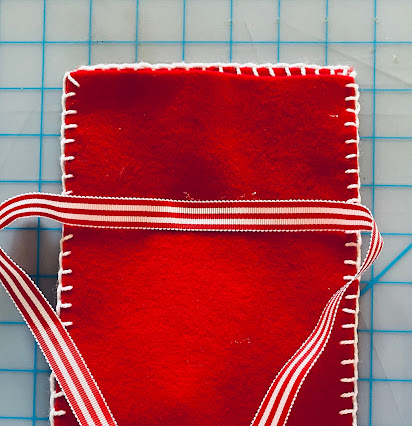
                    1.  Cut a 30" x 6" piece of red felt then fold in half.  Starting at the folded edge, stitch the sides together using blanket stitch.  Stitch all the way up to the top, along one side at the top then stitch both sides together down the opposite side to create the bag.


                    2.  Glue an 30" piece of the the 5/8" striped ribbon to the center of the back of the bag, about 3" from the top edge. NOTE: The back edge is not stitched.


                    3.  Glue one of the gnomes to the from of the bag about 3" from the bottom edge, then place the iron-on letters above. Use a pressing cloth to iron the letters in place on top of the felt.


                    Pillow Wrap

                            Pillows are a great way to add a decorative accent in the home for different seasons and holidays throughout the year. There are so many fun pillows to choose from for every occasion, but finding a place to store the ones that are "out of season" can become a challenge, so I purchased a couple of plain pillows and create custom pillow wraps....  easy to make and store!


                    1.  Cut a piece of felt 14" x 28".  Pillows however, come in a variety of sizes, so you'll need to cut a strip of felt long enough to go around your pillow, plus 2" or 3" to overlap.  The width will also vary. I cut mine so there is about 4"-5" showing on either side.  

                    2.  I used tacky tape to adhere the 5/8" striped ribbon along the edges of the felt wrap, plus 2" to overlap at one end.  Fold this end under to create a 1" tab to attach a snap - one at each side.  Attach the other snap piece about 1" from edge of the opposite end.  When the wrap is placed around the pillow, the snaps will hold it in place.  NOTE:  Yes, you can also use safety pins 😀


                    3.  Glue the remaining 3 gnomes to the from of the wrap.  I also GLUED the letters  J O Y,  one letter to each hat, but this is optional.  I DID NOT IRON THEM ON.


                            I hope you'll enjoy making your holiday projects as much as I enjoyed making them!  You can find more felt projects by checking out the links on the DCC blog.....  and, of course the Kunin Felt blog.


                    Happy Holidays everyone!

                    Yours truly,
                    Julie 💝

                    KEEP CALM AND CARRY ON CRAFTING!
                    ..........  


                    Tuesday, November 2, 2021

                    Dress It Up with Ribbon!

                            When life throws you a busy ball, but you still want to be creative, look for a simple surface at your local Walmart, or Dollar Tree and dress it up with ribbon! There are so many styles of holiday ribbons to choose from, it will make all your holiday decorating quick'n EZ.....  

                            I was really excited to receive samples of die cut ribbon from Gwen Studios. I love all the little  intricate shapes and they can be used on pretty much anything!  Here are just a couple of ideas:

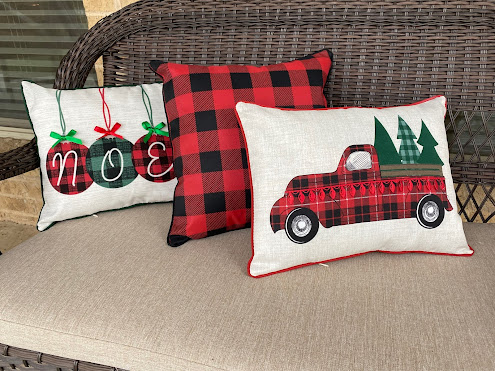
                            I had some inexpensive outdoor pillows that I picked up earlier from the outdoor garden center at Walmart.  All I needed now was a little fabric glue to give them some added sparkle.  What a difference it made!

                    I added small, green and red bows to the top of each ornament and a length of the red Holiday Lights die cut ribbon along the side of the truck. See how much more festive the pillows look now!

                            I also love to shop at the Dollar Tree and had purchased a simple wood shape for my Harvest decorating.  The back was plain, so with a quick coat of white paint, embroidered letters, a simple embellishment, and the gold reindeer holiday die cut ribbon on top of the red ribbon, I had a simple holiday flip for Christmas in no time at all!  


                            You can find more inspiration on the Designer Crafts Connection blog.  What will you make? The  possibilities are endless! 

                    Yours truly,

                    Julie 💝

                    KEEP CALM AND CARRY ON CRAFTING!