Thursday, November 17, 2016

Paper Foil Blog Hop

A couple of months ago I received an email from a designer who had decided to import paper foil from Germany. She loved the product and wanted to make it available for US crafters.  She asked if I could take at look at it and perhaps make some projects.....  Are you kidding me!!! Look at what I've been keeping in my stash since 1967!!!


You may, or may not remember, but I lived in Germany from 1967 - 1976 and since I've always been a crafter, this was a product I was totally familiar with.  Needless to say I was all in and Diane sent me samples of Rinea® to play with.


I received two types of foil papers - double sided metallic and slightly thinner embossed foil. Both types are double sided in a variety of colors.  The colored metallic foil is either silver on the back, or gold. There is also a metallic with gold on both sides, or silver. The embossed foil is the same color on both sides.  They are so easy to work with. I used dies, embossing folders, a paper crimper, punches, and stencils for embossing.  It cut easily and scored with a paper trimmer and was easy to cut with decorative edge scissors. Here are a few of the projects I came up with.


The foil adhered easily with an extra strength glue stick, even to glass. It was so much fun! So much so, that I added an extra project for the hop, my "Accordion Star". 


You will need:
  • 10 Pieces of 8.5" x 4" metallic foil
  • 1/4" double stick tape
  • Extra strength glue stick
  • Tacky glue
  • Small piece of thin poster board
  • Embossing tool (for scoring)
  • Paper trimmer
  • 1" Circle punch
  • 1/8" hole punch
  • Optional: 1" round acrylic crystal jewel for center
1. Starting 1/4" from the short edge of the foil, use the embossing tool to score a line. Measuring from this line, score 3 additional lines 1" apart.  Turn the piece of foil around and repeat from the opposite edge.


2.  The 1/4" line is to show where the ends will overlap. Fold the strip back on the next line, then up then back. Repeat at the opposite side. Overlap the ends then glue in place. Fold and glue each strip in the same manner.


3.  Flatten the folded pieces then adhere a 4" strip of double stick tape down the center of each one and a 2" piece across the bottom.


4.  Remove the backing from the pieces of tape. Working with 3 or 4 pieces at a time stack together, then starting about 1 1/2" from the bottom, cut diagonally across to the center point at the top.


5.  Stack more pieces together, then stack the cut pieces on top. Using the cut stack as a guide, cut the next stack. Repeat until all the pieces have been stacked together and cut.  Press the stack gently along the center and across the bottom to make sure they are firmly stuck together.


 6.  Carefully pull the point of the top piece and the stack will start to unfold. Gently pull the top piece around to form a circle and adhere to the bottom piece.


7.  Punch 2, 1" circles from poster board,  cover the back liberally with thick, tacky glue, then place over the center.  While the glue is still wet you can separate the star points evenly around the center.  Let dry then repeat on the other side.  You can cover the circle with a different color of paper foil, or add a large acrylic crystal sticker as shown on my sample.

8.  Use a hand punch to punch a small hole at the tip of one of the star points for a hanger.


I loved working with paper foil again, it brought back many happy memories of the years I spent in Germany.  

Don't forget to check the other designers projects then comment here, or on their blogs and on the Designer Crafts Connection blog for a chance to win your own packages of paper foil. Use the Rafflecopter widget at the bottom of the DCC post.  Good luck!

You can find more information about Rinea® Paper Foil and a gallery of ideas on their website. Enjoy! Y'all come back now............

Yours truly,
Julie :)  

KEEP CALM AND CARRY ON CRAFTING!

Wednesday, November 2, 2016

Fall Scarecrow

There once was a scarecrow name "Boo"
Made from bunches of straw, clothes and glue
He went trick-a-treating
And now he is waiting
To share all his candy with you.....


Supplies:
JOY iron-on letters
Small Scarecrow (on a pole)
Pumpkin (craft pumpkin used here)
Lo-temp glue gun
Knife to cut pumpkin (adult use only)

1.  Peel the backing away from each letter then adhere to the front of your scarecrow.


2.  Using a zig zag pattern cut the top from the pumpkin then cut a hole at the center of the bottom half of the pumpkin to accommodate the pole.


3.  Place the scarecrow in the bottom half of the pumpkin, pushing the pole thru the hole.  Glue the top of the pumpkin to the scarecrow's head.  Fill the pumpkin bowl with candy.

My outdoor table has a hole at the center, so I placed the pumpkin on the table with the pole thru the hole.  When using indoors, remove the pole, or cut a hole around the stem of a second pumpkin and place "Boo" on top......   Not just for Halloween, we use our pumpkin candy bowl up through Thanksgiving.


Enjoy!  Y'all come back now......

Yours truly,
Julie :)

KEEP CALM AND CARRY ON CRAFTING!

Saturday, August 13, 2016

Pillow Pals

My grandchildren enjoy spending the night at Nana and Papa's house - I think it's because we always make pancakes for breakfast.... LOL   The boys have their own room and enjoy seeing their names on the decorative bed pillows.  Now I need to add one for Connor!


The pillows are easy to personalize. I started with two ready-made pillows then used individual letters to spell out their names and a sheet of smaller letters for numbers for the dates. You will also need some fabric glue.


1. Peel off the waxy paper from the back of each letter to reveal the adhesive. 


2. Position the letters on the pillow then press into place. For positioning, it's easier to place the center letter first, then work out to the left then the right.


3. Gently peel the numbers from the small monogram sheet then glue to the pillow.


4. There weren't enough "0"s for the date on the second pillow, so I substituted the letter "O" instead. I think it looks great!  Now I need to add one more pillow for Connor!


JOY embroidered letters are available in a variety of sizes, fonts and colors.  There are also letters that can be dyed any color with fabric dye, markers, paint and sprays - all available at your favorite craft store!  Enjoy!   Y'all come back now.......

Yours truly,
Julie :)

KEEP CALM AND CARRY ON CRAFTING!

Sunday, August 7, 2016

Personalize the Baby's Room

Since the baby shower, I've been working on projects for my grandson, Connor's nursery.  I started with the letter "C" written in shades of blue buttons, glued to a painted gray canvas with white stars. Then I spelled his name in small wood letters on painted blocks. Really cute, but we needed more!


My daughter-in-law found a galvanized metal container at a local yard sale; perfect for all kinds of baby knick-knacks. I wanted to add his name to that too, but wood letters don't work too well on a curved surface, so it's Joy to the rescue!

Supplies are minimal - all I needed was Joy embroidered letters and Krylon® Spray Paint.


Step 1 - Paint the bucket. I turned it upside down over a stack of large paint cans then lightly sprayed the outside with 2-3 coats of blue. The paint dried really quickly, so it only took about 10 minutes, then I sprayed the inside.


Step 2 - Peel the waxy paper backing off of each letter to expose the adhesive then place around the rim of the container.


TIP:  For names with an even number of letters, mark the center of the container's rim then adhere the last letters of the name to the right, then, working backwards, add the first letters to the left.  If your name has an odd number of letters, place the middle letter over the center mark first.


These letters worked perfectly on the curved rim!  Seriously, how cute is this?
Plus it's quick'n EZPZ!


You can find JOY iron-on embroidered letters in lots of colors, sizes and fonts at your local craft store.  Y'all come back now.....   Enjoy!

Yours truly,
Julie :)

KEEP CALM AND CARRY ON CRAFTING!

Thursday, July 21, 2016

Baby Shower!

My son and his wife are expecting their second child (our 4th grandchild) in a few days, so my daughter and I recently hosted a baby shower for them.

As you can imagine, I love to decorate, but over the past few years I've learned to make it easy...  I still add my own special touches and make quite a few of the decorations, but I don't mind admitting that I also take advantage of the fun, color coordinated, special occasion decorations available at Party City.   Check out the photos below and I'll share how it all came together:

Window:


The white tissue decorations - honeycomb balls, garland and fans in the window were part of a white multi pack for $9.99. The metallic twirly thingies hanging from the chandelier over the table came in a $4.99 pack which also included the "It's a Baby Boy" signs. I glued one of these to the center of one fan and clipped another to the top of the the 3-tier cupcake stand on the table. The romper embellishment at the center of the other fan was also part of the pack. I punched some stars from silver and blue glitter card stock and glued those to the center of the smaller fans.
  
 
Fireplace:

We purchased a helium tank and a package of white pearl balloons which we inflated about 3 hours before guests were due to arrive. I attached a length of thin, silvery yarn to each balloon then glued raindrop shapes, back to back onto the yarn to make it look like a rain shower - the balloons were the clouds.  I cut the shapes from silver glitter card stock on my Cricut Explore. 


To make the banner I created nine, 4" rosettes from blue card stock.  They're easy to make. Score a 12x12 piece of card stock edge to edge at 1/2" intervals, then cut into 2" wide strips across the folds. Accordion fold each strip, then glue 2 strips together, end to end. Glue the opposite ends together to form a cylinder. Crimp the folds together at the top then push down to form the rosette.  Glue a circle of card stock over the center to hold the folds flat - this will be the back.  I punched a white, scalloped circle for the front, layered a smaller, silver scalloped circle on top, then added letters.  You can either cut your own, or use alphabet stickers. (You can see instructions on how to make a rosette here:  http://juliemcguffee.blogspot.com/2013/06/celebrate-red-white-blue.html if needed.)  I punched a small hole at either side of a top fold, then threaded the rosettes onto thin sparkly yarn to hang.  You can make three, 4" rosettes from one 12x12 sheet.
  

Sofa Table:


You can find complete instructions for the lighted "It's a Boy" poster on my blog here: http://juliemcguffee.blogspot.com/search/label/Chibitronics   I also made the diaper cake.  I started by gluing an empty snack container to the center of a silver, cardboard cake round.  The newborn diapers are about  5" wide, so the container should be at least 4" taller than that for a 2-layer cake. The one I used was about 5" in diameter and 9" tall.  Layer the diapers sideways, one on top of the other around the outside of the container. I hold each one of them in place with a small piece of tape.  They can be rolled if you like, but I leave mine flat.  I keep layering until the bottom layer is about 12" across then I add a second layer of diapers. I covered the outside of each layer with holographic white deco mesh and light blue satin ribbon, embellished with decorative washi tape.  I pushed tufts of white tulle into the top of the diapers, and added a bunting at the top using blue and white striped straws with sticker letters strung between using tiny clothespins to hold them in place.  The container was then filled with baby socks, a small hat, pacifiers, etc. then topped with a small, plush bear holding a Babies R Us gift card.


Table:


A celebration isn't complete unless there's food and drink.  We had blue punch with little yellow ducks floating on the top, plus dips, fruit salad, mini quiche, my DIL's favorite - a Sprinkles cake and mini sprinkle cupcakes on the decorated, 3-tier Deflecto dessert stand, topped with color coordinated, blue wrapped Hershey kisses.  The outer edge of each tier was decorated simply with the same washi tape used on the diaper cake.  I topped the stand with the clip and added a dimensional stork sticker to the front.  


My granddaughter completed the decorations with this cute giraffe which we anchored outside the front door. 


Baby and wedding showers, birthday parties and more are occasions just waiting to be decorated - a great way to showcase your creativity.  And remember, you don't have to do it all.  Take advantage of inexpensive decorations and add your own personal touches.  You'll save time, stress and $$$$$$$... how fun is that!  Enjoy!  Y'all come back now..........

Yours truly,
Julie :)

KEEP CALM AND CARRY ON CRAFTING!

Friday, June 3, 2016

Father's Day!

It's Father's day in 2 weeks, so here's a gift you can make in jiffy that dad will definitely enjoy!


You will need the following supplies:
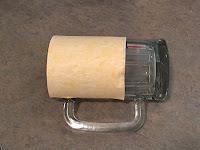
        Glass mug (I got this for about $2 at Walmart)
        etchall® glass etching crème (link in sidebar)
        etchall® etchmask & transfer paper
        Swivel knife and pik tool
        Pattern or stencil

1.  Create the design using fonts installed on your computer, or die cutting machine software (best option) then cut. You can also create the pattern in Word, print then trace onto the etchmask.  Cut with a swivel blade.


NOTE:  Measure the area where you want to etch the design then center the design on your stencil. This will help when it's time to position the stencil on the side of the mug. For example, if you want the design to be 1" below the rim of the glass and 2" to the right of the handle, make sure there is a 1" border above the design and 2" from the left edge on your stencil. 

2.  Cut a piece of transfer paper the same size as your stencil. Remove the backing paper then cover the top of the stencil with the transfer paper.  Remove the backing from the yellow etchmask.


 3.  With the top edge of the stencil aligned with the rim of the glass mug, place the stencil on the side of the glass. Press firmly in place.  Carefully remove the transfer paper.


4.  Use a pik tool, or point of a craft knife to carefully remove the letters to reveal the design to be etched. Use the transfer paper and pieces of backing paper to cover all other areas of the glass to prevent accidental etching.


5.  Balance the mug so it doesn't roll then cover the open areas in the stencil with a liberal amount of etching crème.  I use a plastic spoon to to add the cream.  NOTE: This product is reusable so you can't use too much! 


6.  After 15 minutes, scrape the etching crème back into its container then rinse the mug under warm, running water. DO NOT do this over a porcelain sink!  This is an etching product and it will etch your sink too!  Be aware of your surroundings when working with etching product.  Do not work on a granite, quartz or slate countertop, or they may be etched too!  I work on a laminate countertop.

7.  Remove the stencil then polish with a soft cloth to reveal your perfectly etched design.  Fill with dad's favorite drink and enjoy!  Cheers y'all!

Yours truly,
Julie :)

KEEP CALM AND CARRY ON CRAFTING!

Wednesday, May 18, 2016

Long Live the Creative Heart

I wrote this article for the CHA designer group a few months ago and thought you might enjoy it too!

  "I was asked to review two books recently, Craft Your Stash, by Lisa Fulmer and Craft Fail, by Heather Mann.  I’m still giggling at the last one – it is SO real.

What I love most about Lisa’s book is that it reminds us what crafting is all about.  We are so used to walking into a craft store and being completely overwhelmed with so many products to spoon feed creativity, we’ve forgotten how to be creative with what we already have.  Toilet rolls for example!  There are so many things we can make with these small, cardboard rolls.  We always saved them to take to pre-school and Kindergarten teachers to use in their classrooms. Now we’re encouraged to buy them in the craft store!!  Seriously………….

I was a child in the 50’s and loved to make things!  There weren’t any craft stores back then, so it was all about using our imagination and things we had on hand that could be re-cycled.  We didn’t have a television either, so crafting was all part of making our own fun.  Seems like children back then were inherently creative – and crafty, in all definitions of the word…  There were a few books to help us along, but nothing like the books that are available today, and Pinterest was unheard of.

Heather’s book is a laugh on every page, but it’s also a great reminder to designers and teachers about what to expect from the average crafter who reads our instructions in books and online and follows directions in the workshops we teach.  I’ll never forget the lady in one of my classes a few years ago.  She had 2 identical wood hearts for her project.  One needed to be painted pink and the other white.  She was quite serious when she asked me, which heart should she paint white.

As an educator in the industry, I always found it important to emphasize that there is no right way or wrong way to be creative.  It’s important to follow directions when using certain products, but it’s always fun to experiment and to do what you want to do – think outside the box and off the project page.  Some students will want to follow instructions to the letter and are mortified when their project doesn’t look like the teacher’s so, once the class starts, I put my project away so they can’t compare.  I especially love the rebels, who add their own personal touches; students like me who only want to learn techniques.  I remember how horrified the teacher was when I took my first decorative painting class and saw the paint colors I’d purchased. We had a list of traditional colors to use for the project she was teaching, but they didn’t match my kitchen, so I’d chosen colors that did!

Creativity is a very personal thing.  As designers in the industry our goal is to encourage each person in whatever they want to do – who knows, you may inspire a future Picasso!"

Yours truly,
Julie :)

KEEP CALM AND CARRY ON CRAFTING!

Monday, April 25, 2016

China Plate - Mother's Day Gift

It's Mother's Day in less than 2 weeks, so when the grandchildren spent the weekend, we decided to make something special for mommie.

I had a white lacey china plate, which was already pretty, but I thought it would look nice with a monogram in the center. It was also a good way to show the grandchildren that etching creme can be used for china too!  It's SO simple and SO pretty and only took us about an hour to make.

1. The first step is to either use a stencil you already have, or create a custom monogram with a digital die cutting machine.  I have a Cricut Explore and I used a font that was in my font folder on the computer.  We cut the letter "M" from etchall® etchmask (adhesive vinyl) inside a 4" square.  TIP: Centering it in a square is helpful when centering it on the plate.

2. Cover the stencil with a 4" square of etchmask transfer paper, then remove the backing from the etchmask. Place the stencil at the center of the plate then carefully remove the transfer paper. 


3. Use a pik tool, or point of a craft knife to carefully remove the letter "M".  Do not push the tool in from the cut edge, since this may damage the outline. Always find a thick spot to insert the tip and lift from there.  Make sure the etchmask is firmly on the plate.  Smooth away any bubbles that may be around the opening, otherwise the etching creme may creep under the edge. 


4. We then covered the area to be etched with etchall® etching crème. I usually pour the creme onto a different area of my project, then spread it across the open area to be etched with a squeegee, but it was easier to let the children use a plastic spoon to dip creme from the container and place it onto the opening. They used the back of the spoon to gently spread it over the area to be etched. They were very careful not to get any creme on any other areas of the plate.  It would have been better to cover the rest of the plate completely with pieces of leftover etchmask and/or transfer paper, but we were excited to get to the etching part and we forgot.... silly Nana.  Luckily it worked out just fine.


NOTE: In case you are wondering why I am comfortable letting my grandchildren use this glass etching product, etchall® etching products are ACMI certified, which means they have gone through rigorous testing and meet strict requirements. A copy of the certification symbols are in my sidebar on the left. This product has no noxious, or harmful fumes and, as with other craft materials and tools, they are supervised.

5. We let the creme sit for 15 minutes, then used the spoon to carefully scoop it up and put it back in the container. I have to admit that I did this part, since they had gone on to other things at this point. Waiting is not a strong suit with 7 and 10 year olds..... even if it is only for 15 minutes.

6. I washed away the remaining residue, but left the stencil in place for the next step. Rub'n Buff is a great product for adding a gilded look to etched areas; you only need a little.  Following directions, massage the tube a little before opening to mix the product. It has a tendency to separate like some paints.  Squeeze a small amount onto a soft cloth, or paper towel then, using a circular motion, gently rub the cream over the etched letter.  (A stencil brush works well too.) There are a few colors to choose from, but I used gold for this project.


7. After coloring, remove the stencil to reveal your gilded monogram.


8. I'm sure mommie will love this plate, especially since the children helped to make it!

If you read my blog regularly, you'll have seen other etched projects here and know how much I love etching all kinds of surfaces. Etchall has kindly provided me with product to work with, so I can share my ideas with you.  Enjoy!  Y'all come back now...

Yours truly,
Julie :)

KEEP CALM AND CARRY ON CRAFTING!