Sunday, June 30, 2013

Celebrate - Red, White & Blue!

This month's theme for the Designer Crafts Connection blog hop is Celebrations!  

If you're a Facebook friend, you probably already know that my internet has been down since last Wednesday, so I've been visiting my daughter to use her internet to try and keep up as best I can.  It's scary how dependent we've become on our Smart phones and the internet.  OMG - if it doesn't get fixed tomorrow, I won't be able to pay bills!!!

Not wanting to overstay my welcome, you'll have to excuse me if I re-post a project from 2011.  It's a cute table decoration the grand kids and I made and will no doubt be making again this week.  Not only is this project a great accent piece or a table decoration, but the technique is all about creating a "Rosette".  Once you get the hang of this you can make rosettes in any color for any occasion.  Add to banners, garlands, gift bags and more!


1.  Cut two, 2" wide strips of blue paper and two, 1 1/2" strips of red & white striped paper.  These can be either 11" long, or 12" depending on what size sheet of paper you have.

2.  Score each strip at 1/2" intervals.  TIP:  I cut one, 4" wide strip, scored it then cut it into two, 2" strips.  This way I only have to score one strip, instead of two......

3.  Accordion fold each strip.


4.  Overlap the ends then glue the two blue strips together, then overlap and glue the opposite ends to create a circle. 


5.  Create a red & white circle in the same manner.


6.  Folded circles have a tendency to pop up, making it a little tricky to hold the centers together to make the rosette.  You can either enlist the help of a crafty friend to squish and hold the folds down while you glue a punched circle over the center, or drum roll please


You can hold them together by placing inside a circle cookie cutter!! I bought a set of four just for making rosettes...... EZ PZ...... 


7.  Punch a circle from cardstock then glue it over the center at the front of the red & white rosette.  Let dry.


 8.  Glue a circle to the back of the blue rosette.  When both are completely dry (depending on what type of glue you use) set the smaller rosette on top of the larger one.  With a little coaxing, the folds should nestle into the folds of the blue rosette quite nicely.


9.  I glued my rosette to the end of a dowel which I had glued inside a wooden spool base.  I decorated the spool with strips of paper, then added a star to the front and tails to the rosette.  I also covered a second red circle with glitter then glued it over the front of the rosette.  Gotta have some sparkle for the 4th!

Rosettes are fun embellishments and now you know how easy they are to make.  Enjoy!  Y'all come back now.............

Please Note:  If you would like to know more about becoming a CHA Designer, or just more about the Arts & Crafts Industry please feel free to join the #CHADesigners, for a twitter chat this Wednesday evening at 6pm PST https://www.facebook.com/events/369074133214273/
I sign in thru tweetchat.com.  Enter  #CHADesigners to join the conversation.

Yours truly,
Julie :)

KEEP CALM AND CARRY ON CRAFTING!

Wednesday, June 19, 2013

Etchall Giveaway!

Have you seen all the etched projects designed by Designer Crafts Connection (DCC) members?  Are YOU itching to etch?  Then here's a newsflash for you:  Hop thru the DCC webring and comment on the projects.  Each time you comment you'll be entered to win the same etchall® kit that the designers worked with - the more you comment, the more chances you'll have to win.  (US & Canada addresses only.)


You have until midnight, June 23rd!  

Happy hopping!

Yours truly,
Julie :)

KEEP CALM AND CARRY ON CRAFTING!


Friday, June 14, 2013

Glass Etching

How do you add a little class to your glass?  Etch it of course!  I decided to turn this vase (as in "bars") into a vase (as in "base") using etchall® etching creme from B&B Products.  Look how classy this looks and it was SO easy.


What a great gift for a friend, or to brighten up your own home.  This is how easy it is:

    1.  Wash the piece of glass then dry thoroughly.
    2.  Cover any area you do not want to etch.  I created diagonal stripes on this vase using regular scotch brand tape. 


    3.  Make sure the edges of the tape are pressed down firmly onto the glass surface.
    4.  Cover one side of the glass with the etching creme.  Use the black spatula/squeegee to spread the etching creme thickly over one side of the glass (and yes, it will drip over the edge onto the next side).  Remember that this is etching creme and it will ETCH any shiny surface, so protect any surface you are working on.


    5.  After 15-20 mins, use the spatula to spread the creme over onto the next side.  Repeat for each side.   (This is a square vase so I did one side at a time.)  When you are finished, scrape the creme back into the bottle!!

ETCHALL® ETCHING CREME 
(AND DIP) IS RE-USABLE!!!!

Please note:  I used etching creme for this project, but it would have been much easier (and faster) to use etchall® Dip'n etch.

    6.  After all the creme has been scraped back into the bottle, rinse away the residue under running water then remove the tape.  Dry thoroughly then admire your glass with class.

There is so much to tell you about etchall® it would take me all night, so hop thru each of the DCC member blogs by clicking on the blue logo found in each blog sidebar to see how other designers used the product.  You can also find a wealth of information at www.etchall.com including "how to" videos and lots of inspiration.

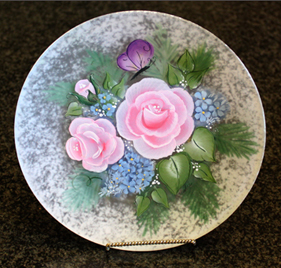
As a decorative painter, I first used etchall® to etch glass plates! I loved painting on glass (it required no prep) and an etched piece of glass had "tooth" so the paint would stick.  Here are a couple of pieces that were featured in my book, Garden of Glassware published by Leisure Arts.


You can also personalize glass by etching.  On these two projects for example, I cut my own custom stencils using etchall Etchmask for the name "jennifer" and the title "Snow" using a digital die cutting machine and used them to etch this small glass bezel and a plain glass frame.  These samples are, of course, just scratching the surface (or should I say etching)..... imagine the possibilities!  Are YOU itching to etch yet? 


The "Snow" frame was featured on Scrapbook Memories, series 1300, so you can find the instructions @ http://www.scrapbooksouptv.com/projects/1300/1310/1310-5.htm

I know you're dying to start hopping, so hop to it and enjoy!  Y'all come back now.....

Yours truly,
Julie :)


KEEP CALM AND CARRY ON CRAFTING!
 

Sunday, June 2, 2013

Happiness is.......

Happiness is....  now that's a leading question..... but it's also the theme for this month's Designer Crafts Connection First Monday post.  Basically it's to make us think about what we do, creatively, that makes us happy.

Well I love pretty much everything.  Decorative painting is probably #1 on my list, but I also like to sew, knit, crochet and papercraft.......  I've always loved making things and I had hobbies that I loved too.  I used to collect wild flowers and bird watch, but photography was, and still is my favourite.  There's something magical about being able to take a photo of a specific moment in time, then being able to go back years later and relive that moment.  I love looking back thru all the photographs I've taken over the years.   Believe me, there's a ton of them.

I received my first camera when I was 11 years old.  It was a Brownie reflex 620.  As a teen I bought myself a 35mm, Olympus Pen EE half frame camera; half frame because that meant I could get twice as many photos/slides from one roll of film.  The Yorkshire in me loved that.  I also used a Polaroid camera occasionally, but quickly found the color didn't last too long.  It was fun to have instant photos to share though.  I still have my old cameras - they must be antiques by this time.

In the late 70's I graduated to a 35mm Konika, then in the mid 90's a Canon Rebel.  Still love that camera.  The first digital camera I owned was an Epson, followed by a Fuji Fine Pix,  a pocket Canon and now I have a Canon Rebel T1i, or something like that...... 

If you follow the Scrapbook Memories/Scrapbook Soup TV series, you'll know that I love my digital camera.  The advantages are that I can take an unlimited number of photos, but the disadvantages are that I can take an unlimited number of photos.  Since I can edit just about anything in Photoshop,  I have a real problem hitting the "delete" button. 

Way too many of my photos are now on my computer, but I do love to be creative with some of them.  I took this photo of a Cardinal a couple of years ago and loved the color and contrast.


I thought it would look great printed on canvas and decided to use it in project I designed for Elmer's on a recent episode of Scrapbook Soup.  This is how it turned out.  You can see the TV segment here: http://youtu.be/vOKv38W36e8
  

Photos printed onto ink jet printable canvas are perfect for all kinds of wall art.  This was a photo of the ocean which I cropped to size then added words in different layers.  I also changed the color of the type and made some layers more transparent.  


Printing on ink jet transparency is another favourite of mine.  I've used photos to make transparent overlays and cropped a wide range of flower photos to make greeting cards.   There are so many surfaces to print on now, which makes being creative with your photos so much fun, especially if you're familiar with photo editing software.  Imagine being able to change your photos to black & white, or sepia then print them out onto wood paper, or fabric so you can put photos on a T-Shirt, or quilt.  A few years ago I made my daughter a maternity T-Shirt.  The slogan on the shirt read "Body by Baby" and it circled around a photo of her sonogram.  It was featured on Scrapbook Memories about 5 years ago, so you can find the instructions here: http://www.scrapbookmemoriestv.com/projects/1300/1307/1307-5.htm

I derive a lot of happiness from the photos I've taken over the last 50+ years, especially now that I can be so creative with them.  Try some of these tips for yourself and enjoy!  Y'all come back now.....

Yours truly,
Julie :)

KEEP CALM AND CARRY ON CRAFTING!