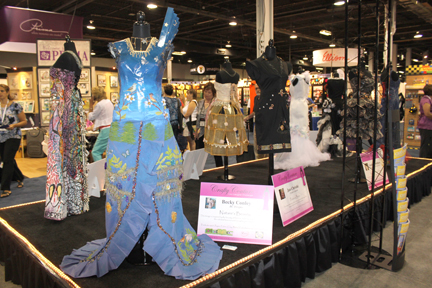
This is post #3, so you might want to read #1 and #2 first. These are additional photos from the show:
Amy Tangerine is a new line from American Crafts.
Jewels shows how creative you can be with wire!
The Brilliant Bowmaker is an impressive product from Little Pink Ladybug.
This cool line of templates makes bow making easy for everyone.
Canvas and burlap are wonderful surfaces for all kinds of crafts and home dec.
Clear rubber stamps made with the Clear Stamp Maker can also be used for making jewelry. Check out these samples:
Craftwork Cards is a British company. "Candi" is a line of packaged domed paper dots in lots of colors. They are wonderful for embellishing.
This happy place is Doodlebugs. Whether it's the summer or winter show, this booth is always bright and cheerful. Check out their new card program in a rainbow of colors.
Graphic 45's booth was, as usual, absolutely amazing with imaginative projects....
These Kanzashi fabric flowers were at the Clover Booth.
They make amazing embellishments for apparel and even jewelry.
There's more to come, so y'all come back now.......
Back home in Texas! It's still hot here, but nowhere near as humid as Chicago. Even so, I think I'll spend the day inside to write more about CHA.
It was an exciting show for Julie FF (Fei-Fan Balzer). Not only did she wow the crowd with her samples of online videos at the Monday seminar, she also débuted her new line of templates for TheCrafters Workshop
and, to top it all, drum roll please, Julie's dress won "Fan Favorite" at the Crafty Couture, CHA Designer Challenge.
It was a fun challenge. CHA Designers were asked to design and create a mixed media dress. They could work independently, or in teams. Here are the other entries.
CHA judges picked 5 additional winners. Among them were Theresa Cifali, Jen Goode, Marisa Pawelka, Carla Schauer, Suzann Wilson and Candice Windham, all wonderful CHA design Divas. The dress below was not part of the challenge, but a winner nonetheless.
CHA trade shows are where buyers go to see and buy products for their stores. The summer shows are always smaller, but still a showcase for the manufacturers who exhibit there. There are demonstrations to show how to create with the products being offered and the most wonderfully creative displays of projects for inspiration. It's "Eye Candy" for every type of crafter. This display of an upside down Christmas tree from the Die Cuts With a View booth greeted us at the entrance to the show floor.
and just round the corner the sign that says it all (except that it should say "We" instead of "I").
Here are a few more displays:
There are lots more photos, so y'all come back now!
I've been in Chicago since Sunday for the Craft & Hobby show. I was presenting a seminar and moderating a panel discussion on Monday so we arrived Sunday afternoon. The seminar was all about how to design then present projects for TV. I've been doing this for 13 years now, so there was lots of information to share. Kathie Stull, owner of KS Productions which produces 9 craft shows for PBS shared lots of information from the "other side of the camera" and Julie Fei-Fan Balzer, the new co-host on Scrapbook Soup, wowd the crowd with info on developing online videos. We had a great crowd and lots of positive feedback.
It's now Thursday evening and I'm worn out...... 3 days of walking and talking is fun, but, strangely enough, it's also hard work. I've been going to the trade shows since 1991 and I really enjoy it, mainly because I get to catch up with friends. Here I am with Sue and Julie from Leeds in England. I grew up in Bradford which is near Leeds so it was lovely to meet friends from "home"; I got a true "Brit fix" and some Rowntrees Fruit Pastels - yummy sweets, from a new friend from Glasgow.
I also saw Kathy Cano-Murillo, the Crafty Chica who was decorating a tuffet,
Colleen and Marianne were in the Copic booth demoing markers and promoting a copy of their new book!!!! Would have loved to have seen it, but someone "borrowed" it before I got there and forgot to return it..... hopefully it will be in the stores soon :)
Claudine Hellmuth demoing in the Ranger booth
and, of course, Tim Holtz.
I found Wendy Sanger, from Tattered Angels demoing in the Walnut Hollow booth. The mists are a great way to add color to wood.
It's almost midnight and hard to keep awake, but here's a few of the over 200 photos that I took of project displays, etc. It takes quite a while to crop and reduce the file size of each photo before posting, so I'll have to wait till the weekend to add more.
Every once in a while I come across a product that I just love! As you know, or maybe not, I design Elmer's projects for the TV shows. Project design is always about showcasing the manufacturer's product and for Elmer's it's all about adhesives. They have a lot of new paper crafting adhesives to choose from, but my favorite technique was the one I developed to feature the new 3-D Pop Up Glue Spots. I used the glue spots to make ribbon roses.
Here's how you do it:
1. Tie a knot at the end of a 12" (about) piece of 3/8" ribbon. Push the knot into the center of a glue dot.
2. Fold the ribbon down as shown then push the edge into the glue dot close to the knot.
3. Continue folding and pushing the edge into the glue dot all the way around the knot to create the center.
4. Continue folding and pushing the edge of the ribbon into the outer edge of the dot.
5. When you have gone all around the outer edge, cut the ribbon.
6. Tuck the end of the ribbon under the edge of the glue dot. Voilà, you now have a ribbon rose. Store your ribbon roses on the backing sheet until you are ready to embellish your project!
Hope you enjoyed this tutorial. Don't forget you can use this same technique to make bigger roses. Just push additional glue dots around a center dot - you can do this on kitchen wax paper and make them as big as you want. Y'all come back now............
Sponsored by Michaels Stores,Sakura, Elmer's, Spellbinders,Westcott, X-Acto and other industry manufacturers, the new series, Scrapbook Soup will start to air on PBS stations across the US on July 21st. Please check with your local stations for days and times. Each station chooses when to air the show. We do not control which stations pick it up, but there is a station finder on the show website @ www.scrapbookmemoriestv.com. Enter your zipcode and it will tell you if its airing. If not, it allows you to email your station to request it! (Scrapbook Soup will be aired by stations which aired Scrapbook Memories. BYU may choose to air the new show later in the year. Here's a sneak peek at one of the Michaels' segments with Jo Pearson, Host of Where Creativity Happens! Enjoy!
When organizing your photos, a lot will depend on how many photos you have and how long you've been taking them. To start with, here's a clip from a short interview with Ellen Marden on the set of Scrapbook Memories a couple of years ago.
Ellen had asked us how we organize our photos. Beth replied that she uploaded her photos once per month to Shutterfly. For better or for worse I have to admit that I download mine to iPhoto and there they stay. Deleting any of them is a real challenge, so I have literally thousands.
Digital cameras allow us to take so many photographs without a second thought because we no longer have to worry about the cost of taking rolls of film for printing and developing. We do however, have to remember to print the ones we could not bear to lose otherwise, as I said on the video, our children and grandchildren will grow up to be jpegs.
So, back to the question, how do we organize our photos? I've had a camera since I was 11 years old, so I've literally been taking photos for over 50 years. I love photographs and remember as a child spending hours looking through the photographs my dad took during the time he spent in the Air Sea Rescue branch of the RAF in the early 1940s.
This is a page from the album he made. I just love how he painted his own background and he even added where and when the photographs were taken. My dad was a scrapbooker and he didn't even know it. Scrapbook albums are a great way way to organize and preserve our special memories, but, let's be honest, if we scrapbooked even half of all the photographs we'd taken, we'd need not only a separate room, but a whole house to store the albums.
Okay, I'm back to organization. Whether you have tons of actual photos (and slides) dating back to the early 1900's, or just digital photos because you're a lot younger than I am, you have to organize them and, if they are digital you have to print out the most important ones. Part of organizing is also recording the names of the people who are in the photos and where and when they were taken.
Here's what I would suggest:
1. Organize your printed photos by decade up through 1970 or 1990 depending on how many you have. I'm thinking digital photography didn't become really popular until 2000. My photos are all in separate photo (shoe) boxes labeled 1920, 1930, 1940, etc and I have a separate box for the photos (and the negatives) that my mother took.
2. Digital photographs can be broken down by year and month, if you take a lot, and also by event. For example, my albums in iPhoto would be labeled something like this:
Jan-Jun 2010,
July-Dec 2010
and events would be:
David & Chelsea's Wedding,
Dylan's Graduation,
Jovie's 3rd Birthday,
Disneyworld - 2011, etc.
3. Each time you upload photos, delete as many as you can, otherwise you will end up with so many, it will be an overwhelming task to sort through them all and you'll keep putting it off.
4. I also have an album of "Photos to Print". I drag all the "special" photos in here to be edited and printed then copied to an external drive and a CD. After backing them up I delete them from the "Photos to Print" album. I'm not sure about other programs, but any photo that goes into this album is a copy and the original is still maintained in iPhoto. I transfer photos onto Gold CD's, which are less likely to become damaged than regular CDs.
5. Reality Check: Computers crash, CD's can be easily damaged and who knows whether or not you'll even be able access information that's on a CD in ten years or so. Flash drives have become very affordable and they're also a great place to store photos, but again, who knows what we'll be using 10 years from now. So, printing your photos either individually to store in either a box or album, or in a photo book is still the best solution. I do have lots of scrapbook pages, but I keep them in page protectors in a 3-Ring album. I call them my "eye candy for the soul". The rest will be in digital albums - McGuffee Family Yearbooks (or Annuals). I make my own using Photoshop and the Unibind system - I just LOVE their coffee table book type paper which can be printed on both sides.
Well, I think I've waxed eloquent (hopefully) for long enough. Hope you found this helpful. Please feel free to ask questions in the comments section and I'll help if I can. Y'all come back now......