Monday, October 31, 2011

Scoreboard Die - Caddy Project

A friend and fellow CHA Designer, Eileen Hull designs Scoreboard dies for Sizzix®.  These are specialty dies for cutting mat board.  Many of us are supporting her with a blog hop during October and November by creating projects to feature her 12 new designs which were introduced this summer.  I received the Caddy die to work with, plus Image Stamps designed by Lara Scott and Baker's Twine from The Twinery.

        This is my project:


And these are the supplies I received plus a package of mat board.  I also used DecoArt® Acrylic paint, a sea sponge and a box of Elmer's Craftbond pop-up medium Glue Spots, gros grain ribbon, twill tape and Elmer's Tacky glue:


This is how it all came together:

1.  Dip a dampened sea sponge into a little DecoArt® Americana pink paint. 


2.  Sponge the paint all over 2 pieces of white mat board.  Sponge lightly at first; you can always add more color.


3.  Stamp the design onto the painted mat board.  I used black ink.  Note:  Make sure the paint is dry.


4.  With the patterned side facing down (on the die), cut two sets of shapes using the die.
5.  Assemble two caddys, then glue the backs together.  (I used Elmer's Tacky glue.)
6.  Referring to the photograph, glue 5/8" wide, black gros grain ribbon around the top of the caddy about 1/4" from the edge then glue off white, or blush pink cotton twill tape on top of the black.
7.  Create twine buttons as follows:
    •  Tie an overhand knot at the end of a 12" piece of twine.  
    •  Push the knot into the center of a glue spot.

  
    •  Wind the twine around the center knot, pushing into the glue spot as you wind.
 

    •  When the spot is covered, cut the twine and push the end under the spot.  
    •  Glue the twine buttons onto the twill border.

This little caddy is perfect for holding business cards, index cards and anything else you need to keep handy.  Gluing two together, gives me twice the space to store my stuff!  If you'd like to see more great projects created with this die, just hop forward via the Sizzix Fresh Vintage logo on the left. 

Wouldn't you just love to have this die, some bakers' twine and two of Lara's stamps?  Well here's a giveaway for you:


Here's how you enter to win: 
You will also see the blue, Designer Crafts Connection logo on the left, just above the Sizzix Fresh Vintage logo.  Many of the DCC designers are also participating in Eileen's blog hop.  Hop forward through these DCC designer blogs and see how many you can find with the Sizzix Fresh Vintage logo on their blog.  If you complete the  DCC hop, you will end up back here.  Tell me how many are participating in my comments section and I will pick a winner from those of you who found them all.  I will announce the winner on November 8th, so check back - you'll also find I'm having another Giveaway on November 8th - a Sizzix Sidekick with 2 sets of Sizzlets alphabets - Script and Girls are Weird!!   Y'all come back now............

Yours truly,
Julie :) 
Monday, October 24, 2011

Halloween Votives 2

I'd forgotten how much fun it was to wield a sponge brush dipped in Mod Podge.  I've already given away the votives I made with napkins, so this time I thought I'd use orange tissue paper.  I cut strips long enough to go around the glass votive and about 2.25" wide - a little less than the height of the glass.   I adhered one strip around the glass with Mod Podge same as the instructions on my post below.  While the découpaged tissue paper was drying, I printed Halloween silhouette images, sized to fit, onto an adhesive ink jet transparency sheet then adhered the image on top of the tissue paper.  This is what they look like:


They hardly take any time at all to make and at $7.99 for a box of 16 at Michaels they're pretty inexpensive - even less if you have a 40% off coupon!  Try some for yourself.  You can find Halloween silhouette images to use on my images page right here.  They are copyrighted, but you're welcome to use them for personal use.    Had another idea - decorate mason jars (same as the votives); wrap wire around the neck and make a handle. Display hanging from tree branches, or on your patio.  Y'all come back now.....

Yours truly,
Julie :) 

Saturday, October 22, 2011

Halloween Votives

Votive candles are a quick and easy way to add a warm glow to any room in the house, 365 days of the year.  Check out these Halloween votives - made in literally minutes.


All you need are a few inexpensive glass votives, decorative napkins, a sponge brush and Mod Podge.


Napkins come in 2 or 3 layers.  Cut away the part of the napkin design you want to use then separate the layers.  You will only use the layer with the pattern on it.  (2 ply napkins from the grocery store are less delicate, than the more expensive ones.)


Using the sponge brush, cover the outside of the glass votive with an even layer of Mod Podge then lay the print on top.  Pat gently in place then cover with a coat of Mod Podge.  Let dry then add tea lights or LED flickering candles.


With so many napkin designs to choose from throughout the year, you'll have no shortage of decorative votive candles for any occasion.  Enjoy!  Y'all come back now........

Yours truly,
Julie :)

Tuesday, October 11, 2011

Halloween

Ghoulies and ghosties and long-legged beasties and things that go bump in the night!  It's almost Halloween which reminds of a rap I wrote for my children to perform in elementary school about 25 years ago.  This is a very condensed version; no idea what I did with the original, but that maybe a good thing:

It's Halloween and party time, so I thought I'd write a little rhyme
About pumpkins and witches, ghoulies and ghosts, all dressed up like 
(TV hosts?)
On All Hallows eve we go trick or treat, looking for lots of goodies to eat,
We score lots of chocolate and candy too, that sticks to our teeth like Elmer's glue.
Jack O'Lantern faces that glow in the night, are scary ol' pumpkins with their insides alight.
Bats and witches fly all about, so take it from me, you'd better watch out!
  
It was really cool back then at the height of rap music popularity....... 

Fall is also one of the busiest decorating and crafting seasons of the year.  Over a period of only 8 weeks, we decorate for Halloween, Thanksgiving, Kwanza, Hanukah and Christmas, depending on personal family traditions.  But let's start with a couple of EZPZ Halloween cards.


You can find the images on my Images for Personal Use page.  Just drag into a Word document then print them out onto colored card stock together with titles.  Cut to size for cards and invitations, or use to decorate treat bags.  You can also print onto inkjet transparency sheets then cut to size and place inside a glass vase or candy jar filled with candy corn, marshmallows, or even an LED votive.  Print on vellum then adhere to the outside of a glass jar then place a tea light inside for a cool, spooky effect.  Inkjet transparencies can also be hung in a window, or from a light fixture. So many ideas, so little time.......   Y'all come back now!

Yours truly,
Julie :)

Monday, October 3, 2011

First Monday - Westcott® Challenge

It's unbelievable how quickly the months are flying by.  Can you believe it's October already!  Our theme for First Monday projects should probably be Halloween, since it's just around the corner, but come back in a week or so, I'm sure we'll have some great project ideas to offer.

This month the Designer Crafts Connection is participating in a manufacturer challenge.  Sponsored by


Each of us received Westcott® Brand Cutting Tools to work with.  The thing I like best about these scissors is the fact that I can cut paper and fabric with the same pair!  Do you remember the days when you couldn't use the same pair?  I had to have one pair for paper and one for fabric.....  well not any more! Plus these scissors are non stick titanium bonded to boot.  This was really important for this challenge because we also received product from VELCRO® Brand Hook and Loop Fasteners and The Duck Brand® Duct Tape Rolls and sheets.  Lots of sticky stuff to work with.  

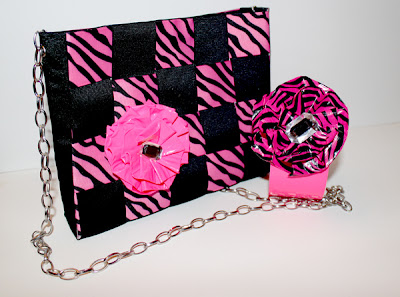
Without further ado, here's my project - a woven ribbon purse and bangle:


And these are some of the supplies I had to work with.  I also used double sided, tacky tape, jewelry chain, 2 silver eyelets and an eyelet setter.


The first step was to measure the ribbon (no ruler needed when you have a cutting mat).  I cut five, 15" lengths of black 1 1/2" gros grain ribbon and one, 21" long.  I also cut eight, 9" pieces of pink and black zebra ribbon.  It was also 1 1/2" wide.


I taped the top edges of the black ribbon to a large piece of poster board to keep them aligned, then wove 4 pieces of the patterned ribbon across as shown.  You will then add the long piece of black ribbon.  This will be the bottom and sides of the purse.
 

Once you've added the additional 4 pieces of patterned ribbon, tape the opposite ends of the black ribbon to the poster board to keep them in place.  Then starting at the center, cover the woven ribbon with duck tape.  BTW - the patterned ribbon is woven with the pattern side down, otherwise you'd be covering it up with the duck tape.

Remove the tape from the top and bottom, then fold the ends inwards even with the first horizontal piece of ribbon.  Hold in place with tacky tape.  I then placed a piece of duck tape across the bottom to cover the raw edges of the ends of the ribbon.  Cover the ribbon that extends on either side with duck tape. Fold the edges inwards even with edges of the black ribbon, the fold the sides upwards.  Adhere the black ribbon to the edges to form the purse.  Fold the end over, so they are even with the top, then punch a hole in each side and place an eyelet in each about 1/2" from the top.  Attach a jewelry chain to each side using a large jump ring if needed.  To finish I cut a 1" piece of black Velcro® to the inside of the purse at the top for a closure.


The rose can be made from the same patterned ribbon, but I made mine from the pink Duck tape then placed a self adhesive "jewel" at the center.  The bangle is simply a wide ring (section) cut from a sturdy plastic bottle of water.  I covered the outside with Duck tape and added a rose with small squares of Velcro®.  This way the rose is interchangeable.  There is also gold metallic Duck tape which would have looked great with a bunch of jewels placed all around it.  So many colors to play with, so little time!

There's a lot of pink going on since, October is Breast Cancer awareness month.  Which reminds me, I'm due for a check up.  Have you had yours this year?  I'm an eleven year Colon Cancer survivor, so, believe me, check ups are important - I'm living proof!

Some of the projects you see on your journey round the webring are being auctioned for a fund raiser at   Charity Wings Website .  You can see them, and bid on them here: http://charitywingsnews.blogspot.com/2011/10/westcott-brand-and-friends-auction-for.html

This is our giveaway for October (US residents only please), provided by Westcott:


To enter to win, click on the photo/link and it will whisk you away to the Westcott® blog where you can comment on your favorite projects, but make sure you hop round the ring first to see what everyone else came up with.  The winner will be announced November 1st.  Good luck and enjoy the hop!  Y'all come back now......

Yours truly,
Julie :)