Monday, June 9, 2025

No Hassle Tassel

 Do you ever tussle with a tassel?  

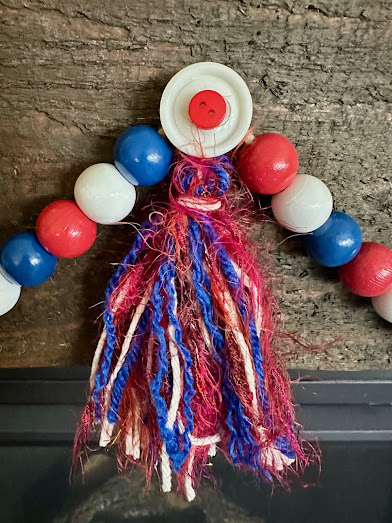
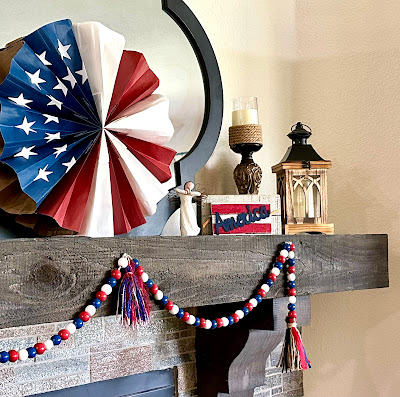
I love beaded garlands to hang on my mantel. Some of them come with tassels, but if they don't, I like to make my own. They're really easy to make, but I received these tassel makers with a beading loom from my friend, Jewels, creator of the Jewelloom and it made it even easier, especially when using yarn, ribbon, or strips of fabric.  Look how much nicer my mantel garland looks with the tassel I made at the center. I really think I need to replace the ones at the ends that came with the garland too....


Here's What I Used
  • Red, White and Blue yarn (use whatever you have available)
  • Jewelloom tassel maker, or sturdy 5"piece of cardboard (same length as finished tassel)
  • AdTech glue gun
  • Large White button, or 1 each red, blue and white bead
  • Scissors

1. Place about 6" of yarn across the top of the loom.  This will be for the hanger at the top.


2. Hold the ends of each color of yarn in place at the bottom of the loom while you wrap the yarn around the loom 5 or 6 times.  The number of times will depend how thick you would like your tassel to be.


3. Tie the piece of yarn you laid across the top to secure the loops of yarn together at the top of the tassel maker. 


4. Cut the loops of the yarn at the bottom of the tassel maker to remove.


5. Cut, then wrap a 10" piece of yarn around the tassel loops about 1/2" from the top. Trim the ends to the same length as the tassel.


TIP: The blue yarn I used was 4 "twisted" lengths, so I untwisted a few pieces of blue yarn for added texture.


You can leave the tassel as is, but here are two other options for the top of the tassel.

    BUTTON OPTION:  Thread the ends of the yarn (for the hanger) thru the holes in the button then tie together to make the hanger. 


You could also glue a small red button at the center of the large white button, then glue to the top of a push pin. Create the tassel hanger by tying the ends together to make a loop to hang over the push pin.


    BEAD OPTION:  Thread beads onto the yarn for the hanger. Secure the top bead to the yarn with a little glue. This is the one I decided to use at the center of the garland. 


    TIP:  I often buy strands of plain and/or colored beads at the craft store when they're 50% off.  Plain beads are easily colored with dye, or if you only need to color one or two, I use paint or paint marker.

    Not just for adding to bead garlands, tassels are a great decorative accent for a multitude of crafts. I wonder what you'll come up with......  Enjoy!

Yours truly,
Julie 💝

KEEP CALM AND CARRY ON CRAFTING!

Friday, June 6, 2025

Etched Glass Vase

If you know me at all, you'll know I love glass,  so when I saw these red and blue bottles and found a matching clear one, they obviously ended up in my basket for a July 4th home dec etching project.....

 My background is decorative painting, specifically Folk Art because anyone can learn the techniques. I liked painting, but didn't enjoy having to spend time sanding and sealing the wood pieces, which were the primary surfaces used waaay back when......  Then I met Barbee, who owns b&b etchall, at a trade show in the early 90's and I was hooked on using etched glass to paint on!  Etched glass has "tooth", so sanding and sealing was NOT required.  You can also rubber stamp on it, but we can talk about that in another post......  Painting, however is not required for this project.... I needed something quick'n EZ.

Unlike another brand of etching cream, which is really stinky and gritty, etchall has an etching liquid, which I love to use, since I can have an etched piece of glass from start to finish in 20 minutes.  Let me show you the difference the liquid - dip'n etch - makes using these samples.

All 3 glass bottles were the same.  The first is the original; the second was filled with dip'n etch, so the inside was etched leaving the outside shiny, giving it a "milk glass" look; the third was dipped in dip'n etch in a plastic container, so only the outside is etched.  


Here are two more examples:  The vase was etched on the INSIDE with dip'n etch to create the "milk glass" look, then I painted the outside with glass paint.  The second was placed in a plastic container of dip'n etch so the outside was etched and the cherries were painted with regular paint.....


And this, after all that info, is my project for my July 4th decorations....


Here's what you'll need:
  • etchall® dip'n etch
  • glass bottles*
  • small empty plastic soda bottle
  • jute
  • the paper rope handle you cut from a gift bag to make the wreath rosette project
  • pliers
  • glue gun
These are the bottles I purchased.

1. Wash the clear, glass bottle thoroughly and let dry.
    *The colored glass bottles were also washed, but they are not colored glass. Colored glass CAN be etched, most colored glass however is simply regular glass with a colored film, so it will not etch. You can however etch the inside by filling with dip'n etch. It does not always work however, since inexpensive and vintage glass may contain too much lead. This was the case with the blue and red bottles I purchased with the clear bottle. 

2.  Cut the top from the small, plastic soda bottle to use as a funnel, then pour dip'n etch into the clear glass bottle. Set the "funnel" aside. After 15-20 minutes you will use this to pour the dip'netch back into its container....  ETCHALL ETCHING creme and dip IS REUSABLE!!!!  


    NOTENeither the creme nor the dip smells and the creme is creamy, but this IS a real etching product, so please read the directions carefully before using.  Do not allow to touch any surface you do not want to etch and always rinse the creme residue away from a porcelain/glazed sink to avoid accidental etching. If you have very sensitive skin, you may also want to wear disposable gloves as a precaution.  

3. Using the "funnel",  carefully pour the dip'n etch back into its container then wash the bottle thoroughly under running water. Let dry.

4. Wrap the top of each bottle with jute then secure with glue.  Create the coil by holding the end of the gift bag handle with pliers on a flat surface then tightly coil. Glue the end to finish then glue the coil over the jute at the top of each bottle.


5. Add flags and strung beads for accents if desired and enjoy your Independence Day!


Yours truly
Julie 💝

KEEP CALM AND CARRY ON CRAFTING!

Friday, May 30, 2025

Red, White & Blue Paper Bag Rosette

Using the same techniques used to create the paper bag snowflake posted on Dec 17th, 2024, it's easy to create this fun and patriotic decoration for July 4th using gift bags!!!

You'll need:

  • Paper gift bags: 4 ea Red, White and Blue
  • AdTech double sided tape
  • Glue stick
  • White card stock (for star shapes) 
  • Scissors
  • 2 Large paper clips


1.  Cut the handles from each bag. (Don't throw the handles away! I'll show you why later.)

2.  Cut 3 stars from white card stock. Fold each star in half.


3. Cover one side of one star with glue then place over one folded side of the bag about 4" from the bottom with the fold at the center of the star over the folded edge of each BLUE bag.


4.  Glue a second star over the opposite folded edge at the side of the bag.


5. Glue a third star with the folded center of the star against the inner fold of the gusset at the side of the bag about 1-2" from the top.


NOTE: I only placed the stars on one side of the blue bags, but if you plan to hang your finished "Rosette" where it will turn, and both sides will be seen, you may want to put stars on both sides.  

6. After adding the stars to each blue bag, glue the blue bags together with a strip of double-sided adhesive tape across the bottom of gusset at the bottom of each bag and 2 strips from the top edge of the gusset down the center of the bag to the top. Press firmly as you add each bag.


OPTION: Gently pull the top of bags apart then add an additional star across the space where the bags are glued together about 1-2" from the top.


7.  Attach alternating white and red bags together with adhesive strips, pressing each bag firmly in place. DO NOT add adhesive to the last bag.  Add the red and white bags to the blue bags. 


8.  Gently pull the attached bags around in a circle and secure the bags together with 2 large paper clips. This will allow you to fold the rosette after use, making it easy to store.


NOTE: Since gift bags with handles are much sturdier than plain paper bags (which can also be used - see the December paper snowflake project), I added a staple at the top at each side of the center, about 1" apart where the bags are joined together.  

        If you would like to use your rosette as a wreath to hang on a door for example, you can easily stabilize by paper clipping this wire frame found at Dollar Tree to the back. Add a paper clip to each wire over the gusset at the bottom of each bag about 2" from the center. Remove the paper clips later so you can fold the bags together to store for next time......  


This is such an easy technique and with a variety of colored gift bags available you can create decorations for birthdays, baby showers and lots of other celebrations!  Enjoy!

Yours truly,
Julie 💝

KEEP CALM AND CARRY ON CRAFTING!!!


Friday, April 25, 2025

Creativation by NAMTA 2025

For those of you unable to travel to Seattle to attend Creativation, grab a cup of tea, or glass of wine, put your feet up then sit back and take an armchair walk with me up and down the aisles of the annual NAMTA Creativation show via photos...  Enjoy!


             Each year a Welcome Reception is held the evening before the show floor opens. It's always a special time to meet old friends, make new ones and to recognize annual award winners and the association's current and new board members. 

            This year was extra special since my long time friend, Ann Butler had nominated me for a Lifetime Achievement Award.  I was accepted, so thought I'd share this aaahmzing news and a couple of photos from that evening before we started our walk. Eight of us received the award this year and other than being totally flabbergasted, it was indeed an honor to be the first Creative Professional NAMTA member to be recognized with this award, especially since "Creative Professional" is a new category for this association. 


I always look for a coffee pot when checking in to a hotel room, but this was SO much better!


Me and my sis who travelled all the way from Tennessee to be there...


with friends Ann Butler, Julianna (Jewels) Avelar and my sis.....

Now let's hug a few friends and walk the show. Let me know in the comments at the end, what you think the top trends were this year.....


TCW - The Crafters Workshop


Boya Crayons


Iwata


Pear Blossom Press


Trinity Stamps


AALL & CREATE


Jack Richeson & Co


Paint Plates


Hahnemuhle - German paper company 


Tomorrow's Artist Created with Encore


Retique It


DecoArt


Creative Professionals were invited to decorate a wood King Salmon fish shape which were displayed on the show floor. After the show they were donated to Mama's Hands, House of Hope.....  each one was unique. I covered mine with small, pearly oyster shells I collected in Maine - it was a "Shellfish" 😜


Bob Ross


OHUHU


RGM Fine Art Tools


Jesmon Eco-Resin


MIYA and HIMI Jelly Paint


Grafix


Colart -  Winsor & Newton


Yasutomo


Faber Castell


Olo


Diamond Art


ALTENEW


Spellbinders


Sharpie


Leisure Arts


Sarah Hurley Academy Pavilion


Tintoretto


Staedtler


Photocentric


Ecstasy Crafts


Jacquard


NuWords Paint


Silver Brush


Excel Hand Tools and Blades


Iwata-Medea.com


Pear Blossom Press & Trinity Stamps


FASHENHUES


Paint Your Photo App


Belagio Enterprises (Cork fabric and more)


Paint-By-Number Kit 


Speedball


Studio Light


Da Vinci Eye


My Creative Camp - Arts & Craft Kits


Triveni USA Inc  - Strung beads


ZIMS GEMS LLC - Beads


Royal Talent


Splatter & Bloom - DIY Watercolor Kits


Notions - Distributors


Kraft Geek


Alumilite - Resin


Sakura


Multicraft


Diamond Art


Paint Puck


Sunbird Spark (check them out on Facebook, YouTube & IG)


For videos and interviews from the show floor, check out Erin Reed's YouTube Creativation playlist and 
Jennifer Crowther's  30 Best Arts & Craft Supplies


That's all for now folks!  See ya next year..........


Yours truly, Julie 

KEEP CALM AND CARRY ON CRAFTING