Wednesday, August 31, 2022

Pumpkin Time!

         I am so looking forward to Fall. It's been a really, really hot summer in Texas and I'm ready for some cooler temps and fall color to take us into the Thanksgiving and Christmas holidays......  

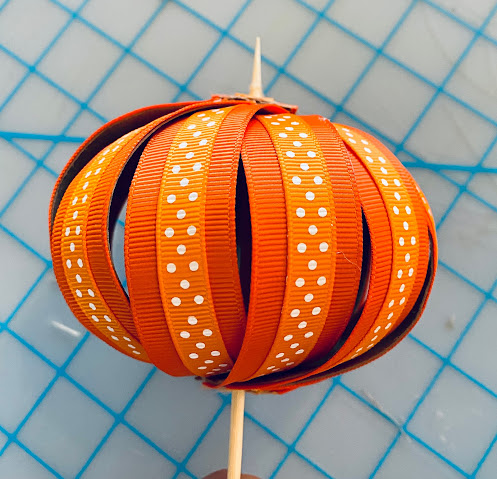
        My grandchildren are back in school, so now is a good time to start prepping Halloween decorations for outside and adding fall decorations inside to add a warm, cozy feeling to my home. Pumpkins are a favorite accent. so making a few small ones seemed like a good place to start.  Can you believe this cute pumpkin pick was made from ribbon and a toilet paper roll!

Here's what you'll need:
  • 1.5 yds Gwen Studios 7/8"  grosgrain ribbon - Orange 
  • 1.5 yds Gwen Studios 3/8" grosgrain ribbon - Dotted Orange 
  • 3" Gwen Studios 1" Dark brown grosgrain ribbon
  • 2 empty toilet rolls
  • Bamboo skewer
  • Double sided adhesive tape
  • 1/8" Hole punch
  • Raffia
  • Scissors
  • Lo-temp glue gun (optional)


1. Cut each toilet roll lengthways then cut into strips about 3/4" wide.  Depending on the size of your roll, you should have about 6 strips.


2. Punch a hole at each end of each strip about 1/4" from the top edge then place a strip of double sided adhesive along the center of the back of each strip, between the holes.


3. Cut a piece of orange ribbon long enough to cover the adhesive strip. Lay the ribbon flat on your work surface then press the curved surface of a strip firmly on top of the ribbon. Yes, you can hold the strip and place the ribbon on top, but it's easier to align if you do it this way.  I also trimmed the ribbon after adhering. You will need 11-12 strips.


4.  Measure then cut the pieces of dotted ribbon. Place a small piece of double sided adhesive at each end, then adhere to the top of the orange ribbon. 


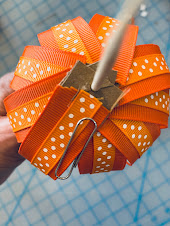
5. Thread one end of each of the covered strips onto the skewer.


6. Starting with the top strip and working your way down from the top, pull the next strip over then thread the opposite end of each strip onto the skewer. 


7.  Spread the strips around the skewer to check you have enough to create the pumpkin. Add more if needed. Yes, you will need to remove the bottom ends of the strips from the skewer to add extra, but you'll do that anyway - see next step.


8. In order for the ends of the strips to be compacted together to make a prettier looking shape, remove the bottom ends from the skewer. Use a small dot of lo-temp glue to glue the ends of each strip together, one at a time where they overlap to create a circle. Add the opposite ends to the skewer, gluing each one in place in the same manner.  Obviously this can be done without using the skewer if you don't want to make a plant pick, but I found having holes in the ends of each strip helped with alignment. 


9. Adjust the skewer so that about 1/2" extends from the top, then cover it with the small scrap of brown ribbon and glue in place. Tie a few strands of raffia around the top to finish.  


        I have lots of empty toilet rolls and, yes, I know strips of cardboard can be used instead, but I really like the way the toilet roll cardboard strips are curved to create the perfect pumpkin shape...


Have a happy Fall y'all...  

Yours truly,
Julie 💝

KEEP CALM AND CARRY ON CRAFTING!

Ribbon used in this project was provided by Gwen Studios, all other products used were purchased by me. You can find more ribbon projects here, on the Designer Crafts Connection blog.


Monday, August 29, 2022

Etched Jack-O-Lantern Wine Glasses

         Fall is just around the corner, hopefully bringing us some cooler weather. A nip in the air always makes us think of fall leaves showcasing their changing colors, pumpkins, toasting s'mores over a fire pit, mugs of hot chocolate, and maybe a glass, or two of wine.  With constant reminders that Halloween is also a big part of Fall, here's a fun project for some of your more lively, adult events.  Stemless wine glasses, etched with Jack O'Lanterns will surely put a smile on everyone's face and they're so easy to make.....


Here's what you'll need
  • etchall® reusable etching crème
  • Stencil cut pick knife, or pick tool
  • Squeegee 
  • Etchmask, stencil or vinyl for creating stencils
  • Wine glasses  (I purchased mine from Dollar Tree) 
  • Jack O'Lantern patterns*
  • scissors  


1. *I used my Cricut Joy® machine to cut the stencils, but there are many other options available.  If you have access to Design Space the patterns are available there. Search Julie McGuffee & Jack-o-Lanterns, or
        
        a. Drag the above patterns from here onto your desktop then upload into your cutting software, or 
        b. Print onto printable vinyl then cut with a craft knife.  Each face is about 1.5-2" wide.   


NOTE: When removing the vinyl from areas that will be etched, make sure to lift from the center of the vinyl to be pulled away. Never place the pick tool at the edge of the cut.


2. Wash the glasses, dry thoroughly then place each glass on a towel to prevent rolling.  Carefully position then press the stencil onto the glass.

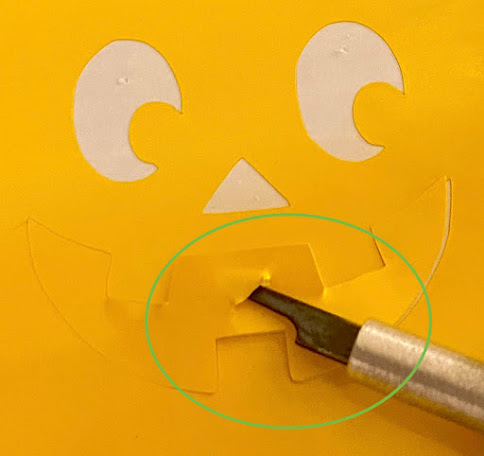
NOTE: Since the surface of the glass is rounded, press the center of the stencil onto the glass first then each side, pressing firmly around the edge of each opening, otherwise the etching crème will go under the stencil. It is not uncommon for the vinyl to crease at the outward corner of the mouth as shown below. If this happens, carefully lift the stencil from the edge and cut along the crease. Press one side of the cut vinyl down then the other side of the cut on top. Press firmly.


3. Check to make sure your stencil is firmly adhered around each opening by looking at the back of the vinyl from the opposite side of the glass. 


4. Cut additional strips of vinyl to put around the edge. This will prevent any accidental etching outside the pattern.


5. Cover the open areas with etchall crème.  Following directions on the container, let sit for 15-20 minutes then using the squeegee, scrape the etching crème carefully from the stencil and PUT IT BACK INTO THE CONTAINER!!  - Don't forget, etchall etching crème is REUSABLE...


6. Rinse away any remaining residue in a plastic bowl of water, or under running water over a kitchen sink unless your sink is porcelain. Remove the vinyl then buff with a soft cloth or towel to reveal your design.


A set of etched Jack-O-Lantern glasses is would be a perfect addition to any party and a great gift!


PLEASE REMEMBER...

etchall etching crème creates a PERMANENT etch on: glass, porcelain, china, mirrors, granite and even slate, so choose and/or cover your working surface carefully.  Dip'n etch, a reusable etching liquid, is also available and perfect for etching glass beads and even the inside of colored glass containers to create a vintage,  milk glass look! 
You can find all these products, tutorials, inspiration and more at www.etchall.com  

Enjoy and have a fabulous Fall!

Yours truly,
Julie 💝

KEEP CALM AND CARRY ON CRAFTING!

etchall® products were provided by etchall. Designs shown are my personal designs.