Friday, December 31, 2010

3 - 2 - 1.....Happy New Year!


HAPPY NEW YEAR YA'LL!!!

May you all have a very blessed and prosperous New Year.....

Yours truly,
Julie :)

Friday, December 24, 2010

Merry Christmas Everyone!


It's Christmas Eve and, as you can imagine, I am at the last minute with most things, like defrosting the turkey for tomorrow.....   it's still as hard as the proverbial rock.  A few hours under cold, running water should do the trick though.  In the midst of the hustle and bustle, however, I wanted to take a few minutes while I had my morning cuppa to wish all of you

A VERY MERRY CHRISTMAS! 
yours truly,
Julie :)

Wednesday, December 15, 2010

Sizzix Blog Hop - Project #7

I hope you've enjoyed hopping from blog to blog over the past 6 weeks to see the amazing projects created by 60 talented Arts & Crafts designers - all using the same Sizzix die cut shapes.  I'm sure you've noticed that our designs are as varied as our personalities.  We've certainly enjoyed creating and sharing our designs with you and hope we've inspired you to do a little crafting of your own.

This is the last week we'll be creating projects using Sizzix dies, at least for the time being, but we are still creating and our blogs will continue to be "linked" together, so you can easily "hop" from one to the other.  The "hop forward" link may change in looks over the next few weeks, but you'll still get to visit the same blogs.  Stop by often - we'll always have something exciting up our creative sleeves to share with you.  A variety of manufacturers will be challenging us to work with their products and these are the projects we'll be featuring as well as a variety of some "out of the box" challenges.  There will also be some challenges for you and even some giveaways, so stay tuned.


They say we always save the best for last, unfortunately I had some camera issues today, so I won't be able to post my projects until a little later.  In the meantime, here's a look back at the projects from the past 6 weeks.  I really do need to add a feather to my photo cube and the picture frames! LOL.  But before you start to browse (and read the very important note at the bottom of my post), here's a message from Eileen Hull, the originator of these past Sizzix blog hops.


"Thanks for checking out the Triple Play Blog Hop! Please visit www.tripleplay.typepad.com for more fun ideas from Brenda Pinnick, Karen Burniston, Eileen Hull and friends. If you have enjoyed seeing all of the inspiring ideas on the blog hop, please "like" Triple Play on Facebook: http://www.facebook.com/#!/pages/Triple-Play/125068950891362.  Happy Holidays".


Y'all come back now!  My first giveaway for the New Year will be a Cricut Expression, so I know you'll want to know how to sign up for that!

Yours truly,
Julie :)

Neat Storage Idea!


OMG - have to share!  I was walking the aisles at Michaels the other day and came across these adorable little glass jars in the Wedding dept.  They're meant for favors, but I think they're perfect for all kinds of small craft supplies and/or embellishments - buttons, brads, eyelets, flowers, etc.  There are 18 in a box and with my 40% off coupon, the price was unbeatable.


There are also some small, round tins with a clear top that would work too.  Just have to wait for another coupon...........  Y'all come back now!

Yours truly,
Julie :)

Wednesday, December 8, 2010

Sizzix Blog Hop - Project #6

Thursday came far too quickly this week, even for a Quick'n Easy :(    So here's a photo from Sizzix.com showing how adorable the pieces from Brenda Pinnick's album die can be with just a little time and effort.  Rather than totally throw in the proverbial towel, I decided that I ought to be able to do something, so....... 


I layered a few of the pieces added my initial to the center and a now inevitable feather (I ought to make a headdress - a real "feather in my cap"), then wondered what to do with it.  I added it to a papier maché box as a decorative element, then thought it might look nice just "hanging", probably nicer with a ribbon and a bow, but alas and alack I didn't have ribbon in the right color.  What would you do with it?  Inquiring minds would love to know how creative you can be.  (BTW, I won't be offended if someone says diplomatically, or not - start over)....LOL.   Now hop to it and see what Julie FF created this week.  I am always amazed and enthralled at her projects.... if only I had more hours in the day............  Yup, I have to admit I'd still be at the last minute - you know what they say, "if it weren't for the last minute, nothing would ever get done".   Y'all come back now!

Yours truly,
Julie :)

Monday, December 6, 2010

St. Nicklaus


December 6th is the day we honor St. Nicholas, a fourth century monk who used to leave gifts in the shoes which were left outside the home.  The date is a little more personal for me since it's our wedding anniversary - 36 years today and still counting.  I often joke that I left a pair of men's shoes outside my door and my husband was my gift from St. Nick.....

I love traditions.  There's definitely something comforting about family traditions - I truly believe they are a constant, which provides a sense of security in today's ever changing world.  No matter how small or insignificant, traditions are important and many of them go unrecognized until we suddenly forget to do something.  It's tradition, for example, to eat Black Eyed Peas on New Year's day.  No one ever eats them in our family, but everyone would notice if they weren't on the table for our New Year's dinner.

Check out my holiday newsletter at the Memory Keeping Collection for more interesting holiday tidbits.
Enjoy and, ya'll come back now!

Yours truly,
Julie :)

Wednesday, December 1, 2010

Christmas Cards - Quick'n EZ


'Tis the season to think about sending Christmas cards, so here's an idea for you.  You can cut a letter size piece of cardstock in half to create two, 8.5" x 5.5", pieces which, when folded in half will each make a "Quarter Card", or look in the "dollar" bins at Michaels for a package of plain cards and envelopes!  It doesn't matter if there's something on the front, because this will be covered up.  Pick two scraps of coordinating/complementary papers cut to half the height and the width of the card.  Glue, one above the other onto the front then glue a piece of ribbon over the area where they meet.  

Now here's the fun part.  Create the saying in a circle in Microsoft word, using the drawing toolbar, then add an image at the center.  If you don't have access to images and can't find any clip art that you like, check out my images under "Pages" in the sidebar to the left (Images for Personal Use).  You can drag these onto your desktop then import them into your Word doc and re-size as needed.  

Print the monograms onto white card stock then cut the circles you created with either a circle punch, or a set of nesting dies.  Mat with additional colors of card stock, using larger plain or decorative punches.  I used Spellbinders' Nestability™ circle dies and Pinking circle dies to make mine.  Glue the monogram pieces together then attach to the front with foam squares or circles for a little dimension.  I also added some crystal stickers between the wording.  Here are some samples for inspiration  Enjoy!


Y'all come back now!

Yours truly,
Julie :)


Sizzix Blog Hop - Project #5


Can't believe another week has already gone by, and, as usual I realize I have to post a project!  so Last Minute Lucy is at it again with something "Quick'n EZ" - definitely the title of my next book.  Not having time to figure out all the paper engineering, I used the frame with the words.  I covered this piece with silver glitter, then taped a piece of acetate to the back.  I cut a heart from red glitter card stock and glued it to the front and added a wire hanger.  It needed jazzing up a bit, so I gave my heart some feather wings and here 'tis.......  Yes, you've guessed it.  After using feathers on 3 of the 5 projects, so far, you've probably realized I have a lot of them.....  they are kinda fun.  Y'all come back now........


Yours truly,
Julie :)

Wednesday, November 24, 2010

Sizzix Blog Hop - Project #4


HAPPY THANKSGIVING EVERYONE!

And without more ado, since it is Thanksgiving, here are my projects - Quick'n EZ as usual.  I'm only using materials I have on hand and the mat board pieces that came for each project.  This frame is a die cut design from Eileen Hull.  I découpaged the large board with a scrap of scrapbook paper then wrapped ribbon around the inner frame.  One (Hearts and Flowers) then embellished with a Quick'n EZ ribbon rose, the second was matted with green glitter cardstock and actually features a photo.......  so, Ta Dah..... here they are..........


You may have guessed, I'm having a fling with ribbon and bling..............  Enjoy!  Y'all come back now.

Yours truly,
Julie :)

Sunday, November 21, 2010

Christmas is Coming!


The goose is getting fat.  Please put a penny in the old man's hat.  
If you haven't got a penny, a ha'penny will do.  
If you haven't got a ha'penny, God Bless You!

It's Thanksgiving this week and 4 weeks later it will be Christmas.  There always so much to do and sometimes those dollars and cents get away from us so we make our own Christmas ornaments and in true crafty fashion we usually make them from things we already have on hand, after all a "penny saved is a penny earned".  

I've been making these wax ornaments since the 60's.  They're easy to make using left over candles - recycling at its best - and they look so pretty on the tree since the wax glows when it catches the light.    You can also make them from beeswax for an "antique" look and color them with "Rub'n Buff".
BTW:  This is a adult craft and not recommended for children.


    Here's How:   Melt wax in a double boiler.  I have an old one I use only for this.  Place PLASTIC
cookie cutters onto wax paper.  You can use a variety of sizes and shapes.  Don't let the wax overheat.  You'll know when it's ready by dipping a metal spoon into the liquid wax.  If the wax coats the spoon as soon as you pull it out, then it's at the right temperature.  Spoon wax slowly into the cookie cutters.  It should be about 3/8" thick.  Don't worry if some of the wax seeps out around the sides, you can break it away when the wax becomes hard.   Let the wax harden then gently pop the cookie away from the wax.  The little angels were made by pouring wax into a candy mold.  Let these harden in the freezer for 15-20 mins, then tap the mold sharply on the counter - the shapes will pop right out.  The best thing about this project is, that if one of the ornaments breaks, or doesn't look right, you just pop it back in the double boiler.  Definitely a "McGoof proof" project.  Once all the ornaments are made I thread gold or silver thread onto a tapestry needle, then heat the end of the needle in a candle flame and push thru the top of the ornament.  When using a candy mold, make a hanger first by knotting the ends of about a 4" piece of thread, then placing it into the mold before adding the wax.

More ideas to come so, ya'll come back now!

Yours truly,
Julie :)

Wednesday, November 17, 2010

Sizzix Blog Hop - Project #3


Dies are not just for paper.....  I've been enamored with die cutting machines since the mid 90's and one of the things I enjoyed most, was cutting fabric.  I cut felt and many different kinds of fabric backed with a fusible web to give it stability for cutting. These shapes can then be ironed onto other fabrics, or even onto cardstock.  Fabric shapes make great embellishments for cards, or even scrapbook pages!  Another great technique is to run posterboard, stiff cardboard/chipboard, or mat board through the Xyron machine, adhere fabric to it, then cut it out.  It all depends on what you want to use your die cut shapes for.

The "Beauty Bloom" die for this weeks project was designed by Brenda Pinnick.  We each received an assortment of cut flower shapes; mostly white cardstock, but there were also a few felt shapes, which I decided to use for my project:
 
The felt had a really soft, pliable texture, so I used Fabric and Paper glue to adhere the felt pieces to the same shapes cut from white cardstock to give it some stability.  I punched holes in the tips of the flower petals then used jump rings and beads placed on to an eye pin to connect all the pieces together.  I attached pearls to the center of each flower with thread, which I tied securely at the back and I even added some of the left over feathers from the house project. 


There's really no limit to what you can do, 
with die cut shapes and Elmer's glue......  

Y'all come back now!

Yours truly,
Julie :)

Thursday, November 11, 2010

Sizzix Blog Hop - Project #2


This week's shape is the die cut Twist Cube designed by Karen Burniston.  Karen has wonderful instructions including a video for the correct assembly of this shape on her blog, so please check it out.  I've been in a time crunch this week - literally burning the candle at both ends, so I had to go the easy route and I assembled mine as a regular cube to display photos of our four legged family members.  The photos should have been "on point", but as I said, I really needed to have a 5 min project, so this is it.  I also re-photographed my house from last week, with its missing door frame in place!  Just one of those little details that I think make a big difference.  Enjoy!


Y'all come back now!

Yours truly,
Julie :)

Thursday, November 4, 2010

Sizzix Blog Hop - Project #1


Today is the first day of the new Sizzix Blog Hop.  60 designers are participating and each of us will create a project each week for the next 6 weeks using the same Sizzix dies.  To hop from blog to blog, click "next" in the Sizzix blog hop icon in the sidebar.  Here's my design for Eileen Hull's Scoreboard "House" die.


After cutting the shape from mat board, I used a sponge brush to coat the entire surface with Elmers Fabric & Paper glue, then sprinkled with glitter.  I glued Zucker feathers to the roof with Elmers Tacky glue.  The windows were outlined with Crystal Elements clear stickers and for an added touch, I colored small pieces of acetate with a yellow marker and adhered behind the window.  Place the finished house over a tea light (the little LCD? ones) - don't want to set the house on fire, right.....  If you want to know which glue to use stick this to that, check out Elmers on FB, and "yes", they even have an AP for that!

This is Sizzix supply list:

#65279;Sizzix Scoreboards Pro Die -  House, 3D, by Eileen Hull
Sizzix 12x12 White Matboard 

This is just one idea of at least 60, so "hop" to it and enjoy!   BTW, check out the GIVEAWAY at the Scrapbook Memories FB page - it's a Sizzix BIG SHOT!  Y'all come back now!

Yours truly,
Julie :)


Wednesday, November 3, 2010

Thanks for the Memories

Hi there!

Now that I have your attention............  For those of you who enjoy Scrapbook Memories, KS Productions has uploaded episodes from some of the older series on YouTube.  I was looking to see which ones were there and, oh my, have things changed - especially  me!  It made me realize how long I've been involved with the show and how much fun Beth and I had taping the series.  A lot has happened over the past 12 years! 

The show was called More than Memories for the first 4 years.  Julie Stephani and I hosted and Beth appeared on the final series as a guest.  She was so good, we thought she'd make a perfect host on the new series and so it was.  Since then, Beth has married and has 2 children; both my children are now married and I am now a grandmother.......!!  Makes me wonder what the next few years will have in store for us.  The Arts & Crafts industry is changing and the show will change too to reflect new trends, etc.  I'm sure you've already noticed a few of those changes on the new series which is now airing.  BTW, I watch the show on BYU at 5pm CST.  It also airs at 5am, but I'm not an early morning person - if the sun isn't up, I see no reason why I should be.  Enjoy the shows and if you have any questions about anything you see, join us on Facebook.  I check there regularly and will try to answer any questions you may have - if I can!  Ya'll come back now!

Yours truly,
Julie :)

Monday, November 1, 2010

And the WINNER IS...........


AMBER 
Cricut Roller bag and 3 cartridges!

MANDERS and CINDYSOUL 
have each won 4 Cricut cartridges!


Congratulations!  Please e-mail your mailing address to me:  julie@juliemcguffee.com and I'll ship these out as soon as possible.  Y'all come back now......  who knows what the giveaway will be for November!

Yours truly,
Julie :)

Sunday, October 31, 2010

Happy Halloween!


Have a safe and happy Halloween, full of treats!

Don't forget to check back tomorrow to see if you were a winner in the Cricut roller bag and cartridges giveaway...   you can still enter up to midnight, PST - you may receive your best treat from my doorstep.  Y'all come back now!

Yours truly,
Julie :)

Thursday, October 21, 2010

Tempus Fugit


They say time flies when you're having fun.  Well, here's a newsflash, it flies whether you're having fun or not especially when you don't want it to.  I have to say though that life is good.  It's just busy.....  I've been trying to catch up on some design work this week, but I am way behind and my "other" life is busy too - you know the one that cooks, cleans, does laundry, grocery shopping, etc.  I have some more product to put in my shop, but can't even find a few minutes to photograph it.  I'm also trying to put some storybooks together for my grandchildren.  I have a Unibind Photobook Creator and love being able to create my own books.  I have photos of taking the kids to the zoo, aquarium and circus and thought I could add text and create some fun story books that would be all about them.  Hopefully they'll be done in time for Christmas - 2010!  I'll share pictures of them when they're finished.

My son and his wife are arriving tomorrow to stay for a few days.  It's "homecoming" weekend, so it'll be another few days before I get back to "work".

Y'all come back now!

Yours truly,
Julie :)

Friday, October 15, 2010

Grand Opening!!


Remember about a week ago, I said I was going to open an Etsy shop?  Well after signing up and spending hours on wording, photos and a whole lot more, I have opened my shop - but not on Etsy.  I got to thinking - always a dangerous pastime, usually while I'm driving.  I really don't want to be in the "selling" business, but I have things that I can give away.  Unfortunately, there are charges involved in getting something from A (me) to B (you).  Therein lay my dilemma - I can give away the product, but it has to ship.  So, I had an awesomely bright idea and have opened my shop on my website.  There you'll find a photo of things I can send you.  Just click on the shop banner above and it will take you there.  Since shipping charges vary from state to state, each item will have a set fee - same for everyone and easy for me.  It will be loosely based on the size of those pre-paid boxes the USPS is advertising.  I will try to use the smallest box, but if I need a bigger one, I will add some "goodies".  You will definitely get more than your cost for shipping.   Hope you like the idea!

Here's a picture of the first kit for the Christmas Crafts projects.  It even includes things like scissors, glue, glitter paint, sponge brush, etc., and most of the pieces are pre-cut.


These are the projects again.  The instructions are here on my blog under PAGES in the sidebar.


Enjoy!

Yours truly,
Julie :)

Wednesday, October 13, 2010

Witching Hour!


Don't forget!   Midnight on October 31st is the last second to enter the drawing for the Cricut roller bag and cartridges!  Winners will be announced Monday, November 1st.  Good Luck!

Yours truly,
Julie :)

Tuesday, October 5, 2010

It's a Slippery Slope


Can you believe it's already October, the beginning of the busiest craft season of the year! During the next few weeks we'll be decorating for Halloween/Fall, if you haven't done so already, followed by Thanksgiving then Christmas (or any other holiday you may celebrate). It's definitely not too soon to start thinking about all the cool gifts and decorations you can make to amaze your friends and family.

My friend, and business partner, Jean, and I taught Christmas craft classes at the CHA Supershow this past summer in Chicago. Christmas in July is always a "stretch" for me, but October.... well that's another story. If I don't start now, nothing will get done. I have to admit though, that I live by the old adage, "if it weren't for the last minute, nothing would get done". Christmas is like birthdays, it comes every year whether we're ready or not, and each New Year I make a resolution to be more prepared - let's just say, I'm not the boy scout type.......

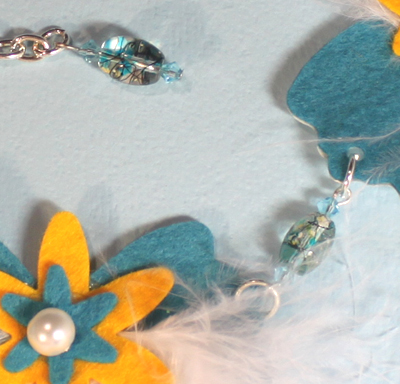
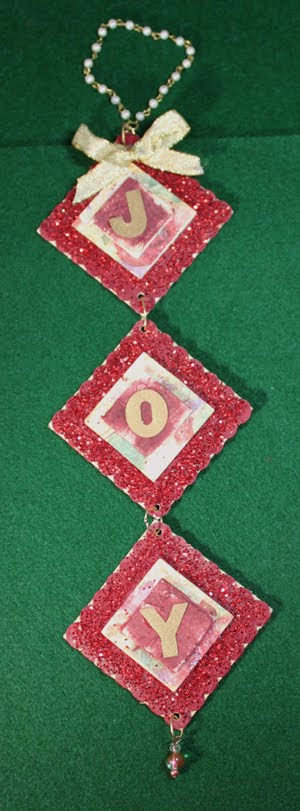
However, YOU may want to start early, so here are photos of the projects I designed for my Christmas Crafts class. All the supplies are easy to find at your local craft store and I will post a list of instructions on the Christmas Crafts page (see left column under pages). I also have some kits available, which I will post in my Etsy shop. The kits will include everything you need to create ALL of the projects, including things like glue! ETSY Shop!!!!!! Yes, I have an Etsy shop, but it's empty at the moment.........


You'll have to be patient with me, I still have to load everything to the shop. Once I've got it all figured out, I will announce the GRAND OPENING of Craft Lane Designs. Hopefully it will be up and running by the weekend. I have "Nana duty" thru mid October, so my time is a little limited at the mo; another reason I haven't posted for a week! My bad.............

Yours truly,
Julie :)

Monday, September 27, 2010

20% Off Everything Coupon for Michaels!


Here's a fantastic coupon from Michaels - your one stop, shop till you drop shop for arts & crafts! It's their Friends & Family coupon and here's a copy for you. Just click and drag onto your desktop, then print away! Valid Sep.30th - Oct 2nd; just in time for all your remaining Halloween purchases and more! (Restrictions apply.) Enjoy!


Yours truly,
Julie :)

Friday, September 24, 2010

Quick & Easy Embellishments!


I design a lot of shapes and images and use these to create quick and easy embellishments for my own scrapbook pages, cards and tags. Images can be imported into a Microsoft Word document, sized then printed onto almost any paper. I also print titles and even personalized paper ribbon. Check out the Projects, Tips & Techniques page for some ideas and I will even share some of my images with you on the Images page. Please note, these are copyrighted images for personal use only.

Here's an additional tip: Print a selection of the Halloween images onto adhesive ink jet transparency paper then adhere to the outside of a glass candle holder, or glass cylinder. They make great table decorations! You can also print onto ink jet fabric then iron onto a T-Shirt or apron! There are so many ways you can be creative! Enjoy! Y'all come back now!

Yours truly,
Julie :)

Thursday, September 23, 2010

Newsletter

I am the editor/designer of a new newsletter. It goes "live" today at the Memory Keeping Collection website. Each month I'll be bringing you scrapbooking and papercrafting tips, plus information on any new offerings from Ashton Drake Galleries. You'll also notice that they're having a drawing for a new Cricut. All you have to do is to go to their Facebook page and "like" them to qualify.

I'm also having a drawing for the month of October! It's for a Cricut roller bag with 3 Cricut cartridges! Plus I have two additional sets of 4 cartridges each to give away.

Blog "followers" will be automatically entered, so sign up here, or leave me a comment on why you like to use the Cricut for papercrafting. The winner will be announced on NOVEMBER 1st.


Y'all come back now.............

Yours truly,
Julie :)

Sunday, September 19, 2010

ScrapFest - Last Day!

This was such a great event! Thanks to all of you who joined us for MITIs over the past 3 days. Everyone seemed to really enjoy the projects and had a lot of fun! Jean created the projects for Mark Richards, the company who manufactures the Sticker Pearls and Crystals - bling is definitely a girl's best friend whether she's a crafter or not.


Everyone loved the paper we used for the cards. It was donated by Basic Grey, Little Yellow Bicycle and SEI. The SEI, shell glitter paper seemed to be everyone's favorite. Unfortunately, it was a summer shipment and Archiver's quickly sold out. It's possible that it's still available from an online store. I sent SEI a message last night thru Facebook to ask if it's still available and where, so I'll let you know if I hear anything.

It was such a treat to meet everyone - I had a great time. Hopefully I'll get to join you again next year! In the meantime, keep checking back for projects, giveaways, more tips and techniques both here and on Jean's blog, "Just Crafty Me".

Hopefully everyone was able to sample many of the other MITIs around the Mall in spite of the long lines. There were so many great vendors who participated this year including EK Success Brands, Prima, Karen Foster Designs, Graphic 45 (I just LOVE their product line), Doodlebugs, Little Yellow Bicycle, Making Memories and more!


Now here's what's coming up here over the next few weeks:

1) Giveaways • A rolling bag for your Cricut, including 3 Cricut cartridges, plus 2 additional sets of 4 Cricut cartridges each.
2) Newsletter • I'm writing a monthly newsletter at the Memory Keeping Collection website. This will go live on September 23rd. They are also having a drawing for the new Cricut! Check their site for details.
3) Quick & Easy Cardmaking • Make 3 cards from one, 12" x 12" sheet of cardstock!

Over 2,000 MITI projects were made in our booth over the past 3 days! That was quite a crafting marathon. Needless to say Jean, Pat and I are a bit on the tired side, so it's time to kick back and put our feet up. Y'all come back now!

Yours truly,
Julie


Saturday, September 18, 2010

ScrapFest!


Wondering why today's post is listed as being posted on Friday, September 17th when it's Saturday, September 18th. Have we crossed into the twilight zone I wonder....... Tomorrow is Sunday, September 19th and I'll be posting a wrap up of the show. Photos and notes from the first 2 days are below. Enjoy! Ya'll come back now............

Yours truly - albeit a bit confusedly,
Julie :)

Friday, September 17, 2010

ScrapFest - Day 2! Saturday, September 18th


900 MITIs yesterday and about 700 today..... how fun! Lots of ladies who stopped by yesterday came back today to make a second project with us. We really had fun... and THAT is the name of the game. We really LOVE what we do and I think everyone enjoyed being creative with us.


We even tried to make waiting in line fun. We showed episodes from the new series of Scrapbook Memories on a laptop - until the battery gave out - shared ideas, tips, techniques and stories and read lots of T-Shirt slogans!


Thanks Archiver's for such a great event! Ya'll come back now.......

Yours truly,
Julie :)

ScrapFest! Friday, September 17th


Today is the first of 3 days of ScrapFest at the Mall of America in Minneapolis, sponsored by Archiver's stores. I hadn't been to ScrapFest for quite a few years, so it was great to see how busy it still is. Hundreds of people lined up around vendor booths for the MITIs and registered for workshops and demos by some of the industry's most popular manufacturers.


The lines snaked up and down the hallways of the Mall of America where the wait for some of the MITIs was up to 90 minutes.


This is a great event for friends who come for a weekend getaway and mothers and daughters who share their love of scrapbooking and crafts.


My friend, and business partner, Jean (Just Crafty Me) plans and designs the MITI projects for Mark Richards, the company responsible for fabulous bling! We provided about 900 MITIs between 9am & 5pm, just today and we still have 2 days to go!


Check back tomorrow for even more updates! Ya'll come back now..........

Yours truly,
Julie :)