It's hard to believe that it's almost 2012. 2011 passed by so quickly, I'm still looking for the brake pedal. The years are picking up way too much speed as they continue to fly by on a far too regular basis. I've said for years, that we don't start to age until we have children then when grandchildren enter the picture, it's a definite wake up call. I tend to take things day by day, but have discovered that if I don't start to plan now what I want to do "when I grow up", it's not going to get done because eventually I will run out of time. Not really, but I still want to be young enough to enjoy what I want to do with the rest of my life. I'm not trying to say that I think I'm old, but once the OAP stage is reached, it's a slippery slope indeed.
So what's in my plans for 2012 - I don't make New Year's resolutions any more, because I don't like the guilt trip when I break them, but I do pull out the calendar on the 31st. CHA comes first at the end of January..... oh no! It's only 3 weeks away, how did that happen! I have SO much prep work - I'm teaching a seminar and also have to pull my showcase together. Gotta get going, I s'pose......... but maybe I can wait till next year. Enjoy the final hour(s) of 2011 and y'all come back now - next year! Have a good one!
Yours truly,
Julie :)

Snippets of Wit & Wisdom embedded in information and observations about the Arts & Crafts Industry as noted by an "itinerant crafter".
Saturday, December 31, 2011
Wednesday, December 28, 2011
Christmas Traditions
Hope everyone had a wonderful Christmas. It's my favorite day of the year. There's nothing better than getting together with friends and family to share good food and cheer.
We do the same things every year, so I suppose these would be our family Christmas traditions. We always have turkey, brussels sprouts, dressing, mashed potatoes etc and Christmas crackers just like we did in England. Another of our traditions involves a manger scene. It's only a small one - Mary, Joseph and baby Jesus in his manger. The manger remains empty however, until Christmas day which is when we put the baby in the manger. I never realized what an impression this made on my 2 year old granddaughter until last Spring when she suddenly asked "where's Jesus?" "He's in heaven watching over us", was my reply. "No he's not!" she said, "he was right there!" and she pointed at the small side table where we always put our manger scene. Of course, I had to rescue baby Jesus from the cupboard and now he is with us all the time. I love the way children think........ The story reminds of the words of song by Larnelle Harris. As the dad is packing up and putting away all the Christmas decorations, his son asks "do we put away Jesus too?" With all the hustle and bustle, it's easy to forget the reason for the season.
Enjoy the rest of your holiday - y'all come back in the New Year!
Yours truly,
Julie :)
Monday, December 19, 2011
It's Christmas! Fun Facts & Last Minute Crafts
Christmas is traditionally a very "crafty" month, but it's also one of the busiest and I have to admit that I have actually bought Christmas ornaments, ready made decorations and cookies...... For some reason it makes me feel really guilty, but I'd rather be stress free to enjoy the fun than overwhelmed with SO much to do, because when all said and done, it's still my favourite time of year.
Did you know that Oliver Cromwell banned Christmas in Great Britain back in the 17th century? The ban didn't last long and neither did he. People love a reason to celebrate, whatever the occasion. The Christmas season officially stretches from December 25th thru January 6th, which is known in England as Twelfth Night. This is the day we take down all our Christmas decorations. Celebrations however, can start as early as the first Sunday in Advent and are as varied as the countries that celebrate them. Father Christmas has been the traditional Christmas figure in England since the 15th century whereas the American Santa Claus is based on the Dutch St. Nicholas from the 4th century. In some European countries, St. Nicholas still fills the children's shoes with gifts on December 6th instead of the 25th. Here in the US we start to decorate Christmas soon after Thanksgiving, but in Germany the Krist Kind (Christ Child) decorates the tree on Christmas Eve - that's one very organized guy. After he's finished he rings a bell and the children rush into the room. Traditions also vary not just from country to country, but also from area to area within a country! In England, Father Christmas is treated to a glass of sherry and a mince pie in appreciation for bringing presents - that's probably why he's so jolly and has a red nose...LOL, whereas the American Santa only gets milk and cookies - bah humbug....
Since we've always been a "crafty" family, we still make a lot of our own ornaments for the tree. The very first Christmas tree after our daughter was born was covered in Raggedy Ann and Andys made from bread & salt dough and painted with bright colors. We also added garlands of popcorn, which lasted quite a few years. My favorite ornaments (I still make them) are the ones we make from wax.


I melt leftover candles in a double boiler. While the wax is melting, I place an assortment of plastic cookie cutters onto a baking sheet covered with wax paper. Using a metal ladle, I gently fill each cookie cutter with wax - about 3/8" deep. Once the wax has hardened, the cookies will easily pop away from the sides. Don't worry if some of them crack, or break, just pop the pieces back in the double boiler and melt again! To add a hanger, thread silver or gold thread onto a tapestry needle. Heat the tip of the needle in a candle flame, then push gently through the top of the ornament. Cut the thread then knot the ends together. Candy molds are also great for making ornaments (see the angel). Allow the wax to set (you can place in the freezer for a few minutes) then tap the mold sharply to release the shape. Ta dah - they're finished! Doesn't it feel great to recyle AND be crafty at the same time.....
Please note, this is an adult craft and not recommended for young children.
Here's another one for you.

These little gift boxes were made from old cards. The front of the card is the top of the box and the back of the card is the bottom, with the verse inside. Score a line all the way around the card about 1" from the edge. (Both pieces.) Make sure the lines go from edge to edge so they cross at each corner. Cut along one scored line from the outside edge to the point where the lines cross at each corner to create a tab. Fold the sides inwards. Glue the tabs in place to create the box shape.
Embellish with ribbon, jewels, charms - anything at all! Now you can make a set of wax ornaments then place them in a gift box for a great gift! Enjoy! Y'all come back now......
Yours truly,
Julie :)
Monday, December 12, 2011
Basic Christmas Crafts
I love working with small wood shapes. I love to draw and maybe that's why..... everything is made up of basic shapes - circles, squares, hearts, ovals, etc and these can be combined into all sorts of things. Check out these simple projects. All you need are some basic wood shapes, acrylic paint, a paintbrush and some glue. You can find instructions for these projects and more at michaels.com


Enjoy! Y'all come back now.........
Yours truly,
Julie :)


Enjoy! Y'all come back now.........
Yours truly,
Julie :)
Wednesday, December 7, 2011
The Adventures of Sock Monkey continue......
"In the meadow we can build a snowman....." if we only had some snow.

"I can fly, I can fly", if I only knew where the accelerator was.......

Hmmm... not the kind of deer I was dreaming about.....

I hope you noticed I now have a tulle skirt under my silver tutu. I also do all my own stunts.
Y'all come back now,
Yours truly,
Julie :)
Monday, December 5, 2011
Sock (Monkey) Hop
Can you believe it's already December and today is First Monday - time for another blog hop and giveaway! This month's giveaway is sponsored by When Creativity Knocks an online craft TV show.

As you hop thru the Designer Craft Connection blogs, you'll see we've been "monkeying" around this month. Take a look at what my little monkey has been up to - obviously inspired by Christmas decorating:


As you hop thru the Designer Craft Connection blogs, you'll see we've been "monkeying" around this month. Take a look at what my little monkey has been up to - obviously inspired by Christmas decorating:


This little monkey thinks she's a fairy.... she must be from England, where fairies help Father Christmas and often sit on top of the Christmas tree. She has white feather wings and a "tutu" skirt from gathered wired ribbon - EZ PZ.
Sock Monkeys have been around for a long time and you only have to visit your local Cracker Barrel country store and restaurant to see that they are inundating our Christmas festivities this year. Making your own is a simple task.
You can find the original socks at Fox River Red Heel Sox
An adorable Sock Monkey rubber stamp at Judikins

Custom color your sox with a variety of colors of RIT Dye and

You can also enter to win
• WKC Video book, Sock Monkey Goes BanAnas
• A Sock Monkey body, pre-sewn, ready to stuff
• One pair of the original Rockford Red Heel Sox
• Button eyes, needle, floss and stuffing
a prize package worth over $40!
Here's what you do:
• Go to http://www.whencreativityknocks.com/ website
• In the Member Log in box click: Create An Account
• Entry Code: Sock Monkey
There is also a discount coupon to purchase the WCK VideoBook: Sock Monkey Goes BanAnas.
We had a blast monkeying around this month - I wonder what else these monkeys will be up to..... y'all come back now.
Yours truly,
Julie :)
Monday, November 28, 2011
4 Weeks and Counting!
Just got back from a wonderful week in PA. The weather was gorgeous and it was nice to just get away and be "uncrafty" for a while. Most of the time anyway. We helped my son and his wife decorate for Christmas; the guys did the outside and the girls took care of the inside. We trimmed the staircase with garland then added these decorations between the swags. Nothing new, I know - but they're easy to make and are a great accent for all kinds of things.


We used plastic balls - just in case one dropped, plus they're not as expensive as the glass ones. To make the "balls", just thread each ball onto thin wire, (8-12 depending how big you want the cluster to be), then pull the ends of the wire together. Twist together to secure then thread narrow ribbon through the center of the balls. Attach the ends to a bow at the top and you're done!
The cluster hanging from the light fixture was made a little differently. We threaded narrow ribbon thru the top of each ball then gathered the ends of the ribbon together, varying the lengths. Adjust as necessary. When it looks okay, wrap the ends of the ribbon with wire to secure then attach to the base of the light fixture. Add a large bow to the top if you like. We had a ball making these; hope you do too! Enjoy! Y'all come back now............
Yours truly,
Julie :)
Sunday, November 20, 2011
Happy Thanksgiving Everyone!
Visiting my son and his wife for Thanksgiving this year, so I've been tying up some loose ends this week, prepping a big job for when I come back and reminding myself that Christmas day is now only 5 weeks away! Oh my.... it's a scary thought. Not sure why it is, but I never feel "ready" for Christmas. But it comes whether I'm ready or not and each year I try to slow down, so I can really enjoy the fun and joy of this special time of year.
I love everything about Christmas - the decorations, the music, but having the family together is the best gift of all. I also indulge in lots of memories of all the Christmases past and enjoy every last second. So take time to smell the turkey cooking next Thursday, eat waaay too much, savor the moment and get in the holiday spirit. Cheers! Y'all come back now..........
BTW: See post below and don't forget to post your ideas about the Flip-Pal™; it's flippin' awesome!
Yours truly,
Julie :)
Tuesday, November 15, 2011
Christmas List
I started on my Christmas list early this year and right at the top is a Flip-Pal™ Mobile Scanner. It's a small hand held, battery operated scanner that you take to your project! I first saw this at the CHA Trade show over a year ago, then Flip-Pal sponsored a segment on "Scrapbook Soup", so I got to see it in use, up close and personal. Check out this video:

There are so many ways to use this handy dandy scanner. I have an old, really old photograph album my dad put together in the '40s and I can use the scanner to copy photos without having to try and remove them. The other thing I like is that I have some antique books with beautiful color plates. I can now scan these without damaging the book itself. Please note: When scanning images, patterns, etc unless they are your own artwork, or designs, you may not use them for any kind of commercial purposes, or personal gain. Images are protected by copyright laws and are the intellectual property of the person who created them. Just so you know, I have also signed up to become a Flip-Pal™ Affiliate, which means that if you click on the Flip-Pal™ logo in my sidebar and purchase a unit, I will receive a small commission from the sale. This amount goes into the account I use to pay to ship the giveaways I sponsor throughout the year.
Talking of giveaways, if you hop round the Designer Crafts Connection, you'll notice there are a number of projects that were created using a Flip-Pal and ideas for even more projects. Here's a challenge for you - How would you use a Flip-Pal™? Share your creative ideas and you could win a Flip-Pal™!!!!!
To submit your “Scan & Share” ideas, click here. The blog hop follower who comes up with the most creative and productive ideas using a Flip-Pal™ mobile scanner will win their very own Flip-Pal™. The winner will be announced on December 15th. Good luck! Y'all come back now.......
Yours truly,
Julie :)
Tuesday, November 8, 2011
Giveaway Winner!
There are 40 designers linked in the Designer Crafts Blog Connection. 27 of us also participated in the Sizzix Fresh Vintage Blog Hop. So, drum roll please
Jengd AND
Pamela Jane AND
ScrappySuZQ
are all winners!
Jengd guessed correctly, but one of our designers removed the Fresh Vintage hop logo from her blog, so Pamela Jane and ScrappySuZQ were also correct with 26. I would like to send each of you something too - there's no way I can pick only one winner when 3 of you were correct.
I have email addresses for jengd and Pamela Jane from the comments. Scrappy, please email your address to me julie@juliemcguffee.com no later than November 11th.
Don't forget you can still win a Sizzix Sidekick and 2 sets of Sizzlets Alphabet dies. Details are posted below.
Y'all come back now!
Yours truly,
Julie :)
Sunday, November 6, 2011
First Monday!
It's "First Monday" and this month our theme is "Holidays". Before I share my project, there's a couple of things you'll want to know:
1. Check out my Scoreboard Die Caddy project. There's a Giveaway and if you haven't already entered you can do so until midnight tonight, Nov 7th. The winner will be announced tomorrow, Nov 8th.
2. Designer Crafts Connection now has a Facebook Page @ https://www.facebook.com/DesignerCraftsConnection LIKE our NEW Designer Crafts Connection Page on Facebook so you'll learn about our challenges, giveaways, and announcements. Don't forget to share with your Facebook friends so they can join in the fun.
Now here are my Holiday projects:

 You'll find specific instructions for these projects in Spellbinders® Nestabilities® Basic & Beyond book, but I think you can see how they're made by looking at these photos. There may be a couple of things about the tree that aren't quite obvious. I used a spool of green thread for the base and glued a dowel into the hole. The cones were made using three sizes (sm, med & large) of Nestabilities® Scalloped Circles. To make the cone, cut from the outer edge to the center then overlap the edges to form the cone shape. Before placing the large cone over the dowel, place a 2" piece of a clear drinking straw over the dowel first. This will stop the cone from falling to the bottom of the dowel. Separate the medium and small circles in the same manner with cut pieces of the drinking straw. I used glitter card stock for the die cut circles. Nothing says "Holidays" like lots of "bling".
Since it is the beginning of the holiday season, I also have another giveaway for you:

A Sizzix Sidekick and two sets of Alphabet Sizzlets, "Girls are Weird" and "Script". To enter to win, check each project in the DCC webring as you hop around and note how many designers used a die cut shape on their project. It can be any die cut shape. Write your answer here, in the comments section, then check back November 16th to see if you're a winner! And, guess what, there'll be another giveaway!!! Like I said, it's the holiday season, so there are 3 giveaways this month and, of course, there'll be one in December. So, don't forget to "like" our FB page so you'll hear all the latest news and tell your friends! BTW: Some designer blogs have the DCC Logo near the top of their sidebar, but some of them place it waaaay down, so keep looking.... if you get stuck hopping forward, go back to the blog where you started, then simply hop backwards. BTW - I can only ship to a US address. Good Luck! Enjoy!
Yours truly,
Julie :)
1. Check out my Scoreboard Die Caddy project. There's a Giveaway and if you haven't already entered you can do so until midnight tonight, Nov 7th. The winner will be announced tomorrow, Nov 8th.
2. Designer Crafts Connection now has a Facebook Page @ https://www.facebook.com/DesignerCraftsConnection LIKE our NEW Designer Crafts Connection Page on Facebook so you'll learn about our challenges, giveaways, and announcements. Don't forget to share with your Facebook friends so they can join in the fun.
Now here are my Holiday projects:


Since it is the beginning of the holiday season, I also have another giveaway for you:

A Sizzix Sidekick and two sets of Alphabet Sizzlets, "Girls are Weird" and "Script". To enter to win, check each project in the DCC webring as you hop around and note how many designers used a die cut shape on their project. It can be any die cut shape. Write your answer here, in the comments section, then check back November 16th to see if you're a winner! And, guess what, there'll be another giveaway!!! Like I said, it's the holiday season, so there are 3 giveaways this month and, of course, there'll be one in December. So, don't forget to "like" our FB page so you'll hear all the latest news and tell your friends! BTW: Some designer blogs have the DCC Logo near the top of their sidebar, but some of them place it waaaay down, so keep looking.... if you get stuck hopping forward, go back to the blog where you started, then simply hop backwards. BTW - I can only ship to a US address. Good Luck! Enjoy!
Yours truly,
Julie :)
Saturday, November 5, 2011
Please to Remember the Fifth of November
Wow, November is a really busy month! The first thing that comes to mind, of course, is Thanksgiving. Thanksgiving is one of the holidays that is only celebrated in the US and Canada. However, there are celebrations in different parts of the world to give thanks for a bountiful harvest, since this is the time of year when crops are harvested to provide food for the following months.
November 1st was All Saints Day, or All Hallows Day when the Saints and Martyrs of the Christian faith are remembered. This is also All Souls Eve, when families remember the souls of the departed. It is still tradition in many parts of the world to light candles on the graves of family members, in cemeteries and churchyards. Maybe this is where the tradition of lighted pumpkins originated for Halloween.
November 11th is Veterans' Day and Poppy Day in the UK. The poppy is significant because the armistice for the Great War (World War 1) was signed in Flanders field in Belgium. Legend says that red poppies grow in this field as a reminder of the blood that was lost. (I may not have this quite right - the memory is not what it used to be, but this is the story my mum used to tell.)
I wouldn’t be British if I didn’t mention that November 5th, is Guy Fawkes Day. This charming feller tried to blow up London’s Houses of Parliament in 1605. The dastardly plot failed miserably and the plotters were captured leading to this annual celebration, which continues to this day. Bonfires are lit and an effigy of Guy Fawkes is placed on top. Not exactly a pleasant thought, but it is one of the most eagerly awaited celebrations throughout the year. The night before, November 4th, is, as you can probably guess, "Mischief Night".
Please to remember, the fifth of November, gunpowder, treason and plot.
I see no reason why gunpowder treason should ever be forgot.
There are many other Saints’ days and traditions during the month of November and all of them have their own special feasts. Celebrations go hand in hand with food and drink throughout the year, with recipes being passed down from generation to generation. I feel there is a great sense of security to be derived from traditions, whatever they may be, since these are the things that are certain in the uncertainty of life.
We eat turkey at Thanksgiving and in England on November 5th it's all about Parkin Pigs (these are kinda like gingerbread men, only pigs instead), potatoes baked in the embers of a bonfire, meat pies and mushy peas, but the best was always "Plot Toffee". Here's my mum's recipe, and I quote directly from her, handwritten recipe book:
Put 3 oz Butter, 6 oz Granulated Sugar, one small tin of Nestle’s Condensed Milk, 1 tsp Vanilla Essence and 1 ½ really big Tablespoonsful of Golden Syrup* into a pan, which has been well greased with lard. Cook very slowly to the boil stirring continually until it turns a nut brown colour (about 30 mins). Test a little in a basin of cold water for hardness. Pour into a well buttered 7” x 9” pan. When set turn out onto wax paper then break into pieces by hitting sharply on the under side (with a hammer). *Golden syrup, or treacle can be found in many food stores in the international aisle. You may be able to substitute with corn syrup, but I’ve never tried it…….. Enjoy! Y'all come back now!
Yours truly,
Julie :)
Monday, October 31, 2011
Scoreboard Die - Caddy Project
A friend and fellow CHA Designer, Eileen Hull designs Scoreboard dies for Sizzix®. These are specialty dies for cutting mat board. Many of us are supporting her with a blog hop during October and November by creating projects to feature her 12 new designs which were introduced this summer. I received the Caddy die to work with, plus Image Stamps designed by Lara Scott and Baker's Twine from The Twinery.
This is my project:


This is how it all came together:
1. Dip a dampened sea sponge into a little DecoArt® Americana pink paint.

2. Sponge the paint all over 2 pieces of white mat board. Sponge lightly at first; you can always add more color.

3. Stamp the design onto the painted mat board. I used black ink. Note: Make sure the paint is dry.

4. With the patterned side facing down (on the die), cut two sets of shapes using the die.
5. Assemble two caddys, then glue the backs together. (I used Elmer's Tacky glue.)
6. Referring to the photograph, glue 5/8" wide, black gros grain ribbon around the top of the caddy about 1/4" from the edge then glue off white, or blush pink cotton twill tape on top of the black.
7. Create twine buttons as follows:


This little caddy is perfect for holding business cards, index cards and anything else you need to keep handy. Gluing two together, gives me twice the space to store my stuff! If you'd like to see more great projects created with this die, just hop forward via the Sizzix Fresh Vintage logo on the left.
Wouldn't you just love to have this die, some bakers' twine and two of Lara's stamps? Well here's a giveaway for you:

Yours truly,
Julie :)
This is my project:

And these are the supplies I received plus a package of mat board. I also used DecoArt® Acrylic paint, a sea sponge and a box of Elmer's Craftbond pop-up medium Glue Spots, gros grain ribbon, twill tape and Elmer's Tacky glue:
This is how it all came together:
1. Dip a dampened sea sponge into a little DecoArt® Americana pink paint.
2. Sponge the paint all over 2 pieces of white mat board. Sponge lightly at first; you can always add more color.
3. Stamp the design onto the painted mat board. I used black ink. Note: Make sure the paint is dry.
4. With the patterned side facing down (on the die), cut two sets of shapes using the die.
5. Assemble two caddys, then glue the backs together. (I used Elmer's Tacky glue.)
6. Referring to the photograph, glue 5/8" wide, black gros grain ribbon around the top of the caddy about 1/4" from the edge then glue off white, or blush pink cotton twill tape on top of the black.
7. Create twine buttons as follows:
• Tie an overhand knot at the end of a 12" piece of twine.
• Push the knot into the center of a glue spot.
• Wind the twine around the center knot, pushing into the glue spot as you wind.
• When the spot is covered, cut the twine and push the end under the spot.
• Glue the twine buttons onto the twill border.
Wouldn't you just love to have this die, some bakers' twine and two of Lara's stamps? Well here's a giveaway for you:

Here's how you enter to win:
You will also see the blue, Designer Crafts Connection logo on the left, just above the Sizzix Fresh Vintage logo. Many of the DCC designers are also participating in Eileen's blog hop. Hop forward through these DCC designer blogs and see how many you can find with the Sizzix Fresh Vintage logo on their blog. If you complete the DCC hop, you will end up back here. Tell me how many are participating in my comments section and I will pick a winner from those of you who found them all. I will announce the winner on November 8th, so check back - you'll also find I'm having another Giveaway on November 8th - a Sizzix Sidekick with 2 sets of Sizzlets alphabets - Script and Girls are Weird!! Y'all come back now............Yours truly,
Julie :)
Monday, October 24, 2011
Halloween Votives 2
I'd forgotten how much fun it was to wield a sponge brush dipped in Mod Podge. I've already given away the votives I made with napkins, so this time I thought I'd use orange tissue paper. I cut strips long enough to go around the glass votive and about 2.25" wide - a little less than the height of the glass. I adhered one strip around the glass with Mod Podge same as the instructions on my post below. While the découpaged tissue paper was drying, I printed Halloween silhouette images, sized to fit, onto an adhesive ink jet transparency sheet then adhered the image on top of the tissue paper. This is what they look like:


They hardly take any time at all to make and at $7.99 for a box of 16 at Michaels they're pretty inexpensive - even less if you have a 40% off coupon! Try some for yourself. You can find Halloween silhouette images to use on my images page right here. They are copyrighted, but you're welcome to use them for personal use. Had another idea - decorate mason jars (same as the votives); wrap wire around the neck and make a handle. Display hanging from tree branches, or on your patio. Y'all come back now.....
Yours truly,
Julie :)
Saturday, October 22, 2011
Halloween Votives
Votive candles are a quick and easy way to add a warm glow to any room in the house, 365 days of the year. Check out these Halloween votives - made in literally minutes.

All you need are a few inexpensive glass votives, decorative napkins, a sponge brush and Mod Podge.

Napkins come in 2 or 3 layers. Cut away the part of the napkin design you want to use then separate the layers. You will only use the layer with the pattern on it. (2 ply napkins from the grocery store are less delicate, than the more expensive ones.)

Using the sponge brush, cover the outside of the glass votive with an even layer of Mod Podge then lay the print on top. Pat gently in place then cover with a coat of Mod Podge. Let dry then add tea lights or LED flickering candles.

With so many napkin designs to choose from throughout the year, you'll have no shortage of decorative votive candles for any occasion. Enjoy! Y'all come back now........
Yours truly,
Julie :)
Tuesday, October 11, 2011
Halloween
Ghoulies and ghosties and long-legged beasties and things that go bump in the night! It's almost Halloween which reminds of a rap I wrote for my children to perform in elementary school about 25 years ago. This is a very condensed version; no idea what I did with the original, but that maybe a good thing:
It's Halloween and party time, so I thought I'd write a little rhyme
About pumpkins and witches, ghoulies and ghosts, all dressed up like
(TV hosts?)
(TV hosts?)
On All Hallows eve we go trick or treat, looking for lots of goodies to eat,
We score lots of chocolate and candy too, that sticks to our teeth like Elmer's glue.
Jack O'Lantern faces that glow in the night, are scary ol' pumpkins with their insides alight.
Bats and witches fly all about, so take it from me, you'd better watch out!
It was really cool back then at the height of rap music popularity.......
Fall is also one of the busiest decorating and crafting seasons of the year. Over a period of only 8 weeks, we decorate for Halloween, Thanksgiving, Kwanza, Hanukah and Christmas, depending on personal family traditions. But let's start with a couple of EZPZ Halloween cards.


You can find the images on my Images for Personal Use page. Just drag into a Word document then print them out onto colored card stock together with titles. Cut to size for cards and invitations, or use to decorate treat bags. You can also print onto inkjet transparency sheets then cut to size and place inside a glass vase or candy jar filled with candy corn, marshmallows, or even an LED votive. Print on vellum then adhere to the outside of a glass jar then place a tea light inside for a cool, spooky effect. Inkjet transparencies can also be hung in a window, or from a light fixture. So many ideas, so little time....... Y'all come back now!
Yours truly,
Julie :)
Monday, October 3, 2011
First Monday - Westcott® Challenge
It's unbelievable how quickly the months are flying by. Can you believe it's October already! Our theme for First Monday projects should probably be Halloween, since it's just around the corner, but come back in a week or so, I'm sure we'll have some great project ideas to offer.
This month the Designer Crafts Connection is participating in a manufacturer challenge. Sponsored by

Each of us received Westcott® Brand Cutting Tools to work with. The thing I like best about these scissors is the fact that I can cut paper and fabric with the same pair! Do you remember the days when you couldn't use the same pair? I had to have one pair for paper and one for fabric..... well not any more! Plus these scissors are non stick titanium bonded to boot. This was really important for this challenge because we also received product from VELCRO® Brand Hook and Loop Fasteners and The Duck Brand® Duct Tape Rolls and sheets. Lots of sticky stuff to work with.
Without further ado, here's my project - a woven ribbon purse and bangle:
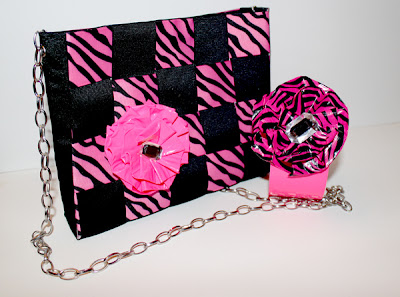
And these are some of the supplies I had to work with. I also used double sided, tacky tape, jewelry chain, 2 silver eyelets and an eyelet setter.

The first step was to measure the ribbon (no ruler needed when you have a cutting mat). I cut five, 15" lengths of black 1 1/2" gros grain ribbon and one, 21" long. I also cut eight, 9" pieces of pink and black zebra ribbon. It was also 1 1/2" wide.

I taped the top edges of the black ribbon to a large piece of poster board to keep them aligned, then wove 4 pieces of the patterned ribbon across as shown. You will then add the long piece of black ribbon. This will be the bottom and sides of the purse.

Once you've added the additional 4 pieces of patterned ribbon, tape the opposite ends of the black ribbon to the poster board to keep them in place. Then starting at the center, cover the woven ribbon with duck tape. BTW - the patterned ribbon is woven with the pattern side down, otherwise you'd be covering it up with the duck tape.
 Remove the tape from the top and bottom, then fold the ends inwards even with the first horizontal piece of ribbon. Hold in place with tacky tape. I then placed a piece of duck tape across the bottom to cover the raw edges of the ends of the ribbon. Cover the ribbon that extends on either side with duck tape. Fold the edges inwards even with edges of the black ribbon, the fold the sides upwards. Adhere the black ribbon to the edges to form the purse. Fold the end over, so they are even with the top, then punch a hole in each side and place an eyelet in each about 1/2" from the top. Attach a jewelry chain to each side using a large jump ring if needed. To finish I cut a 1" piece of black Velcro® to the inside of the purse at the top for a closure.

The rose can be made from the same patterned ribbon, but I made mine from the pink Duck tape then placed a self adhesive "jewel" at the center. The bangle is simply a wide ring (section) cut from a sturdy plastic bottle of water. I covered the outside with Duck tape and added a rose with small squares of Velcro®. This way the rose is interchangeable. There is also gold metallic Duck tape which would have looked great with a bunch of jewels placed all around it. So many colors to play with, so little time!
There's a lot of pink going on since, October is Breast Cancer awareness month. Which reminds me, I'm due for a check up. Have you had yours this year? I'm an eleven year Colon Cancer survivor, so, believe me, check ups are important - I'm living proof!
This is our giveaway for October (US residents only please), provided by Westcott:

To enter to win, click on the photo/link and it will whisk you away to the Westcott® blog where you can comment on your favorite projects, but make sure you hop round the ring first to see what everyone else came up with. The winner will be announced November 1st. Good luck and enjoy the hop! Y'all come back now......
Yours truly,
Julie :)
This month the Designer Crafts Connection is participating in a manufacturer challenge. Sponsored by

Each of us received Westcott® Brand Cutting Tools to work with. The thing I like best about these scissors is the fact that I can cut paper and fabric with the same pair! Do you remember the days when you couldn't use the same pair? I had to have one pair for paper and one for fabric..... well not any more! Plus these scissors are non stick titanium bonded to boot. This was really important for this challenge because we also received product from VELCRO® Brand Hook and Loop Fasteners and The Duck Brand® Duct Tape Rolls and sheets. Lots of sticky stuff to work with.
Without further ado, here's my project - a woven ribbon purse and bangle:

And these are some of the supplies I had to work with. I also used double sided, tacky tape, jewelry chain, 2 silver eyelets and an eyelet setter.

The first step was to measure the ribbon (no ruler needed when you have a cutting mat). I cut five, 15" lengths of black 1 1/2" gros grain ribbon and one, 21" long. I also cut eight, 9" pieces of pink and black zebra ribbon. It was also 1 1/2" wide.

I taped the top edges of the black ribbon to a large piece of poster board to keep them aligned, then wove 4 pieces of the patterned ribbon across as shown. You will then add the long piece of black ribbon. This will be the bottom and sides of the purse.

Once you've added the additional 4 pieces of patterned ribbon, tape the opposite ends of the black ribbon to the poster board to keep them in place. Then starting at the center, cover the woven ribbon with duck tape. BTW - the patterned ribbon is woven with the pattern side down, otherwise you'd be covering it up with the duck tape.


The rose can be made from the same patterned ribbon, but I made mine from the pink Duck tape then placed a self adhesive "jewel" at the center. The bangle is simply a wide ring (section) cut from a sturdy plastic bottle of water. I covered the outside with Duck tape and added a rose with small squares of Velcro®. This way the rose is interchangeable. There is also gold metallic Duck tape which would have looked great with a bunch of jewels placed all around it. So many colors to play with, so little time!
There's a lot of pink going on since, October is Breast Cancer awareness month. Which reminds me, I'm due for a check up. Have you had yours this year? I'm an eleven year Colon Cancer survivor, so, believe me, check ups are important - I'm living proof!
Some of the projects you see on your journey round the webring are being auctioned for a fund raiser at Charity Wings Website . You can see them, and bid on them here: http://charitywingsnews.blogspot.com/2011/10/westcott-brand-and-friends-auction-for.html
This is our giveaway for October (US residents only please), provided by Westcott:
To enter to win, click on the photo/link and it will whisk you away to the Westcott® blog where you can comment on your favorite projects, but make sure you hop round the ring first to see what everyone else came up with. The winner will be announced November 1st. Good luck and enjoy the hop! Y'all come back now......
Yours truly,
Julie :)
Subscribe to:
Posts (Atom)