Sunday, April 13, 2014

Easter Crafts

It's Easter Sunday next week, so here's a last minute project you can make for yourself, or take to a friend's as a hostess gift.


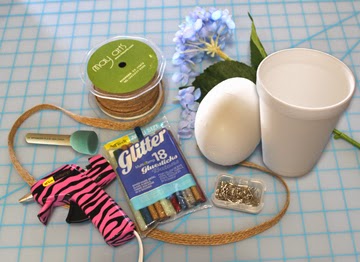
You'll need the following supplies, most of which you may already have around the house:

        4" Smoothfoam Egg; 2" Smoothfoam ball, or cupcake shape; small disposable coffee cup; green Floral Plant Stake (or bamboo skewer painted green); small silk florets (from a hydrangea for example); glue gun; clear glitter glue stick; sequin pins; 1/2" Burlap ribbon; scrap of accent ribbon and/or curly ribbon; craft paint (color to match florets - not necessary if you use white florets); sponge pouncer and a rabbit "peep".  


1.  Push the plant stake into the bottom of the egg.  Use as a handle while you pounce paint over the surface of the egg.  Let dry.
2.  Glue the end of the burlap ribbon at the bottom of the cup.  Wrap the ribbon around the cup until it is completely covered.  Glue at the top then cut.  Glue either a ball, or a cupcake shape to the inside of the cup with the hole facing up.
3.  Pull the small florets off the stems. Attach each floret to the surface of the egg with a pin until the surface is completely covered.  Add a spot of glue to the center of each floret to cover the head of the pin.


4.  Trim the stake to the desired length then push the end thru the center of the peep from the top down.  Insert into the foam piece in the center of the cup. Secure with glue.  Note: I let my peeps harden first by leaving them out of the package.  
5.  Tie a small bow around the stake at the base of the egg and/or add curly ribbon.  Fill the cup with Easter candy.

GLUE GUN TIP:  There are lots of colored glue sticks to be creative with.  One of the challenges, however is emptying the glue gun when you wish to change color.  You can use up the color already in the gun by making little dots of glue on wax paper, or a disposable foam plate to make "brad" accents for all kinds of projects, or if you have silicone molds, fill the shapes with glue for some really fun accent pieces.  I have silicone button and floral molds which I used to make the embellishments shown below.  These molds are for cake decorating, but perfect to use with glue and paper clay!  The detail is amazing!


Hop to it!  There aren't many days left, but you'll find this project EZPZ, quick'n EZ.  Enjoy!  Y'all come back now...............

Yours truly,
Julie :)

KEEP CALM AND CARRY ON CRAFTING!

Monday, April 7, 2014

DCC First Monday - Spring Flowers

I love flowers!  I like to paint them, photograph them and grow them in planters and barrels around the house and in the front yard.  Unfortunately Texas weather doesn't really cooperate except in Spring when the wild flowers here are beautiful.  Bluebonnets, Indian Paintbrush and yellow daisies start to decorate the highways and byways in April, making it the prettiest time of year.  It's illegal to pick these, of course, so I venture to say they are the most photographed wild flowers in the US.


Snowdrops start to poke their heads thru the snow in February in the UK, followed by hosts of daffodils in March which grow willy nilly along the banks of both country and city lanes, up hill and down dale like clouds of yellow.  This is one of my favourite photos taken in York.


I used to collect wild flowers as a child and pressed them between the pages of the telephone book.  Once dried, I would place them in a journal with a note about where and when I found them together with the name.  I won a prize at school one year, for having collected the most wild flowers (almost 150, all found locally).  The prize was a book about trees - I have yet to figure that one out....

The most common of all wild flowers is the tiny daisy - they grow everywhere!  These are the tiny daisies we used to make crowns for our heads and daisy chains to drape around our necks.  My mum's lawn was always full of them and when I visited in the Spring of 1999 I couldn't resist picking a handful and pressing them between the pages of her phone book, so I could bring some home.  I quickly found a use for them and scanned them to show Scrapbook Memories viewers a technique for creating custom embellishments for their scrapbook pages.  I also used the dried flowers to embellish this scrapbook page. You can see them on the border on the left side of the page together with a few buttercups.  If you remember the earlier scrapbooking shows you may remember this page and, in case you're wondering, I still have a handful securely stashed away together with my other memories.....

  
I love all flowers, but my favourite flowers are tulips..... and daffodils... and fresias... and daisies... and iris, especially if they're all together in one big vase on my dining room table..........  Enjoy!  Y'all come back now..........

Yours truly,
Julie :)

KEEP CALM AND CARRY ON CRAFTING!


Thursday, April 3, 2014

Stained Glass with Attitude!

I'm sure everyone realizes by now that I pretty much love all kinds of crafts, but I do have some favourites.  As a craft designer in the creative, Arts & Crafts industry for 30+ years, I've had the opportunity to see and work with some wonderful products.  It's always a special thrill, however when a company introduces something that's brand new to the industry - something that hasn't been seen before.  Craft Attitude™ is one such product and it is absolutely amazing!  Craft Attitude is a printable film that works with your every day inkjet printer and whatever surface YOU like to work with, whether it's wood, glass, fabric, metal, or...... you get my drift.  You can print anything onto it, photographs, clip art, music, graphic art, etc. then adhere it to a surface you like to work with.

When I was asked to create a project for the Spring blog hop, I had the hardest time trying to decide what to create - I was overwhelmed with ideas!  Since Easter is just around the corner and I love working with glass, I finally decided to make a "faux" stained glass piece to hang in a window.


I purchased a float glass frame for this project.  This type of frame includes 2 pieces of glass and no backing.  The design is a combination of a photograph of the Amaryllis growing in front of  my house and graphic art I designed for this project. You can download a PDF of the artwork here (it's free): https://drive.google.com/file/d/0B1iqvH1CdtvxRktaZ25TbW9qcGM/view?usp=sharing


I printed the artwork onto Craft Attitude, applied it (printed side down) to one of the pieces of glass then placed the second piece of glass on top.  The film clings to the glass easily.  Remove the backing slowly, smoothing as you go with your fingers, or a soft cloth.  If there are any wrinkles in the film, carefully lift the film then smooth out the wrinkles working from the center to the outer edges. 


I used fishing wire to hang the frame from the top of the window, but you can also prop it up in a well lit corner. 


I posted a jpeg of the artwork, minus the flowers, on the "Images for Personal Use" page here on my blog if you would like to use it.  You can drag the image off onto your desktop then click to open in "Preview" or,  import the jpeg into a Word document if you would like to re-size.  

Check out and "LIKE" the Craft Attitude Facebook page here 
for more ideas and year round inspiration.  Enjoy!   Y'all come back now.........

Yours truly,
Julie :)

KEEP CALM AND CARRY ON CRAFTING!


Disclaimer: This is a paid post. I have a professional relationship with Craft Attitude and received compensation and/or product for this blog post. The opinions and project are my own.