Sunday, December 21, 2014

Last Minute Christmas!

OMG!  Only 3 more days till Christmas so here's a last minute idea for either your home or a gift for a friend. 

I love LED candles, especially the ones that have the timers, and I always pick them up whenever I find them on sale - usually at the Dollar store.  The tall ones look kinda plain though so I decided to dress one up a bit for a centerpiece.  I think it took 10 mins....  Quick'n EZ, right.... and it looks awesome!


I simply printed some Christmas sheet music onto a sheet of Craft Attitude™ then glued it to the front of the candle.  I measured the height of the candle first then sized it about 3/4" shorter before printing.  Pretty cool huh...........   Not just for Christmas decorations, you can also use this idea year round with all kinds of music or even old movie posters and photos, etc. 

Don't forget, you can also use Craft Attitude on any surface including glass, wood and even fabric!!!  Enjoy!  Y'all come back now.........

Yours truly,
Julie :)

KEEP CALM AND CARRY ON CRAFTING!

Friday, December 5, 2014

Smoothfoam Holiday Ball

Every year Smoothfoam has a Holiday Ball and everyone is invited! 

Smoothfoam balls are SO easy to decorate and definitely meet my criteria - Quick'n EZPZ.  So here are a couple of my guests for the "Holiday Ball" - (I'd say they were my Holiday Balls, but would hate to offend anyone).

I made two versions - one for a fancy tree and one for my "kid friendly" tree and here they are:
 

1.  This one is kind of elegant, but still easy to make.  You'll need a length of 18 gauge floral wire, crystal glitter, white glue, sponge brush, fancy beads, a decorative ornament hanger and I thought the feathers added a nice touch.  You'll also need a Smoothfoam ball.......  this one is 3", but you can use any size.

       Step one is to push the wire thru the center of the ball.  Smoothfoam is very dense, so I heat the end of the wire in a candle flame then push thru the ball, using the hole at the bottom of the ball as a guide.  EZPZ.  Use needle nose pliers to make a small loop at the top.  Next step is to cover the surface with an even coat of white glue, then sprinkle with glitter.  I push a bamboo skewer into the bottom of the ball (next to the wire) so I have something to hold onto while I do this. Set aside till the glue is dry, then remove the skewer, trim the wire and make a small loop at the bottom.  Thread whatever beads you have on hand onto an eye pin, beading wire, or thread then secure to the loop at the bottom of the ball.  To finish I added the feathers by poking the ends up thru the bottom bead, then added the ornament hanger to the loop at the top.

2.  The snow "ball" is even easier. (there's actually 2 versions).      


 Push a piece of wire thru the ball as above then make a loop at the top for the hanger.  Cover the ball with glitter.  His eyes and center of his mouth are large, black quilt pins.  I used 2 smaller quilt pins for each side of the mouth.  The nose is a red pony bead held in place with a large, red quilt pin.  Now you can hang on the tree as is, or decorate him in variety of ways.  I used a cupcake paper for the hat, and chenille and pom poms to make ear muffs and a scarf for the other.  The pom poms were held in place with quilt pins.  I also used a small, "U" shaped piece of wire to attach the bell to the bottom.  So many ideas, so little time - Christmas is only 3 weeks away - oh my!!!   Better get cracking...........  Enjoy!  Y'all come back now.................

Yours truly,
Julie :)

KEEP CALM AND CARRY ON CRAFTING!

Sunday, November 30, 2014

Milk Bottle Snowman

I found some vintage style milk bottles at Michaels the other day.  I wasn't really sure what I wanted to do with them, but I played around awhile and this is what I came up with - a Frosty the Snowman candle!


Isn't he cute!  And, he's so easy to make.... this is what you'll need:


1.  Etch the bottle:
To give Frosty his special look, I filled the bottle with etchall® dip'n etch, glass etching liquid from B&B Products.  Leave for 20 mins then pour the dip'n etch back into its container.  Rinse the bottle thoroughly. Now to etch the outside of the bottle.  You'll need a plastic container a little taller and a little wider than the bottle.  Fill the bottle with marbles, pebbles, or something that will stop it from floating, then place it into your container.  Fill the container with water up to the neck of the bottle. Carefully remove the bottle.  The water level will sink.  Mark the water level on the outside of the container, then empty the water.  Dry the container thoroughly then fill with dip'n etch up to the mark.  Carefully place the milk bottle into the container. The etching liquid will rise to the occasion.  Let stand for 20 mins.  Remove the bottle, rinse thoroughly then dry with a soft cloth.  Pour the dip'n etch back into the dip'n etch container to be used again at a later time.

2.  Nose:
Holding the brush upright, dip the rounded end of a paintbrush handle into a puddle of orange glass paint.  Make a dot on the glass where you want his nose to be, then without removing the handle from the surface, slide it downwards and to one side.  Practice on a piece of wax paper first.


3.  Eyes:
Using a paintbrush handle, make 2 black dots on each side of the nose.

4.  Mouth
Dip the paintbrush handle into black glass paint then place the first dot where the center of the mouth will be.  Continue to add 3 dots on one side.  Each dot will be smaller than the preceding dot. To add dots to the other side, dip the handle into black paint then make the first dot on wax paper, then add 3 dots to the opposite side of the center dot. 

5. Tea Light:
Use the paint dauber to lightly sponge black paint onto the bottom of the tea light.


6.  Hat:
Cut a strip of black felt about 1" wide and long enough to go around the neck of the bottle. Glue the overlapped ends together.  To make the brim, cut a 3" circle of black felt with a hole at the center large enough to place over the tall part of the hat. Place the LED tea light upside down inside the top of the hat.  It is a little larger than the bottle opening, so it won't fall in.  Don't glue in place, or you won't be able to replace it when the battery eventually wears out. Decorate the hat if you like.  Frosty the snowman never looked so good! Especially in the evening when his light is turned on.


There are lots of other glass containers you can use for this technique.  What will you make?  

See the post below this one for more, easy to make etched gifts.  Enjoy!  Y'all come back now.........

Yours truly,
Julie :)

KEEP CALM AND CARRY ON CRAFTING!

Friday, November 28, 2014

99 Handmade Holiday Gifts - Etched Glass Votives


There's always something special about candlelight around the holidays.  Use on tables, mantels above the fireplace, in guest bathrooms, or give them as a hostess gift.  Votives are relatively inexpensive and I buy the boxes of clear ones (without the wax candles) from Michaels using my 40-50% off coupon if they're not already on sale, plus the LED tea lights.  I do like to jazz them up a bit though so I used a sheet of peel off (or outline stickers) and dip'n etch, from B&B products to etch star designs on each votive.  As you know, I like EZPZ and these fit the bill perfectly.


To create the negative star design, I placed star stickers around each glass, then realized that after removing all the stars, the leftover sheet had a pretty neat design on it too!  That's what I used to create the carpet of etched stars on the other votive.

This is what you do:

1. Carefully remove the sticker backing sheet from the carrier sheet. You can discard, or use this to etch the stars as seen on the sample above by placing it carefully around the outside of the glass votive.


2.  Roll the carrier sheet back away from the star stickers and the points of the stars will pop up, making it easier to remove them with the tip of a craft knife, or a pick tool.  Decorate the outside of the glass with stars.


3. Now to etch. You'll need a plastic container that's just a little larger than the glass votive.  Fill the votive with something to weigh it down (I use glass marbles) then place it inside your plastic container.  Fill with water until it almost reaches the top of the glass then remove the glass.  Mark the water level in the container.  This is so you'll know how much etching liquid to use.  Empty the water then dry the container and the glass votive thoroughly.  (Use a votive without stickers for this step.) Fill to the line with dip'n etch then carefully place the glass votive into the container.  The etching liquid will rise to the occasion to the top of the votive.  Let sit for 20 mins, then repeat with your second glass votive.  etchall® Dip'n etch from B&B products is re-usable, so you can use it multiple times.


4.  Remove the votive from your container, rinse well then dry with a soft cloth.  Remove the stickers to reveal your design.

CAUTION - Etchall dip'n etch is a permanent etching product.  It is very easy to use, but please read the directions on the container.  Do not let the liquid touch a surface you do not want to etch. I work on a laminate counter top, not granite for example, and my sink is stainless steel, not porcelain. Always use caution.


So here are the etched votives with their LED tea lights.  I put red cellophane around the inside of one of them.  It ended up looking a bit too pink for Christmas, but it was an idea worth trying! My granddaughter loves pink though, so it will look nice in her bedroom...........

Look for more Handmade Gifts from the 365 Days of Crafts,  99+ Handmade Holiday Gifts blog hop.  Find instructions by selecting the links below.  If you see projects you like, follow the designers on Facebook, Pinterest or Instagram to keep up with their creations. You'll find gifts that are perfect for friends, family, teachers and almost everyone on your list. There are handmade food items, paper crafts, ornament ideas, sewn items, home decor and so much more.  Be sure to visit each blogger and see what they created.  There is also a giveaway for  a $100 Amazon Gift Card.  You can enter the giveaway by using Rafflecopter.

a Rafflecopter giveaway

Enjoy!  Y'all come back now.............

Yours truly,
Julie :)

KEEP CALM AND CARRY ON CRAFTING!

Monday, November 24, 2014

Handmade Holiday Gifts - Christmas from the Beach

Life's a beach, even during the holidays.  I'm a shell collector and love creating with shells.  I've found all kinds washed up on the beaches I've visited and many of them have ended up as decorations in our home.  Have to admit however that I didn't collect these Helmet starfish.  These are from US Shell, and I found them at my local Michaels' store.  I have a shell mirror and a shell basket in our guest bathroom and since my sister and her husband are coming for Christmas, I thought it would be fun to add a small Christmas tree and it was easy to make! My sister has a "beachy" bathroom too, so this will be an additional gift to take home.


Here's what you need:


    •  Smoothfoam® cupcake shape
    •  5 Helmet Star fish (in graduating sizes large to small). You buy the larger ones in eaches, but there are packages of the smaller ones.
    •  2 Tiny Starfish (found in a package of assorted shells)
    •  Burlap ribbon
    •  Cool-temp glue sticks and glue gun

1. Glue the burlap ribbon around the cupcake shape for the base.
2. Glue the largest starfish to the top of the base then glue the others on top.
3. Glue two tiny starfish together (back to back) then glue to the top for the star.

Yep, it's that easy and it really does add that perfect little bit of merry to my bathroom beach theme!

These are the other shell projects:  The mirror was made by gluing a craft store mirror to the center of a Smoothfoam disc then adding shells around the edge.  To make the baseket, I glued clam shells around the outside of a Smoothfoam bowl.  Shells are surprisingly heavy, so Smoothfoam is the perfect surface for these pieces since it's very sturdy yet lightweight.


These are just a few of the Handmade Gifts from the 365 Days of Crafts 99+ Handmade Holiday Gifts Blog hop.  Look for more by selecting the links below.  If you see projects you like, follow the designers on Facebook, Pinterest or Instagram to keep up with their creations. You'll find gifts that are perfect for friends, family, teachers and almost everyone on your list. There are handmade food items, paper crafts, ornament ideas, sewn items, home decor and so much more.  Be sure to visit each blogger and see what they created.  There is also a giveaway for  a $100 Amazon Gift Card.  You can enter the giveaway by using the Rafflecopter.

a Rafflecopter giveaway

Enjoy! Y'all come back now........

Yours truly,
Julie :)

KEEP CALM AND CARRY ON CRAFTING!


Wednesday, November 19, 2014

Etched Glass = Easy Gift Giving

I was looking thru a cabinet the other day for some Christmas CDs and came across this small, hand painted vase.  I was about to put it in the Goodwill box, but decided to improve it a bit.  It's not that I didn't like it, it's just that it could be so much prettier.   It's a busy time of year, so whatever I needed to do had to be quick and easy.  You don't need 3 guesses to know what I did........ yep, I filled it with etchall® dip'n etch.  It doesn't get much easier than that and I just love the "milk glass" look! 


As you can imagine, it's not going in the Goodwill box.  It will be an amazing gift for a friend, or neighbour!

So, next time you find a glass container, decorated or not, fill it with dip'n etch for a simple and elegant, upscale look...   


BTW, if you need to know how much dip'n etch you'll need to fill your glass container, fill it first with water, then pour the water into a measuring cup.  Dip'n etch comes in different sizes, but I use it a lot, so I buy the large container.  This etching product is re-usable, so after 15 minutes, pour it back into its container to use again, and again and again!  It lasts a very long time.  You can check the etchall Facebook page for holiday sale offers then purchase directly thru the "buy now" tab on their page, or click on their logo in my sidebar to go directly to the etchall website.  Enjoy!  Y'all come back now......

Yours truly,
Julie :)

KEEP CALM AND CARRY ON CRAFTING!

Friday, November 14, 2014

Book Review - Upcycled Jewelry, Bags, Belts and More

Do you remember the term "waste not, want not"?  or how about "one man's trash is another man's treasure"?  Sayings to remind us that it isn't always necessary to throw things away.

  
Upcycled Jewelry, Bags Belts and More  by Linda Peterson is full of ideas on how creative we can be with many of the day to day items we nonchalantly throw in the trash.  I've known Linda since the early 90's and have always admired her amazing creativity with products like Friendly Plastic, clay (she makes the cuuuutest clay figures and animals) and jewelry pieces.  Linda definitely put that creativity in overdrive when she created the projects for this book.  From soda can tabs and empty plastic soda bottles to bicycle chains and inner tubes, there's something for everyone here, but more importantly it makes each one of us think twice about throwing things away.......

My hubby says I'm a hoarder, but I'm really just a born and bred Yorkshire lass who hates to throw anything away.  I know that one day I'll find a use for it - after all, that's what being "crafty" is all about.  Here's a recycled project I still have around the house:


We used to have the prettiest chandelier that hung in our entryway for many, many years.  After many, many moves however, it simply fell apart, but I couldn't bear to part with those pretty little crystals that picked up the sunshine and filled our home with rainbows.  So - I purchased 2 glass candlesticks and glued a "bowl" from the chandelier onto the top of each one. Then I simply added short strands of crystals around the edge.  I also gave some crystals to my brother-in-law to include in his stained glass pieces, but I still have quite a lot of crystals left just waiting to be given new life when I turn them into something fabulous! 

Now you know what I think about Linda's book, check out what other designers are saying using the links below:


Enjoy!  Y'all come back now............

Yours truly,
Julie :)

KEEP CALM AND CARRY ON CRAFTING!

Sunday, November 2, 2014

Thanksgiving Gifts

November 3rd is First Monday and this month Designer Crafts Connection is sharing ways to say "Thank You"...  For more inspiration, hop thru the webring using the "hop forward" link in the DCC logo found in the sidebar of each member.

Thanksgiving is a uniquely American holiday.  Catherine Millard wrote: "We can trace this historic American Christian tradition to the year 1623. After the harvest crops were gathered in November 1623, Governor William Bradford of the 1620 Pilgrim Colony, “Plymouth Plantation” in Plymouth, Massachusetts proclaimed:
"All ye Pilgrims with your wives and little ones, do gather at the Meeting House, on the hill… there to listen to the pastor, and render Thanksgiving to the Almighty God for all His blessings."
Although Thanksgiving seems to be more about getting ready for the Christmas holidays and looking for the best shopping bargains on Black Friday, I think the majority of families still remember this as the day to give thanks for our many blessings and to share with family, friends and neighbours.  Here's a gift idea using a large, clear glass mason jar with smooth sides:


 Step 1:  Etch the outside of the jar with etchall® by immersing the jar in dip'n etch up to the neck.  (See instructions for glass etching in the second part of this previous post, which will explain how to dip using an empty soda bottle. http://juliemcguffee.blogspot.com/2014/09/glass-etching.html)

Step 2:  To decorate the outside, I printed a photo (sized to 4" x 11") on to Craft Attitude printable film then wrapped it around the center of the jar. I secured the ends with tape, so the wrap could be removed later when the jar needed to be washed.  The photo I used was a pile of apples taken with my phone at the grocery store, but you can use any photo.


Step 3:  Cover the top and bottom edges of the wrap with 1/2" wide burlap ribbon.  Secure the ends with 3D glue dots then adhere additional embellishments to the front with glue dots.  Cover the rim of the lid if desired.

You can fill the jar with a mix to make an apple dump cake, then place it in a basket of red apples and your favourite dump cake recipe to give to a friend or neighbour, or simply place a small LED tea light inside and use as a decorative accent in your own home.  


For a different look, fill the mason jar with etchall dip'n etch then découpage the printed layer of a fall themed napkin onto the bottom half of the jar with DecoArt® Americana® DécouPage.  Embellish as shown.  Etching the inside of the jar will give the jar a milky look, but it will still be shiny on the outside.


              Etched on the outside of the jar                Etched on the inside of the jar
                                 
There are so many other designs you can create using these easy techniques.  Enjoy!  Y'all come back now...........

Yours truly,
Julie :)

KEEP CALM AND CARRY ON CRAFTING!

Saturday, November 1, 2014

Craft Fail

ROTFLMAO because this book is SO real!


Heather sent me a copy of her book to review a couple of weeks ago and I haven't stopped giggling since.  These are the stories that make crafting fun and they're an important reminder that none of us is perfect.  It made me think of more than a couple of times when things went horribly wrong for me.

I love decorative painting and in the 80's and early 90's I sold my painted pieces at craft fairs and craft malls. One of my popular pieces was this "Sweetheart Clock" designed by Scottie Foster.


It was carefully painted then antiqued.  Now the thing about antiquing is that you have to let the patina dry in a dust free environment for at least 24 hours before adding a sealer.  Dust free? In my house? That was a challenge until I came up with what I thought was the perfect solution - I'd put it in the oven.  Definitely no dust in there!  It was a pat myself on the back moment and in it went.

With 2 teenagers in the house plus friends, there was always something going on, so said clock was completely forgotten until I decided to cook pizza for dinner and - you guessed it, I turned the oven on......  it was the smell that reminded me what was already in the oven.  I should have taken photos, but Instagram hadn't been invented then, so I'll let you have the fun of visualizing the clock in all its glory.  The glue that held the wood pieces together had kinda melted and dripped and the paint had cracked in places, but I have to say, it was the BEST LOOKING ANTIQUE clock I ever made!

My story isn't in her book, but you will totally enjoy the ones that are and, yes, there are photos of what each project should have looked like and how they turned out........ The underlying moral of the stories is to learn from mistakes - preferably other people's......


You can follow Heather at Dollar Store Crafts a great resource for tons of great projects, with easy to follow instructions and supplies that won't break the bank!  Enjoy!  Y'all come back now......

Yours truly,
Julie :)

In true British fashion - KEEP CALM AND CARRY ON CRAFTING!

Thursday, October 16, 2014

Hebe Cord Beads

A few weeks ago I received some samples of Hebe cord with the request, "what can you do with this?"  I love a challenge, as do all members of the Designer Crafts Connection, and 13 of us accepted.  If you're not familiar with Hebe cord, it's a thin parachute type cord - strong, shiny and easy to work with.  Unlike floss, or some of the other types of cord, it doesn't ravel - a definite plus when making things like Friendship bracelets.  You can crochet with Hebe cord and also knit with it, using very small needles......  I can knit and crochet and there's an overwhelming number of Friendship bracelet techniques on Pinterest, so I thought I'd try to make something different.

For a number of years I designed and presented projects for Hands on Crafts for Kids, a TV show that airs on PBS.  The second series featured crafts from around the world and I remembered showing viewers how to make a Temari ball.  If you don't know what that is, submit a search on Pinterest and you'll see where my inspiration came from.  This is my version - a lot smaller and not quite as time consuming.


 I had a variety of colors of Hebe cord to choose from plus I used a 1" Smoothfoam™ ball (available at all major craft stores), some sticky dots (from my scrapbook supplies), silver jewelry chain, 2 silver beads, 2 Rondelles, a 2" eye pin, a jump ring, craft knife and a large eye tapestry needle. 


My idea was to wrap the Smoothfoam ball with the cord to create a bead for a pendant necklace. Smoothfoam is so lightweight, you could also make matching earrings...


It's as easy to make as this:  Cover the top half of the ball sparingly with thin glue dots, then starting at the top, wrap the cord around and around down to the half way point on the ball. You'll see that there is a mark all the way round the center of the ball. Make sure the strands of cord are nestled closely together.  Cover the remainder of the ball with glue dots (you can also use a thin, even layer of tacky glue) and continue wrapping until the ball is completely covered.  Holding the needle with a pair of jewelry pliers, carefully heat the end in a candle flame then push thru the wrapped ball from top to bottom.  Now you have a beautiful wrapped bead to incorporate into all kinds of jewelry pieces.

To make my pendant, I added a silver bead and rondelle to the eye pin, added the Hebe bead then another rondelle and silver bead then created a loop at the end of the eye pin.  Using the tapestry needle, I threaded cord thru the links in the silver chain to add a little extra color, then attached the ends of the chain to a jump ring at the top of the eye pin.  I also made a tassel of short lengths of chain and attached them to the opposite end of the bead.

With lots of cord colors to choose from you'll have an easy time making a custom piece of jewelry for any occasion.  Enjoy!  Y'all come back now............

Yours truly,
Julie :)

KEEP CALM AND CARRY ON CRAFTING!


Friday, October 3, 2014

Craft Your Stash!

"If you're crafty and ya know it clap your hands............."


 Love this book!  What I love most about it, is that it reminds us what crafting is all about.  We are so used to walking into a craft store and being completely overwhelmed with so many products to spoonfeed our creativity, we've forgotten how to be creative with what we already have.  Toilet rolls for example!  There are so many things we can make with these small, cardboard rolls.  We always saved them to take to pre-school and Kindergarten teachers to use in their classrooms. Now we're encouraged to buy them in the craft store!!  Seriously.............

I was a child in the 50's and loved to make things!  There weren't any craft stores back then, so it was all about using our imagination and things we had on hand that could be re-cycled.  (We didn't have a television either, so crafting was all part of making our own fun.)   Seems like children back then were inherently creative - and crafty, in all definitions of the word...  and we definitely didn't have books like this to help us along.

Lisa's book is filled with ideas to be crafty, using "supplies" you already have around the house.  You may not even recognize some of them as being "craft supplies", so I challenge you to put your imagination to work and create something without going to the store!  Craft your stash! This is what I did.....

The holiday season is a great time to put our creative caps on.  I make something new for Christmas every year.  For this project I started with a box of old, wooden spools (found in my mother-in-law's attic), some vintage silver tinsel, alphabet letter stickers and bamboo skewers.


A wooden spool is the perfect base for a tree, so I decided to cut triangles (4" x 4") from silver/gold glitter card stock, cover the edges with the tinsel and make some trees.  The letters could spell out a word - the shorter the better, so I decided on J O Y.  I liked the silver letters but didn't have a "J", so used the red acrylic letters and substituted the snowflake for the "O".  I really like the way the red acrylic lets the glitter on the card stock show thru.  I love it when a plan comes together, even if it's way off my original idea.  Instead of gluing the tinsel to the edge of the card stock, I used silver mini brads to anchor it at each corner.  The spools are wrapped with some leftover burlap trim, secured with a glue gun.  I pushed two,  5" skewers, side by side into the hole in the spool.  They fit perfectly and having 2 skewers makes a nice flat surface to glue the triangle to.  Didn't take long to make these at all - EZPZ, just like I like it....


You can purchase a copy of Lisa's book from Amazon, your local bookstore,  or order a signed copy at http://craftyourstash.com    You might even want to get 2.  This book would be a great holiday gift for a crafty, or even a non-crafty friend.

Check out more projects and reviews here as well as a list of participating designers: http://craftyourstash.blogspot.com/2014/09/craft-your-stash-book-tour-giveaway.html and you can also enter to win even more stash!

Here's one more quick idea for you for Halloween - découpaged votive candle holders.  I've posted these projects before, but that's the nice thing about Halloween and Christmas, some projects are timeless and it's okay to re-cycle.


You can find instructions and step by step photos here:  http://juliemcguffee.blogspot.com/2011/10/halloween-votives.html  Enjoy!  Y'all come back now...........

a Rafflecopter giveaway

Yours truly,
Julie

KEEP CALM AND CARRY ON CRAFTING!
 

Monday, September 22, 2014

Glass Etching

I love glass.  I started my first collection when I was 7 years old.  My aunt gave me a glass animal for my birthday and I added more whenever I could.  My collection grew quickly and by the time I left home at the ripe old age of 18, I had more than enough pieces to fill a half dozen or so shoe boxes.  After so many moves, there are only a couple of pieces left, but those small glass animals were definitely the start of something big.

I also love decorative painting and it was at a decorative painting show that I discovered a product that would etch glass quickly and easily - the perfect surface for decorative painting!  There are a few other glass etching products available, but the products from B&B etchall® appeal to my "turn every penny over twice" Yorkshire upbringing - THIS product is re-usable, which means I can use it, put it back in its container and use it again and again and again!!  And you can believe, I do!  Here are a couple of plates I etched with B&B etchall® then painted with acrylic paint:
 

For these samples I used etching products to etch the surface of the plate to give it "tooth" so I could paint on it, but the product is far more exciting than that...  with etchall® crème, or etchall dip'n etch (a liquid) you can etch designs onto all kinds of glass pieces, plus china, ceramic tile, slate and more!  So, you may be wondering, how do I decide which one to use  - etchall crème or etchall dip'n etch?

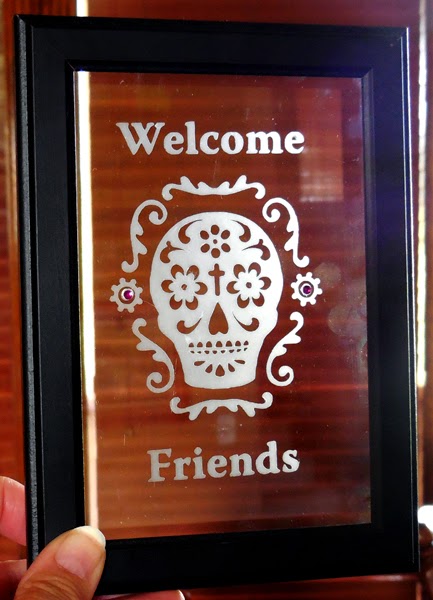
Check out these two glass projects below.  The same design was used for both the mason jar and the framed glass.


I etched the design itself onto the framed glass - "positive" using etching crème, but etched the surface around the design on the mason jar - "negative" with etchall dip'n etch.  


Let me show you how easy this is to do.  BTW, don't be alarmed by the length of the post, I tend to write as if I'm talking......    We'll start by etching the piece of glass with etching crème. 

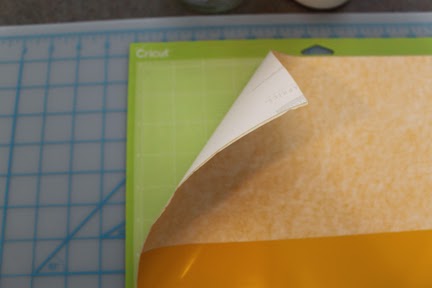
Glass stencils are readily available for glass etching, but will only allow you to etch a "positive" design onto your surface.  In case you haven't already guessed, designing is something else I enjoy.  The sugar skull, which I'm using as an example for this tutorial is one of my designs.  I uploaded the jpeg onto my computer, then using etchall etchmaskstencil material and the vinyl setting, I cut two designs side by side (one with lettering) with my Cricut Explore.  This setting creates what we call a "kiss cut".  It only cuts through the yellow part of the stencil material - not the backing.  It is this special cut which allows us to create either a positive or negative design.

Step 1:  Upload the design to Cricut Design Space then follow the on-screen instructions.  Place the etchmask onto the design mat then load when directed. Cut then remove the mat.


Step 2:  Remove the backing from a sheet of etchmask transfer paper then place the transfer paper on top of the etchmask.  Press firmly in place with the small, black Squeegee.  Do this while the etchmask is still on the cutting mat. 
 

Step 3:  Carefully peel the etchmask and transfer paper away from the cutting mat.

  
Step 4:  This design is 4" x 6" so I included a cut line around the design.  Using the cut line as the guide, cut the "Welcome Friends" stencil from the sheet then carefully peel the backing from the back of the yellow etchmask. The transfer paper will hold all the cut pieces in place.  With the edges of the stencil aligned with the edges of the glass, press carefully, but firmly onto the piece of glass.  Use the squeegee to press in place then carefully remove the transfer paper.  Set the transfer paper aside to use as a catch-all for all the little pieces you'll remove during the weeding process.

  
Step 5:  Use the Detail Pick Tool to remove (weed) the design pieces from the glass.  When removing pieces do not pick from the edge, always pick up from an area away from the edge so the edge of the design is not damaged.  When working with a small, detailed design like this one, make sure that the small pieces are not accidentally removed.  If this happens, use the pick tool to put them back in place.  All exposed glass will be etched.  I place all the pieces of etchmask I remove onto the transfer paper. This way they don't end up in odd places.


Step 6:  This design was 4" x 6" so when I centered it onto a 5" x 7" piece of glass there was a space between the edge of the stencil and the edge of the glass.  I did not want this to be etched so I covered all the edges with leftover pieces of etchmask.  As you can see, I also placed a piece of backing paper from the etchmask and the transfer paper under the top and bottom edges of the glass.  I then poured a large amount of etching crème at the bottom of the glass being careful not to let the crème pour onto the openings in the stencil.  You cannot use too much crème and it is very important that you don't use too little.  Don't skimp!  Use the squeegee to spread the crème across the stencil.  Don't drag the squeegee on the surface, stroke the crème gently across as if you were icing a cake.  Pull in one direction.  Do not go back and forth or side to side.  Cover in one or two strokes if you can.  Now set the squeegee aside and walk away for 20 minutes.


Step 7:  Now scrape the crème back into the container.  A plastic spoon is helpful for this part.  Once you've returned as much as possible to the container, wash away the remainder and remove all the etchmask.  Wash thoroughly then dry with a soft cloth.


Step 8:  Return the piece of glass to the frame, then admire your etched design.
 

This isn't exactly a "beauty shot",  but I wanted to show how cool the etched design looks!  I even added a couple of adhesive "jewels" for a little Halloween bling.

Now let's learn how to use the dip.  Here's a project I created recently using colored glass jars.  They were so quick and easy to make.  I poured dip'n etch into one jar, let it sit for 20 mins, then poured it into the second jar and so on until all the jars were etched on the inside!  When all the jars had been etched, I poured the dip'n etch back into its container to be used again.  I then added some jewel dangles for a little more pizazz.  I love the way the glass is still shiny on the outside while the etching on the inside gives the jars a milky look. 


The technique for the mason jar however, is quite a bit different.


I chose a large mason jar with smooth sides for this project because I needed a smooth area for the design.

You will need a plastic container when using the etching liquid.  The container should be a little larger in diameter than the item you want to etch and a little taller if you want to etch all the way to the top.  I had the perfect container - an empty soda bottle!

Cut the top from the soda bottle.  Don't throw it away, you'll use this as a funnel when returning the dip to its container.  You'll also need some pebbles, or a bag of dried beans or something to put inside the jar to weight it down when you place it in the liquid.  I use red, glass marbles.


Step 1: Position the stencil design on the jar then remove the transfer paper.  This is the same process we used for etching crème.


Step 2:  This time we will remove the etchmask from around the design.  For this project, the design will remain clear - it will not be etched. 


Step 3:  Fill the mason jar with glass beads (or whatever you are using to weight it down), then place it inside the empty soda bottle.  The next steps will determine how much dip'n etch we will need.


Step 4:  Fill the soda bottle around the mason jar with WATER up to the neck of the jar.


Step 5:  Remove the jar and dry completely.  NOTE:  It is better to complete this process before putting the stencil on the glass.  I placed the stencil on the jar first so the jar would be more visible inside the soda bottle for photography purposes.  


Step 6:  When the jar is removed the displaced water will sink to a low level in the soda bottle.  Mark the water line with a sharpie then discard the water and dry the inside of the bottle thoroughly.  Fill the soda bottle with dip'n etch up to the line only then carefully replace the mason jar.  The dip'n etch will rise to the occasion....  Leave for 20 mins then remove the jar, rinse thoroughly, remove the stencil then dry.  Remove the marbles and using the soda bottle "funnel", pour the dip'n etch back into its container.


I now have 3 mason jars ready to place in my window on Halloween.  I found LED lights that change color so this is what my jars will look like in the dark of the night........ hmmm it's kinda like a traffic light....


 IMPORTANT NOTE: When using these, or any products you are not familiar with, please read the instructions on the containers. For example, this product must be stored correctly at all times and you will find details on the container.  It is also recommended that you may want to use gloves when handling the product and wear protective eyewear when using the dip.  There is also a wealth of information, including step by step video tutorials at www.etchall.com together with a full list of the B&B etchall product line.  Visit www.etchall.com via this link or by selecting the logo in my sidebar.  You are also welcome to call their toll free number at any time and ask about a beginner kit - tell them Julie sent you and they'll know exactly what you will need.

Hope you enjoyed the tutorial, even if it was a little lengthy.  I'll keep future projects short and sweet now that you know all the basics, so don't forget to bookmark this post.........  enjoy !  Y'all come back now..........

Yours truly,
Julie :)

KEEP CALM AND CARRY ON ETCHING!