Friday, October 4, 2019

Dancing Storyteller - Making a Difference

It's October! Let's share the love and "Makerdifference"


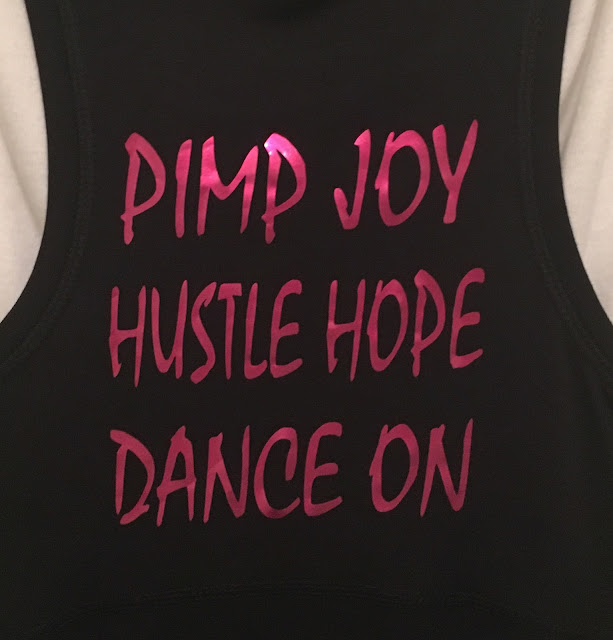
For those of you who have a Cricut® cutting machine and are familiar with the "Dancing Storyteller" Facebook group, here's a shirt to make for yourself and/or a friend.... 

You'll Need:
Cricut® cutting machine
Cricut® Iron-on - White and Hot Pink foil
EasyPress® or iron (no steam)
Shirt  (I got mine at Target)

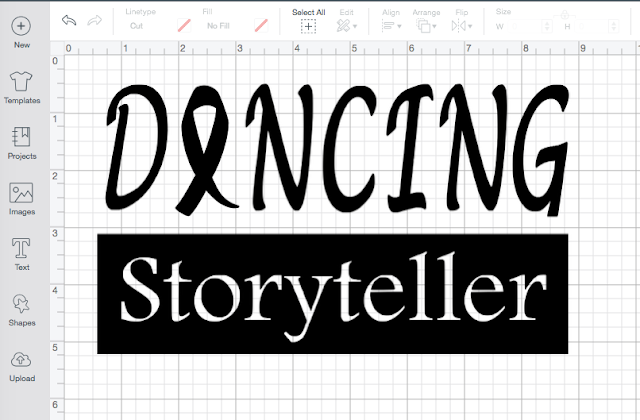
1. Sign in to Cricut Design Space.  Click on the link for the design below, download to your computer desktop then upload to CDS:

  Dancing Storyteller JPEG

NOTE: This design is a JPEG. After uploading to CDS, you will need to delete all the white areas in CDS, Step 2. i.e. the area around the letters and each letter in the word "Storyteller".  You can also use a font in your system to create the word "D   ANCING" together with the Storyteller PNG.

 Storyteller PNG

2. Size the design for the front of your shirt then cut from white iron-on. Remember to select Mirror Image.  FINISH to return to the project page.  If using a different font for the "D   ANCING", you will need to size to the same length as the Storyteller block.


3. Upload the FREE Pink Ribbon image from the CDS image library.  Size the ribbon to fit in the space between D & N then "hide" the "Dancing Storyteller" image by clicking on the "eyeball" in the column on the right.


4. The ribbon and wording on the back of the shirt are cut from pink foil. Select a font from your computer, a Cricut font, or download the PNG file below.  Size the block of words as needed to fit the back of the shirt then cut the ribbon and words - Mirror Image!  Note: If using a computer font, create each line separately, then adjust the width so each line is about the same length.

 Shirt Back
 

5.  Weed both designs. Position the white design on the front of the shirt then press in place.  Remove the liner.  Separate the pink "ribbon" from the wording, then place the pink ribbon in the space between the "D" and the "A".  Press in place.  Note: Temperature settings for your Easy Press can be found here.  
Directions for the iron-on can be found on the packaging.

6. Place the Easy Press mat, or a folded towel, inside the shirt.  Position the wording on the back of the shirt then press in place to finish.  

 Wear with pride.....  not only in October, but throughout the year. Cancer surrounds us every day of every year, not just in October.........


Yours truly,
Julie

KEEP CALM AND DANCE ON  
We don't care if someone is watching!

Sunday, July 28, 2019

Tag A Bag!

Have bag will travel! Just add a fun felt tag for a little added pizazz! 


With a rainbow of felt colors to choose from, pick school colors or personal favorites!
And, with a Cricut® Maker™ to cut even the most intricate shapes, it's quick'n EZ...!

You'll need:
  • Kunin® Classic Felt*, 9" x 12" - Royal Blue, Candy Pink, Orange & Yellow 
  • Cricut® Maker and rotary blade, or use patterns provided
  • Embroidery floss - Pink, Orange and Lighter Blue 
  • Embroidery needle
  • Scissors
  • Button
  • Cotton balls
  • 5/8' Gros grain ribbon - 3"
  • Swivel ring
  • Felt glue
* With so many fun colors of felt to choose from, it was hard to decide!


NOTE: You will need to cut 2 large - 4", 1 medium - 3" and 1 - 2" small flower shapes. If you have a Cricut Maker, use the link below to the project in Cricut Design Space. If not, go to Step #4 in the instructions to download the flower patterns.  Steps 1-3 are for readers who have a Cricut Maker.

1.  If you have a Cricut Maker, use this link to connect to the project in design space. Select "customize" then "hide" the 2 large blossoms by selecting then clicking on the "eye" in the sidebar.  


2.  Cut* the small and medium flower shapes in 3 different colors.  To cut all at one time, cut a 4" wide strip of 3 colors of felt then place them side by side on the mat. You'll decide which colors to use for your project after all the shapes are cut.

*When cutting felt, browse all materials, then select acrylic felt setting under the felt drop down menu.


3.  Carefully remove the cut shapes from the mat then place the Royal Blue felt on the mat. Reveal the large flower shapes by clicking on the "eye" in the sidebar next to the large shape then "hide" the set of small shapes.  Move the large shapes toward the top of the canvas then cut.  Remove the cut shapes from the mat.  

4. Cutting with scissors.  Download the flower shape patterns. You will need to enlarge, or reduce sizes as needed.  The pattern for the filigree flower is not given, since it may be hard to cut with scissors.

Large Flower      


5.  Once all the pieces are cut from the colors you chose, it's time to play around with layering to see which colors work best together.


I liked these colors in this arrangement best.


6. I love the added texture and dimension of simple embroidery on felt, but it's not necessary. You can always glue the layers of felt together!  I recommend however, that if you plan to stuff your tag, it's better to stitch the two large layers together using the blanket stitch or a simple running stitch.

7. When stitching layers together, start with the top layer. Using pink thread, sew the yellow flower to the orange flower with simple running stitches around each petal as shown. Attach the button to the center. My button was small, so I placed a felt circle between the button and the flower center.


8.  Stitch the orange flower to the blue with yellow thread then sew the two large flower shapes together using a lighter blue thread and blanket stitch.  Simple running stitch is fine too, if you find that easier.  Leave a space between the layers then stuff with about 6 cotton balls.


9.  After stuffing cotton balls between the layers, use the ribbon to attach the swivel clip. Thread one end thru the ring then place both ends in the opening. Continue to stitch the two layers of felt together, sandwiching the ends of the ribbon between them.


10. I glued my initials to the back with Joy® embroidered letters to finish, but you can layer flower shapes to the back too!  Remember to sew (or glue) the layers together before stuffing......  


Tag your bag and enjoy!

Yours truly,
Julie

KEEP CALM AND CARRY ON CRAFTING!

Tuesday, July 2, 2019

Get Crafty with Leftovers

        I have a LOT of craft supplies! And, probably half of them are left over from projects I've worked on over the past 30+ years...  Hate to admit that I hardly ever throw anything away, resulting in an infinite resource of crafty leftovers.  (I cook the same way. I always make too much, then have meals for the next few days......)   So, if you check my previous post, you'll understand why I had enough cut pieces of felt to make more of those fun felt flowers......  for another project!


You will need
  • Kunin® Classic Felt, 9” x 12” – Baby Pink, Lemon Frost and White
  • Kunin® Premium Felt, 9” x 12” – Kelly Green 
  • Cricut® Maker™ with Rotary blade
  • Zots® clear adhesive dots - singles
  • 8" x 10" Mixed media canvas
  • 12" x 12" Green striped burlap paper
  • 10" Strip of decorative border (cut from a piece of scrapbook paper)
  • Lo Temp glue gun
  • Extra strength glue stick, or other glue
  • Jute


Instructions:

1. Please refer to my previous post for step by step instructions on how to make the rolled roses and the free pattern for the leaf.  You will need 3 roses and 3 leaves.

2. Cut the burlap paper to fit into the opening at the back of the mixed media canvas. Cut the paper about an inch wider then tuck the ends between the wood frame and the canvas and it will stay in place.


2.  Cut a 9" piece of border pattern from a sheet of scrapbook, or other paper. Place on top of the burlap paper then tuck the ends behind the wood frame to secure. You may need to glue the strip to the burlap to prevent it slipping.


3.  Position, then glue the roses to the center of the strip with lo-temp glue.  Glue the leaves between the roses. 


4.  Cover the staples with strips of burlap paper. You can glue the strips with either the green side up, or the back.  Overlap, then trim ends to fit.  I chose to have the plain side facing up.


5.  Wrap the length of jute 3x around the top edge of the frame, tie the ends in a bow et voilà, it's finished and it took hardly any time at all. Note: It took longer to decide which papers I wanted to use than it did to make the project!


I really love how easy these roses are to make and can think of lots of different ways to use them; decorate baskets, headbands, summer hats, bags, wreaths and a whole lot more.  Wonder what you'll come up with - enjoy!

Yours truly,
Julie :)

KEEP CALM AND CARRY ON CRAFTING!

 Don't forget to follow Kunin Felt Products on Facebook for a chance to win a selection of felt!


Sunday, June 30, 2019

Decorate with Bloomers!

Home is where you hang your bloomers to announce that summer is here!


You will need:
  • Kunin® Classic Felt, 9” x 12” – Baby Pink, Lemon Frost, White and Apple Green
  • Kunin® Premium Felt, 9” x 12” – Kelly Green 
  • Cricut® Maker™ with Rotary blade
  • Joy® Iron-on Embroidered letters – O x 2, B L M
  • Mod Podge® Ultra Spray - Matte
  • Zots® clear adhesive dots - singles
  • 12” x 16” Wood plaque*
  • 10” Embroidery Hoop*
  • Tacky glue & lo-temp glue gun
  • Canvas cloth (drop cloth)

*Choose a plaque to suit your particular needs and an embroidery hoop large enough to fit on top as shown.  Embroidered letters are also available in different sizes.


Instructions:

1.  Cut 4 pieces of canvas cloth to cover each section of the wood plaque then, following manufacturer’s directions, spray the wood liberally with mod podge ultra. Press the cloth on top then set aside to dry.  Rinse the spray nozzle when finished to avoid clogging. 

2. Glue the hoop in place on top of the covered plaque with lo-temp glue. Peel the backing from the embroidered letters to reveal the adhesive, then press firmly in place as shown. TIP: Always start by placing the middle letter first, then adding letters to the left and right for even spacing.


3. Using the “felt acrylic” setting and rotary blade on your Cricut® Maker, cut 7, 2” x 1” oval felt shapes for each medium rose and 7, 2 ½” x 1 ¼” ovals for a larger rose.  Cut 16, or more 2” and 2 ½” leaves from 2 shades of green using the pattern below.


You can download/or print the leaf pattern here:

4. Using adhesive dots, attach 7 ovals together in a slight curve. Press the felt firmly onto the adhesive dots.


5.  Starting at one end, tightly roll the linked shapes together to form the rose.  To prevent unrolling, squeeze shapes together at the base then secure by spreading lo-temp glue across the bottom. 
    

6. Position roses, rosebuds* and leaves on the plaque at the base of the hoop, then glue in place. 


*Create rose buds by tightly rolling 3-4 shapes together.

Hang your bloomers for summer fun and enjoy!

Yours truly,
Julie

KEEP CALM AND CARRY ON CRAFTING!

Thursday, January 31, 2019

Creativation 2019 - Phoenix, AZ

Another year, another trade show for the Arts & Crafts industry.....  I wasn't quite as organized with taking photos this year, but there's plenty of inspiration.  Let's start with the new product showcases, then take a quick stroll up and down the aisles.  Enjoy!


This is a kit to make your own screen stencils... stencils without bridges!


Unicorn Spit booth was hopping!


Prima!


Paper cutting with Katy Sue Designs...


friend Noreen McKie demoing the Katy Sue Moulds with paper clay...


The hot foil pen, from We R Memory Keepers was a New Product winner and one of the most talked about products at the show.... look for it on HSN in March!


Designers rock! Did you find a pebble for your pocket on the show floor?


Erin Reed demoing at the Kunin felt booth.....


Speciality markers for printing on a different surfaces....


 New products from Plaid...


Glow in the dark glue from Beacon...


New Product winner!


Graphic 45


See ya next year!

Yours truly,
Julie

KEEP CALM AND CARRY ON CRAFTING!