I am so looking forward to Fall. It's been a really, really hot summer in Texas and I'm ready for some cooler temps and fall color to take us into the Thanksgiving and Christmas holidays......
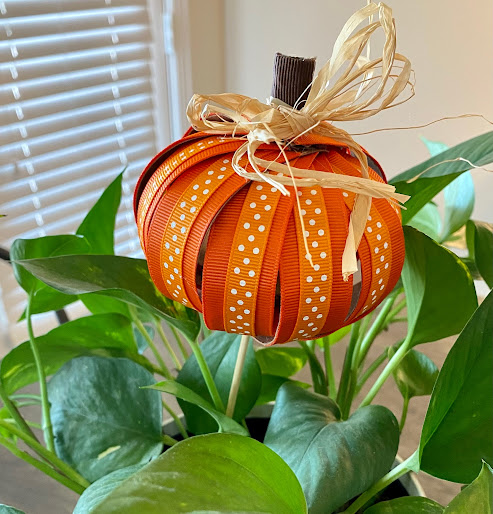
My grandchildren are back in school, so now is a good time to start prepping Halloween decorations for outside and adding fall decorations inside to add a warm, cozy feeling to my home. Pumpkins are a favorite accent. so making a few small ones seemed like a good place to start. Can you believe this cute pumpkin pick was made from ribbon and a toilet paper roll!
Here's what you'll need:
- 1.5 yds Gwen Studios 7/8" grosgrain ribbon - Orange
- 1.5 yds Gwen Studios 3/8" grosgrain ribbon - Dotted Orange
- 3" Gwen Studios 1" Dark brown grosgrain ribbon
- 2 empty toilet rolls
- Bamboo skewer
- Double sided adhesive tape
- 1/8" Hole punch
- Raffia
- Scissors
- Lo-temp glue gun (optional)
1. Cut each toilet roll lengthways then cut into strips about 3/4" wide. Depending on the size of your roll, you should have about 6 strips.
2. Punch a hole at each end of each strip about 1/4" from the top edge then place a strip of double sided adhesive along the center of the back of each strip, between the holes.
3. Cut a piece of orange ribbon long enough to cover the adhesive strip. Lay the ribbon flat on your work surface then press the curved surface of a strip firmly on top of the ribbon. Yes, you can hold the strip and place the ribbon on top, but it's easier to align if you do it this way. I also trimmed the ribbon after adhering. You will need 11-12 strips.
4. Measure then cut the pieces of dotted ribbon. Place a small piece of double sided adhesive at each end, then adhere to the top of the orange ribbon.
5. Thread one end of each of the covered strips onto the skewer.
6. Starting with the top strip and working your way down from the top, pull the next strip over then thread the opposite end of each strip onto the skewer.
7. Spread the strips around the skewer to check you have enough to create the pumpkin. Add more if needed. Yes, you will need to remove the bottom ends of the strips from the skewer to add extra, but you'll do that anyway - see next step.
8. In order for the ends of the strips to be compacted together to make a prettier looking shape, remove the bottom ends from the skewer. Use a small dot of lo-temp glue to glue the ends of each strip together, one at a time where they overlap to create a circle. Add the opposite ends to the skewer, gluing each one in place in the same manner. Obviously this can be done without using the skewer if you don't want to make a plant pick, but I found having holes in the ends of each strip helped with alignment.
9. Adjust the skewer so that about 1/2" extends from the top, then cover it with the small scrap of brown ribbon and glue in place. Tie a few strands of raffia around the top to finish.
I have lots of empty toilet rolls and, yes, I know strips of cardboard can be used instead, but I really like the way the toilet roll cardboard strips are curved to create the perfect pumpkin shape...
Have a happy Fall y'all...
Yours truly,
Julie 💝
KEEP CALM AND CARRY ON CRAFTING!
Ribbon used in this project was provided by Gwen Studios, all other products used were purchased by me. You can find more ribbon projects here, on the Designer Crafts Connection blog.


Julie I really like this project!
ReplyDeleteThanks Janet.
DeleteVery cute and very clever use of toilet paper rolls!
ReplyDeleteThanks Terry
DeleteVery Cute Idea. Love it!!! Thank you for sharing.
ReplyDelete