Showing posts with label etched glass. Show all posts

Monday, August 29, 2022

Etched Jack-O-Lantern Wine Glasses

         Fall is just around the corner, hopefully bringing us some cooler weather. A nip in the air always makes us think of fall leaves showcasing their changing colors, pumpkins, toasting s'mores over a fire pit, mugs of hot chocolate, and maybe a glass, or two of wine.  With constant reminders that Halloween is also a big part of Fall, here's a fun project for some of your more lively, adult events.  Stemless wine glasses, etched with Jack O'Lanterns will surely put a smile on everyone's face and they're so easy to make.....


Here's what you'll need
  • etchall® reusable etching crème
  • Stencil cut pick knife, or pick tool
  • Squeegee 
  • Etchmask, stencil or vinyl for creating stencils
  • Wine glasses  (I purchased mine from Dollar Tree) 
  • Jack O'Lantern patterns*
  • scissors  


1. *I used my Cricut Joy® machine to cut the stencils, but there are many other options available.  If you have access to Design Space the patterns are available there. Search Julie McGuffee & Jack-o-Lanterns, or
        
        a. Drag the above patterns from here onto your desktop then upload into your cutting software, or 
        b. Print onto printable vinyl then cut with a craft knife.  Each face is about 1.5-2" wide.   


NOTE: When removing the vinyl from areas that will be etched, make sure to lift from the center of the vinyl to be pulled away. Never place the pick tool at the edge of the cut.


2. Wash the glasses, dry thoroughly then place each glass on a towel to prevent rolling.  Carefully position then press the stencil onto the glass.

NOTE: Since the surface of the glass is rounded, press the center of the stencil onto the glass first then each side, pressing firmly around the edge of each opening, otherwise the etching crème will go under the stencil. It is not uncommon for the vinyl to crease at the outward corner of the mouth as shown below. If this happens, carefully lift the stencil from the edge and cut along the crease. Press one side of the cut vinyl down then the other side of the cut on top. Press firmly.
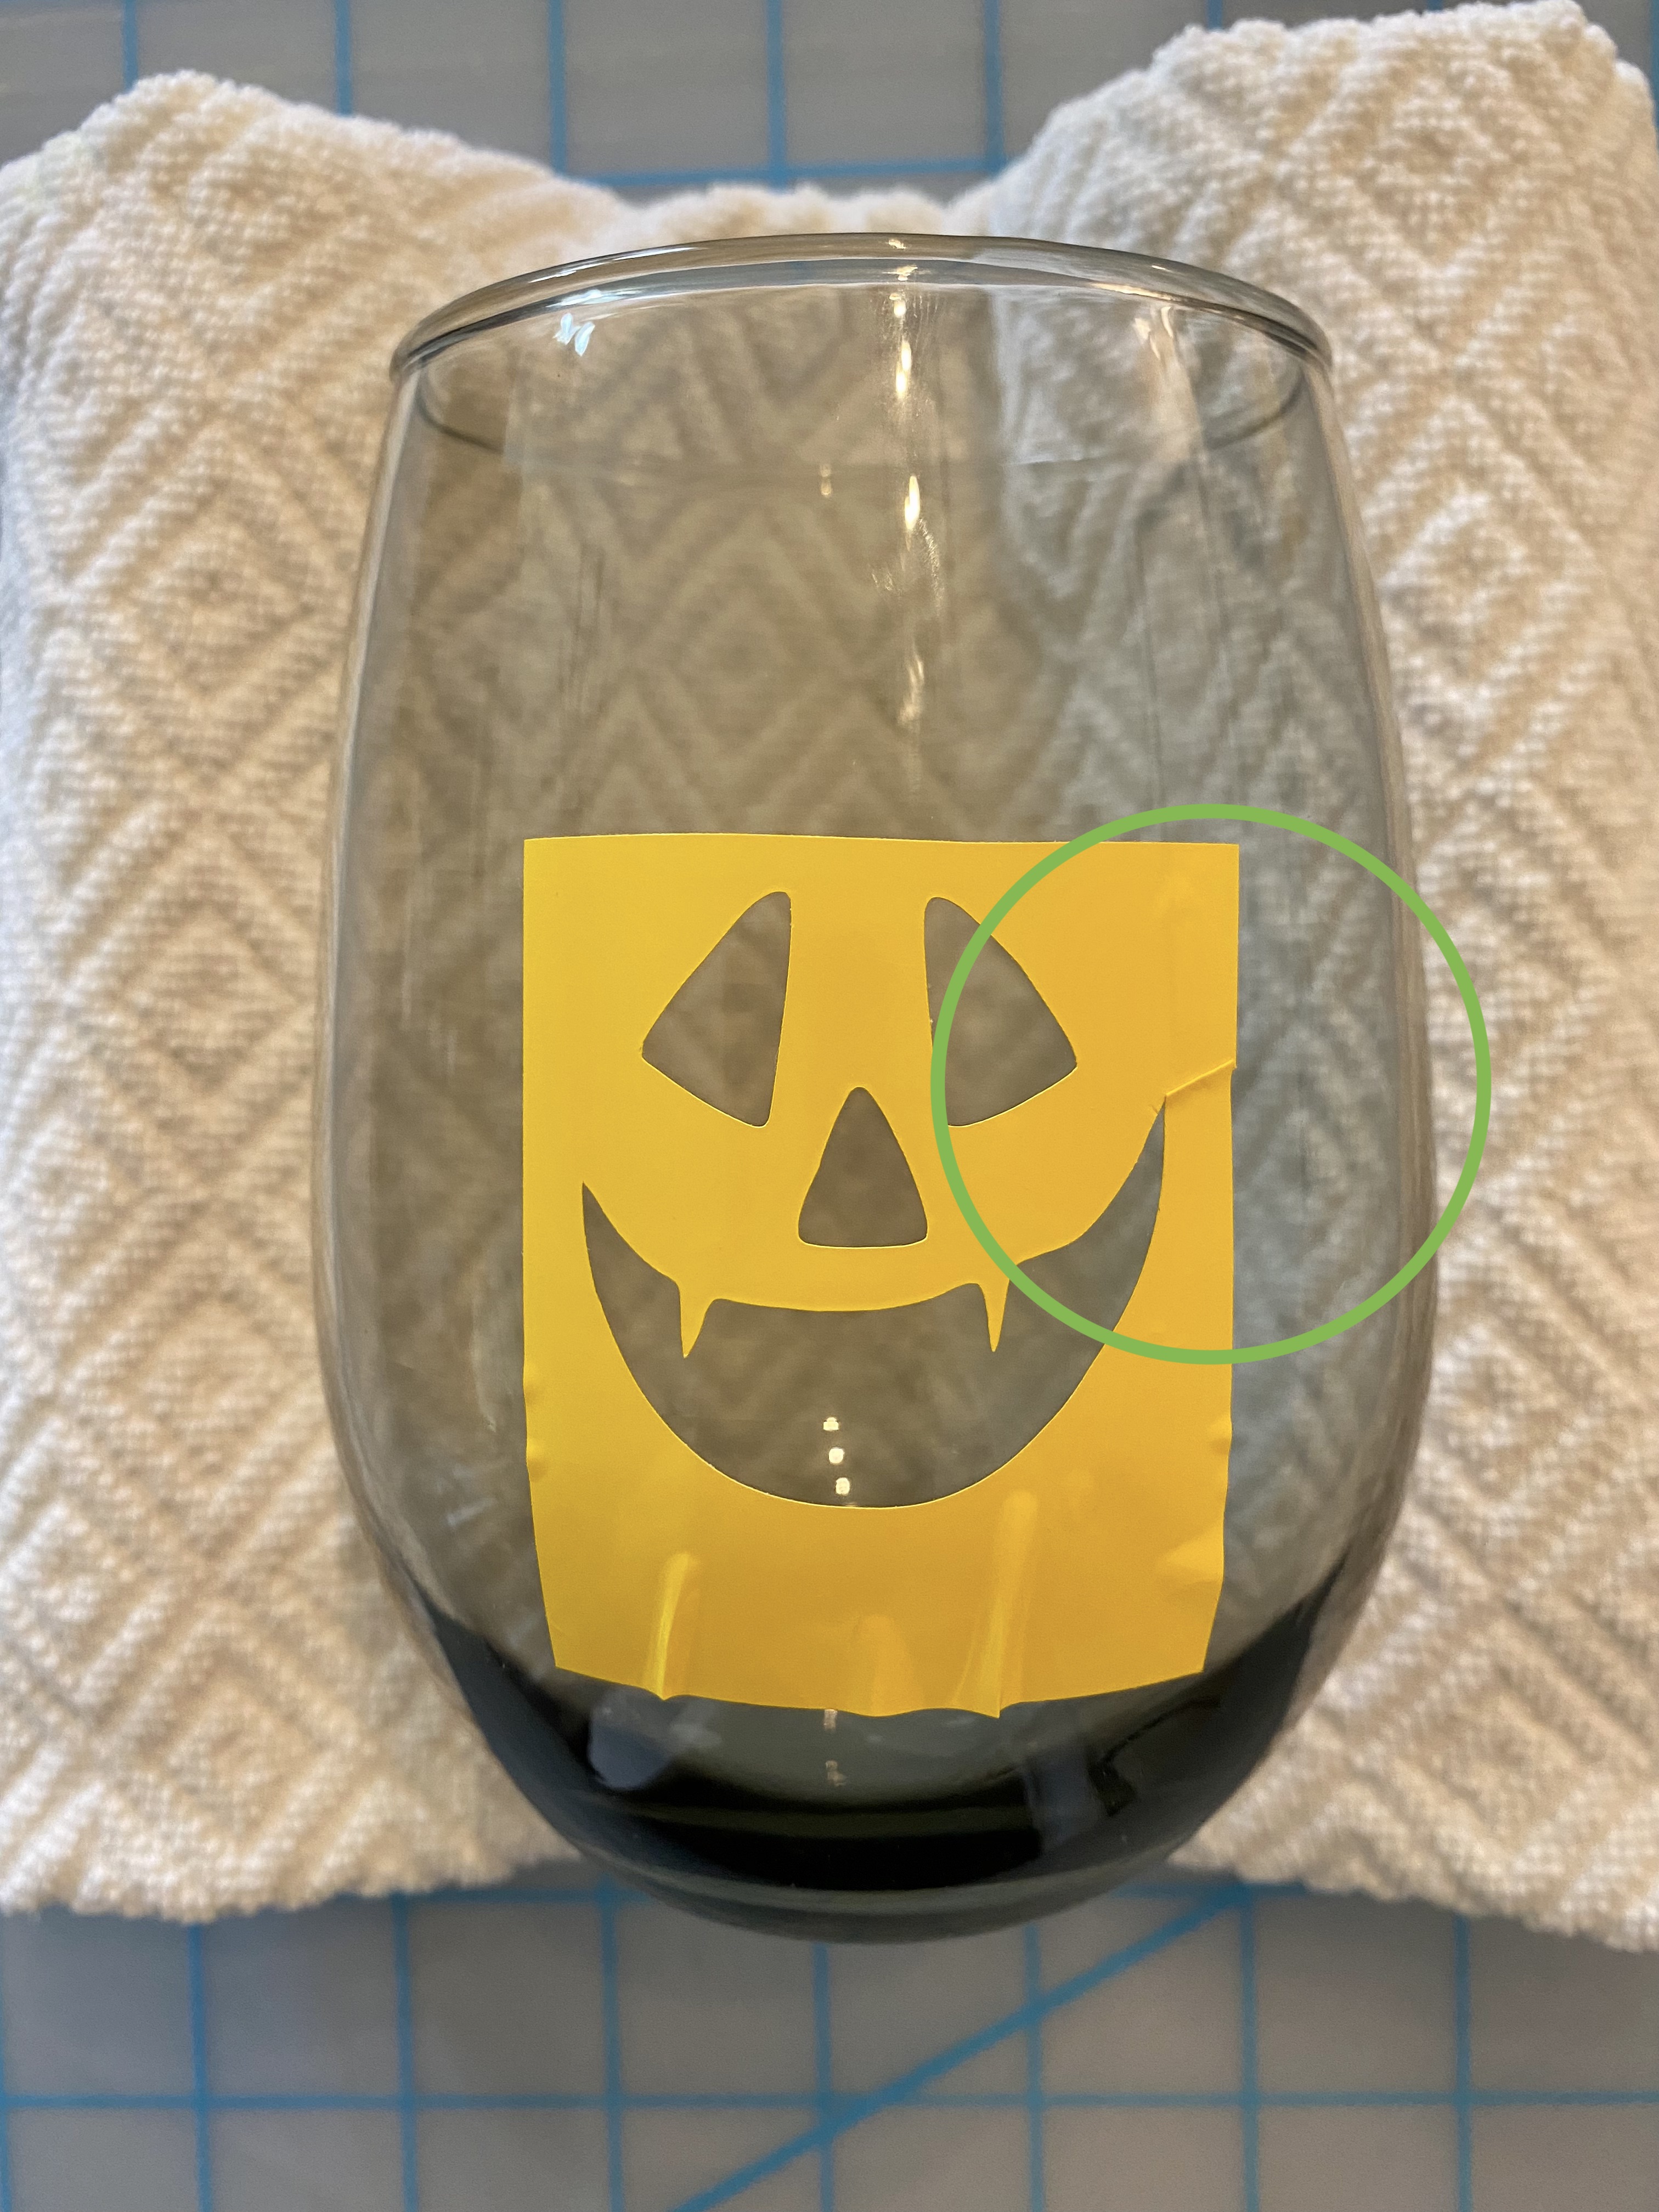


3. Check to make sure your stencil is firmly adhered around each opening by looking at the back of the vinyl from the opposite side of the glass. 


4. Cut additional strips of vinyl to put around the edge. This will prevent any accidental etching outside the pattern.


5. Cover the open areas with etchall crème.  Following directions on the container, let sit for 15-20 minutes then using the squeegee, scrape the etching crème carefully from the stencil and PUT IT BACK INTO THE CONTAINER!!  - Don't forget, etchall etching crème is REUSABLE...


6. Rinse away any remaining residue in a plastic bowl of water, or under running water over a kitchen sink unless your sink is porcelain. Remove the vinyl then buff with a soft cloth or towel to reveal your design.


A set of etched Jack-O-Lantern glasses is would be a perfect addition to any party and a great gift!


PLEASE REMEMBER...

etchall etching crème creates a PERMANENT etch on: glass, porcelain, china, mirrors, granite and even slate, so choose and/or cover your working surface carefully.  Dip'n etch, a reusable etching liquid, is also available and perfect for etching glass beads and even the inside of colored glass containers to create a vintage,  milk glass look! 
You can find all these products, tutorials, inspiration and more at www.etchall.com  

Enjoy and have a fabulous Fall!

Yours truly,
Julie 💝

KEEP CALM AND CARRY ON CRAFTING!

etchall® products were provided by etchall. Designs shown are my personal designs.   

Tuesday, November 21, 2017

Let's Celebrate Christmas!

I really LOVE Christmas - the decorations, the music, the food; even the somewhat corny Christmas movies.  The sad part is, we tend to get so wrapped up (pun intended) in Christmas shopping and all the excitement that surrounds us at every turn, it's easy to forget the reason for the season.  So, this simple project is a little reminder of why we celebrate....  Enjoy!


This is what you'll need:
etchall® etching crème
etchmask stencil and transfer paper
Squeegee
Craft Pik, or craft knife


5" x 7" Frame
Rinea™ Paper foil - blue
Tinsel
Double sided tape
Electronic shape cutting machine (I use a Cricut® Maker, or Cricut Explore)


1.   Drag the images from the "Images for Personal Use" page onto your desktop, then upload to your digital software.  NOTE:  There are two separate images.  One image will be etched on the front of the glass and the other on the back.  Each image should be about 4" x 6" to fit within the edge of the frame.

https://drive.google.com/file/d/1d0wYp6_pfhD8G3dyZFKYkFeJW5FY5r2m/view?usp=sharing


2.  Cut the designs from a sheet of etchmask.  While your stencil designs are cutting,  remove the glass from the frame then wash and dry thoroughly.

3.  Using the craft pik tool, weed* each design while still on the cutting mat.  *Weed means remove all the elements of the design to create the stencil for etching.

4.  Cover each stencil design with a piece of transfer paper then remove one stencil from the mat.  Remove the waxy backing paper from the etchmask to expose the adhesive, then center the stencil on the glass.


5.  Press firmly in place with the squeegee then carefully remove the transfer paper.  Check underneath the transfer paper as you lift to make sure all the etchmask is still in place on the glass.  Cover any areas of the glass not covered by the stencil with extra pieces of etchmask and/or transfer paper to prevent accidental etching on those areas.


6.  Cover the open areas of the stencil liberally with etching crème then leave for 15 mins.  You can find more comprehensive illustrations of this process in an earlier post here: https://juliemcguffee.blogspot.com/2016/12/winter-wonderland-etched-float-frame.html 


7.  After 15 minutes, use the squeegee to scrape the etching crème back into its container.  Remember! etchall crème and etchall dip are REUSABLE.  Rinse away any remaining residue then remove the stencil. Use a scraper if necessary.  Dry, then buff the glass with a soft cloth to reveal the etched design.  NOTE: Do not rinse in a porcelain sink!  The etching crème will etch the glazed surface. Use a plastic bucket, or other large plastic container instead.

8.  Etch the design on the other side of the glass in the same manner, positioning the stencil so the crib on the other side is centered between the two figures. The trunks of the palm trees can also be used as a guide.  I used a Cricut BrightPad™ (a large light box) to aid in placement.


9.  Cut a 5" x 7" piece of blue foil then adhere to the front of the frame backing.  Glue white tinsel to the inside edge of the frame for a "frosty" look if desired.  Place the etched glass in the frame then secure the frame back behind the glass to finish.


The frame also looks wonderful without the backing…  This frame has a square edge so it will stand on a table, or shelf without the backing.


Christmas decorating is just beginning, so y'all come back for more holiday projects!

Yours truly,
Julie :)

KEEP CALM AND CARRY ON CRAFTING!

Thursday, March 16, 2017

Etching with etchall®

If you follow my blog, you'll know how much I love working with glass. I even took a class on glass cutting about 25 years ago, but soon realized that that wasn't for me. I think it had something to do with the band aid in the supply kit...

I first met "etchall Barbee" at the Arts & Crafts trade show in the early 90's. I also loved decorative painting and fell in love with the idea of being able to paint on an etched glass surface.  The prep work was so much easier and a lot faster than sanding and sealing wood.......   Since that time,  I've created a number of etched glass pieces, so I thought I'd share a variety of ideas and techniques to inspire and encourage your itch to etch.....   Most of them have been featured here on my blog, so if you'd like detailed, step by step instructions, enter "etched glass" in the search bar and they should come up.  Let's go!


1.  Let's start with some dip'n etch projects that are quick and easy.


I love colored glass, so I picked up some colored glass pieces from the dollar store and even found a couple on the clearance shelf at my local supermarket. You can also find them at your local craft store, but make sure you have a coupon.....   The challenge with some colored glass pieces is that it isn't colored glass at all. More often than not, it's clear glass with a colored coating on the outside - can't be etched - on the outside, but you can etch the inside!  You can tell if it's coated by looking at the bottom.  If the glass is color coated, the bottom will be clear.  If it's colored glass, the bottom will be colored too - like a wine bottle.  

Check out these glass pieces before and after etching them on the inside.  Always wash and dry glass pieces thoroughly first, then simply fill with dip'n etch liquid.  Leave for 15 minutes, then pour the dip'n etch back into the container.  Quick'n EZPZ....


And these were decorated with beads...  The mason jar is colored glass, so it can be etched on the inside or the outside, or both.


This painted vase was also etched on the inside, I simply filled it to the brim with dip'n etch.  

 
The pieces below were etched on the outside by immersing in a plastic container that was just a little larger than the pieces.  The heart shaped bottle looks like sea glass. I etched the milk bottle so I could paint the cherries on it.


The mason jars were also immersed in a container of dip'n etch.  (I used an empty soda bottle a little larger than the mason jar for this.)  The designs were created using a star punch and strips of etchmask™ used for creating your own stencils.  For the votives and wine bottle, I used Peel Off star stickers. The light comes from a light stick in the wine bottle.


Here are some more etched bottles using dip'n etch.  They each have an LED tea light under their hat.


And here's a glass plate I etched so I could paint it with regular acrylic paint. This is just one of the projects featured in my book, Garden of Glassware, a decorative painting book by Leisure Arts.


2. These projects were etched with etching cream.


I designed and cut my own stencils for these using etchmask and my Cricut Explore. 


I etched the candlestick bases with star stickers (negative etch) then placed a small, multi colored LED tea light under the base of the candlestick. I loved how the stars reflected on the wall. You can see the base design on the second photo.  The top is a light shade kit, also from etchall.


The feathery look on the painted plate and the rim of the cookie plate was created by using a sea sponge to dab the etching cream onto the surface.


And here's etching on china. The pig was placed in dip'n etch and the letter M was etched onto the center of the plate with cream then enhanced with gold rub'n buff. The Aloha sign is etched slate.  The lantern has a different design etched on each side of each piece of glass which gave it a dimensional effect.


I used the same layering technique for the winter frame.  4 individual designs were etched on both sides of 2 pieces of glass which were then layered in a float frame......


I hope you enjoyed this round up of etched designs and will try some etching yourself.  You'll be amazed how professional your projects will look - perfect for your own home, or to give as a gift.  Don't forget to use the code on the Designer Crafts blog for a special discount.  Enjoy!

Y'all come back now............

Yours truly,
Julie :)

KEEP CALM AND CARRY ON CRAFTING!