Thursday, May 21, 2020

Crêpe Paper Flowers

        As a member of Designer Crafts Connection, I was excited to receive a sample pack of DCWV Petal Paper. The quality was similar to the crêpe paper we used in the 50's; stronger and much easier to shape than rolls found at the party stores.  I love it when there's an opportunity to work with a "new" product that brings back childhood memories. I remember watching,  and sometimes helping, my parents make crêpe paper flowers in the 50's. That was a long time ago, but memories last forever.

        Techniques for making traditional roses have changed very little over the years (I still have my parents  "how to" book), so my first project is a familiar rose, perfect for a simple accent for any room in the house and easy to make, then stay for a fun technique to create a ruffle edge for a carnation, or any size decorative flower you can use to embellish gift boxes, themed party decorations and more!


Here's what you'll need to get started:

    DCWV Petal Paper (I received a pack of pink and lavender)


    Lo-temp glue gun
    Pencil with eraser tip
    Scissors
    Needle and thread


This is what you do to make the traditional rose:

1. Unfold one piece of crêpe paper. Cut in half to create two, 10" x 24" pieces. Set one piece aside. Fold then cut one piece in half again to create two, 10" x 12" pieces. Fold one piece in half lengthwise then cut to create two, 5" x 12" pieces.

2.  Cut each 5"x12" piece into six, 2" x 5" pieces along the grain. Note: When working with crêpe paper, it's important to work with the direction of the grain. Since rose petals are curved, you'll want the grain to go vertically up and down the petal. 


3. Create 2 petals at a time by folding each piece in half, top to bottom, then in half again, side to side. Starting from the top of the fold cut a half "leaf" shape toward the folded edge at the bottom. Make sure not to cut up to the edge at the bottom fold (see photo). The shape doesn't have to be perfect. Shapes will not be noticeable when the rose is assembled.


4.  Unfold, then working from the center of each petal, use your thumbs to push the center of each petal outward.


5. With centers aligned, layer 3 pairs of petals across each other. Secure with needle and thread, or a dot of glue. Create the center of the rose by folding the petals upward and nesting them together. Pinch together at the bottom.


6. Cut the remaining petals in half at the base. Curl each one then add one at a time around the center, overlapping about 1/4" each time and securing each one as you go with a dot of glue. Add additional petals until the rose is about 4"-5" across, cutting more petals as needed.


7. Starting with the outer petals, gently pull each one outward. 


8. I used the stem and leaves from an old artificial flower and glued the rose into the calyx at the top. Place in a simple vase, (I used an inexpensive glass vinegar bottle - see above), or insert into a small square glass filled with pebbles, with a twig from the yard and filler flower for a more updated accent.


This is what you do to create a ruffled edge for carnations, or decorative flowers:

1. Cut the 12" x 10" piece of crêpe paper in half lengthwise to create two, 12" x 5" strips.  Lay one strip flat on a craft mat, or other hard surface. Starting at one end, place your finger and thumb about 1" apart at the top edge.


2. Using either the index finger of your other hand, or the eraser of the pencil, pull the edge of the paper down to create the dip in the paper as shown.


3. Repeat along the edge of the strip. Flip the strip OVER, then repeat along the opposite edge.


4,  Fold in half lengthwise.


5. Unfold then using the needle and thread, create simple, up and down running stitches along the fold.


6.  Pull the thread to gather until the strip is about 5" in length. Fold in half again. It's helpful to fold around a pencil when the paper is gathered. Pinch the fold firmly.


7.  Pull the thread to tighten the gathers then secure the end of the thread with an overstitch. Do not cut the thread yet.


8. Coil the gathered strip around one end, which will be the center then stitch the opposite end in place. Seal the bottom with lo-temp glue then separate the layers to finish.


9. Create wider, additional layers for a fuller, larger flower then glue the smaller flower at the center of the wider layer. Squinch tightly together at the base then cover with lo-temp glue to secure.


Use this simple, ruffle technique to create flowers in different sizes by simply adjusting the height and the number of layers and mixing different colors. 


With a variety of colors of Petal Paper to choose from, the options are endless for unlimited flower fun for all seasons! For more designer ideas and inspiration check the DCWV Petal Paper post on the Designer Crafts Connection blog...


Have fun and enjoy!

Yours truly,
Julie

KEEP CALM AND CARRY ON CRAFTING!
P.S. Here's a photo of the book my parents used. Flowers haven't changed since the 1950's so the ideas are still relevant today......  If you're looking for authentic flower patterns, it might be worth looking for this one. There are also lots of other resources available, including patterns for your favorite cutting machines, punches and dies!


Tuesday, April 28, 2020

Save the Bees! Earth Day Project

April 22nd is Earth Day!


Earth day is the day when we're reminded to be kind and considerate to the planet we call home and to do our part to protect it as much as possible. This little bee project is an easy to make reminder, that even the tiniest of creatures has a BIG part to play too!


You will need:

  • Kunin® Classic™ 9” x 12” Craft Cuts – 1 each Lemon Frost, yellow, white and black


  • Joy® Iron-on embroidered Classic Monograms letter sheet – black
  • Glue gun & lo-temp glue sticks
  • Scissors
  • Quilt pins
  • Empty water bottle
  • Artificial flower stem with leaves
  • Paper shreds
  • 12” jute
  • Cricut® Maker™ with Rotary blade (optional)

Step One – Make the Bee

1. Cut two, ½” wide strips of black felt.  Fold one end over about ¼” then roll the strip around about 4 times to form a cone shape. Trim the end and glue to secure.

2. With edges even, coil the second strip of black felt until it is large enough to tuck sideways into the bottom of the cone. Glue the end then glue the coiled felt inside the bottom of the cone.
  
NOTE: Steps are created with yellow felt in order to show the process. 


3. Cut a 5/8” wide strip of yellow felt then wrap once over the center.  Trim the length then glue the ends in place.


NOTE: The felt colors in the step out photos above are inverted to show the process.

4. Cut a ¼” wide strip of black felt then wrap around the center on top of the yellow to finish.


Step Two – Make the Flower

1. Cut seven, 11” x ½” strips of white felt.  Cut 2” from one end of each piece and set aside. Fold the end of the remaining 9” strip over about ½” then coil the strip around to form an oval “petal”.  Glue the end.  Make 7 “petals”.


2. To make the center of the flower, tightly roll a ½” x 11” strip of lemon frost. Glue the end in place then wrap twice with of a ½” strip of yellow. Trim then glue the end. Gently push the center outward a little to create a more rounded look.


3.  Arrange, then glue the “petals” around the center. Fold the 2” pieces of felt in half. Glue the ends together then glue one loop between each of the petals.


4. Cut 6, 1” slivers of black felt for the bees legs. Position on the flower then glue the bee on top.  Glue the top of the stem to the back of the flower.


Step Three – Assemble

Cut the top off the empty bottle about 4” from the bottom. Wrap with a 4” wide strip of yellow felt. Trim to fit then glue a 2” wide strip of black across the center.  Remove the letters from the sheet to write SAVE A BEE and PLANT (or GROW) FLOWERS.  Glue in place then wrap around the bottle. Overlap the ends at the back then glue.  Wrap jute around the center as shown.  Place the top of the bottle upside-down in the “pot”.  This will help to keep the flower stem upright.  Add the flower stem then fill with paper shreds.


*For best results, use a Cricut® Maker, if you have one, to cut even strips of felt. If not, you can use a craft knife against a metal edge ruler, or simply cut with scissors. Enjoy!

Yours truly,
Julie

KEEP CALM AND CARRY ON CRAFTING

Sunday, April 5, 2020

Paper Bunny Vase

Here's a quick'n EZ project for kids to make for Easter.  
Supplies are readily available - I'm sure you'll have everything you need at home.


You'll need:
  • Sheet of letter sized paper - 8 1/2" x 11"
  • Black and pink crayons, markers, or colored pencils
  • Scissors
  • Tape
  • Empty plastic bottle and cap


1. Fold the paper in half lengthways then cut along the fold.


2. Fold one of the pieces in half then cut in two along the fold.


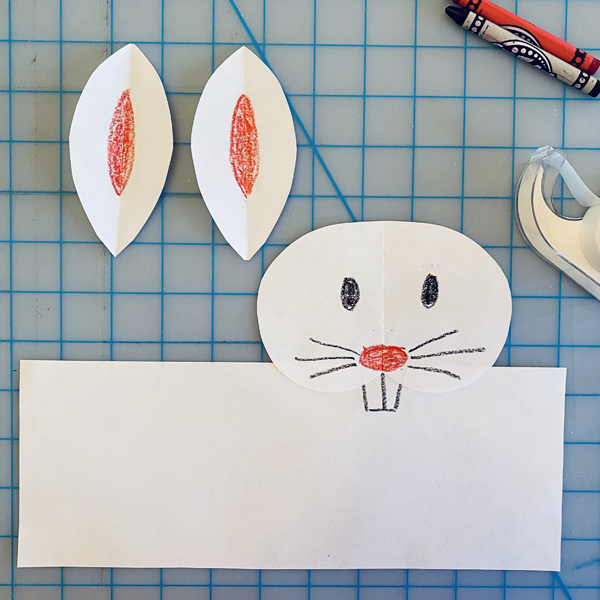
3. Make the head: Fold one of the small pieces in half and draw the pattern on one side as shown.  The pattern is a wide circle with a little dip at the top. Cut out then unfold.


4. Make the ears: Fold the second small piece in half then cut along the fold. Place one piece on top of the other with edges aligned, then fold in half.  Draw part of a circle from the top of one folded edge to the other then cut out.


5. Color the center of the ears pink. Draw a pink nose on the head above the dip.  Add 2 black eyes and some whiskers.  Draw teeth at the top of the large (body) piece at the center.


6. Put a piece of tape at the back of the body above the teeth then stick the head on top at the front.


7.  Flip the head and body piece over and tape one ear to the back of the head. Tape the second ear on top of the first.


8.  Place the empty bottle on top of the bunny, then pull the edges of the "body" around the bottle. Overlap the edges then stick together with tape.  Don't make the wrap too tight, you will want to be able to remove the bottle.


Fill the bottle with water and add a flower from your yard, or fill with small pieces of candy - jelly beans would be nice and colorful. Don't forget to put the bottle cap on if you do this.

Before wrapping, you could write "Some Bunny Loves You" on the front.   
What a fun gift this would be to leave on your neighbor's or friend's doorstep during Easter week!

If you would like a pattern, you can download one here - it's free..........  Enjoy!

Yours truly,
Julie   

KEEP CALM AND CARRY ON CRAFTING!

Sunday, March 29, 2020

Felt Roll-Ups for Easter

If you love paper quilling, you'll have fun with these quick'n EZ felt projects!


I love to decorate for Easter and each year I make something new for my Easter tree, a tradition I adopted while living in Germany. (See the short video at the end of this post). I love working with felt and was gifted felt from Kunin to create projects for their blog. These projects were made from leftover scraps.  

You'll need the following supplies:

Kunin® Classic™ 9” x 12” Craft Cuts – 1 each Baby Pink, Lemon Frost, orange (scraps) & white 
Pom-poms
Lo-Temp Glue Gun
Scissors
Quilt Pins
Seed beads - black


Instructions:
1. Cut 1/2" wide strips of pink and yellow felt. The number of strips needed will depend on how large you want your bunnies and chicks/ducklings to be. Cutting even strips is really easy if you have a Cricut® Maker using the rotary blade, but a rotary cutter and/or scissors work just as well. Make sure the edges are even.


2. Tightly coil a strip of white felt to make the body. Glue the end to secure. Add a second strip to make larger. Trim the end when it's about 1 1/2". Secure the end with glue. Coil a second piece for the head. Secure the end then glue the 2 pieces together.  


3. To make the ears, flat fold pink for inside the ear; secure. Wrap one or 2 pieces of white around the pink. Pinch the ends tightly together then glue to the top of the head.


4. Glue a white pom pom in place near the base of the body. Make a variety of sizes. Add 2 small beads, a tiny piece of rolled pink felt and a freehand bow shape to the front if you plan to hang your bunny. You can also give your bunny a pink tummy by starting the body with a pink coil.


5. Chicks and ducks are made in the same manner using yellow felt strips. Add 2 loops of felt between the head and body. To make the feet and beak, cut a 1" square of orange felt. Cut a square from one corner. Fold this small square diagonally in half to form a triangle. Trim as needed then glue the fold to the center of the head. Glue the remaining piece at the base of the body for feet. Glue a bead at each side of the beak for eyes.


You can find more Easter tree projects here too...    Enjoy!

Yours truly,
Julie

KEEP CALM AND CARRY ON CRAFTING!

Monday, March 2, 2020

Little Girl's Easter Headband

I love Spring and Easter and have many happy memories of making Easter bonnets for myself and my sister!  Nowadays it's all about headbands, so here's how I made a quick'n EZ headband for my sweet grand daughter!


This headband is made of felt. I have a Cricut® Maker, so I use it a lot for cutting multiple shapes. The shapes I used in this project however, can easily be cut with scissors.

You'll Need:
  • Kunin® Classic™ 9” x 12” Craft Cuts – 1 each Lemon Frost, Baby Pink, Baby Blue  & Bright Lilac (or combination of colors you like) 
  • Kunin® Premium 9” x 12” Craft Cuts – 1 each White & Olive
  • Cricut® Maker™ with Rotary blade
  • Glue gun & lo-temp glue sticks
  • Scissors
  • Headband
  • Small cable ties (4”)
  • Quilt pins 


Instructions:

1. Cut* the following pieces of felt:
·       1” Baby blue circles: 7-8
·       1” Leaves:  3-6  (copy or download the pattern.)


Make the Bow

        1.  Cut one 2” x 6” and one 2” x 12” rectangles of pink felt.  Notch each end of the 6” piece as shown then finger gather at the center. Place at the top of the headband then secure with a cable tie. Spread the folds evenly on top of the head band so it lays almost flat.

        2.  Overlap then glue the ends of the long piece of felt to form a circle.  Flatten then finger gather at the center. Secure with a cable tie then glue to the top of the head band toward the back edge. The flowers will be glued in front. 


Make the Flowers:  Each flower uses a different technique. Make one of each, or 3 of the same in different colors. Your project, your choice......

        1.  Dahlia: Cut a 2” x 6” strip of yellow felt.  Fold in half lengthwise. Pin, or hold firmly while making cuts, 1/8” apart from the folded edge to within ¼” of the bottom edge. Do not unfold. Roll up the piece then spread glue across the bottom to hold the roll in place. Fluff the loops to create the flower.


         2. “Ribbon” Rose: Cut a 12” x ½” strip of lilac felt.  Fold 1” of one end over at right angles then roll the fold over to create the center.  Hold the 1” tab firmly in one hand. Fold the longer end over and down then pull around the center. Continue folding and wrapping around the center and your rose will quickly grow.  Glue the end to the back of the rose.


          3. Simple Rose: Tightly roll then glue one blue circle to create the center. Glue additional circles around the base of the center piece, overlapping each one slightly to form the rose. Add circles until the rose is the size needed.


Make the Ears.

            1. Cut 2, ½” X 12” strips of pink felt.  Roll then glue the end to secure. Pinch the roll at each end to make it less like a circle. 

            2. Glue one end of the white strip to the pink roll then wrap around. Glue the opposite end to finish. Add additional strips as needed. Firmly pinch the finished “ear” at the top to create the tip.
Note: You may find it easier to maintain the shape by adding short strips, one at a time around the pink, starting and ending at the base. 


Finish:  Glue the flowers to the top of the headband in front of the bow loops, the leaves between the flowers and the ears at each side of the bow.  Your little princess will now be ready to celebrate Spring in style!


Happy Easter ev'rybunny!

Yours truly,
Julie

KEEP CALM AND CARRY ON CRAFTING!