Showing posts with label holiday crafts. Show all posts

Friday, November 26, 2021

Holiday Star

It's always a starry night when you decorate with foil stars for the holidays!

You will need:

  • Rinea® Paper Foil - Starstruck silver
  • Scissors
  • Adhesive

Instructions:

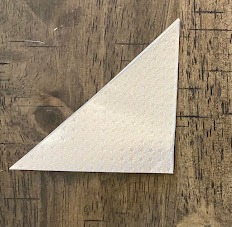
1. Cut a 4"x 4" square of foil then fold in half diagonally.  Fold in half again along the fold.


2. Starting at the two, folded edges, make 4 cuts about 3/8" apart, parallel to the long, cut edge. Cut to within 1/4" from the thicker, folded edge.  Gently open up the folded square.


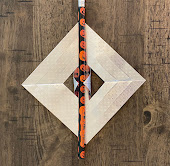
3.  Starting at the center, gently pull the center tabs upwards, overlap the points and glue in place.  This is row 1.  Since these tabs are small, it is helpful to lay a pencil along the fold line and fold the tabs over the pencil.  Repeat with row 3. 


4. Turn over then repeat the process with rows 2 and 4.


5. Make 5 then glue the bottom points together to create a star! 

There are two types of Rinea paper foil. Starstruck is available in a variety of colors. It has an all-over embossed design and is the same on each side.  Rinea glossy paper foil is slightly thicker. It is colored on one side and gold on the other. Sapphire and gold is shown below.  Each style is available in two sizes: 4" x 6" and 6" x 12" online at Rinea's online store.
 

Enjoy your starstruck holiday home!

Yours truly,
Julie 💝

KEEP CALM AND CARRY ON CRAFTING!

Tuesday, November 2, 2021

Dress It Up with Ribbon!

        When life throws you a busy ball, but you still want to be creative, look for a simple surface at your local Walmart, or Dollar Tree and dress it up with ribbon! There are so many styles of holiday ribbons to choose from, it will make all your holiday decorating quick'n EZ.....  

        I was really excited to receive samples of die cut ribbon from Gwen Studios. I love all the little  intricate shapes and they can be used on pretty much anything!  Here are just a couple of ideas:

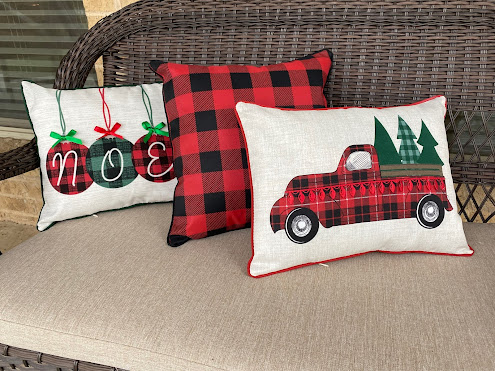
        I had some inexpensive outdoor pillows that I picked up earlier from the outdoor garden center at Walmart.  All I needed now was a little fabric glue to give them some added sparkle.  What a difference it made!

I added small, green and red bows to the top of each ornament and a length of the red Holiday Lights die cut ribbon along the side of the truck. See how much more festive the pillows look now!

        I also love to shop at the Dollar Tree and had purchased a simple wood shape for my Harvest decorating.  The back was plain, so with a quick coat of white paint, embroidered letters, a simple embellishment, and the gold reindeer holiday die cut ribbon on top of the red ribbon, I had a simple holiday flip for Christmas in no time at all!  


        You can find more inspiration on the Designer Crafts Connection blog.  What will you make? The  possibilities are endless! 

Yours truly,

Julie 💝

KEEP CALM AND CARRY ON CRAFTING!


Thursday, November 17, 2016

Paper Foil Blog Hop

A couple of months ago I received an email from a designer who had decided to import paper foil from Germany. She loved the product and wanted to make it available for US crafters.  She asked if I could take at look at it and perhaps make some projects.....  Are you kidding me!!! Look at what I've been keeping in my stash since 1967!!!


You may, or may not remember, but I lived in Germany from 1967 - 1976 and since I've always been a crafter, this was a product I was totally familiar with.  Needless to say I was all in and Diane sent me samples of Rinea® to play with.


I received two types of foil papers - double sided metallic and slightly thinner embossed foil. Both types are double sided in a variety of colors.  The colored metallic foil is either silver on the back, or gold. There is also a metallic with gold on both sides, or silver. The embossed foil is the same color on both sides.  They are so easy to work with. I used dies, embossing folders, a paper crimper, punches, and stencils for embossing.  It cut easily and scored with a paper trimmer and was easy to cut with decorative edge scissors. Here are a few of the projects I came up with.


The foil adhered easily with an extra strength glue stick, even to glass. It was so much fun! So much so, that I added an extra project for the hop, my "Accordion Star". 


You will need:
  • 10 Pieces of 8.5" x 4" metallic foil
  • 1/4" double stick tape
  • Extra strength glue stick
  • Tacky glue
  • Small piece of thin poster board
  • Embossing tool (for scoring)
  • Paper trimmer
  • 1" Circle punch
  • 1/8" hole punch
  • Optional: 1" round acrylic crystal jewel for center
1. Starting 1/4" from the short edge of the foil, use the embossing tool to score a line. Measuring from this line, score 3 additional lines 1" apart.  Turn the piece of foil around and repeat from the opposite edge.


2.  The 1/4" line is to show where the ends will overlap. Fold the strip back on the next line, then up then back. Repeat at the opposite side. Overlap the ends then glue in place. Fold and glue each strip in the same manner.


3.  Flatten the folded pieces then adhere a 4" strip of double stick tape down the center of each one and a 2" piece across the bottom.


4.  Remove the backing from the pieces of tape. Working with 3 or 4 pieces at a time stack together, then starting about 1 1/2" from the bottom, cut diagonally across to the center point at the top.


5.  Stack more pieces together, then stack the cut pieces on top. Using the cut stack as a guide, cut the next stack. Repeat until all the pieces have been stacked together and cut.  Press the stack gently along the center and across the bottom to make sure they are firmly stuck together.


 6.  Carefully pull the point of the top piece and the stack will start to unfold. Gently pull the top piece around to form a circle and adhere to the bottom piece.


7.  Punch 2, 1" circles from poster board,  cover the back liberally with thick, tacky glue, then place over the center.  While the glue is still wet you can separate the star points evenly around the center.  Let dry then repeat on the other side.  You can cover the circle with a different color of paper foil, or add a large acrylic crystal sticker as shown on my sample.

8.  Use a hand punch to punch a small hole at the tip of one of the star points for a hanger.


I loved working with paper foil again, it brought back many happy memories of the years I spent in Germany.  

Don't forget to check the other designers projects then comment here, or on their blogs and on the Designer Crafts Connection blog for a chance to win your own packages of paper foil. Use the Rafflecopter widget at the bottom of the DCC post.  Good luck!

You can find more information about Rinea® Paper Foil and a gallery of ideas on their website. Enjoy! Y'all come back now............

Yours truly,
Julie :)  

KEEP CALM AND CARRY ON CRAFTING!

Monday, December 2, 2013

Crafts for the Holidays with Craft Attitude

I've hosted a TV show on scrapbooking for 14 years so it's only natural that people think I'm a scrapbooker, but, truth be told, I simply LOVE ALL KINDS of crafts!  I enjoy the creativity of designing a scrapbook page, but I have to admit that my first love is photography followed closely by decorative painting.  I received my first camera, a Brownie Reflex, at the ripe old age of 11 and I've been snap happy ever since.  I'm always on the look out for new surfaces to print photos on and was totally ecstatic when I saw Craft Attitude at the craft & hobby trade show a couple of years ago.  I came home with treasured samples to "play" with and haven't stopped since.  I was thrilled when Jonathan Fong asked me to create a project for their holiday blog hop.  The hardest part was deciding what to do!  I also love to etch glass so here's a project that incorporates both my love of photography and the magic of etched glass.


These are the supplies you'll need, plus ribbon and a few embellishments - I used deco mesh ribbon and a holiday craft pick.  I took this photo of a Cardinal in our back yard a couple of years ago, so all I had to do was crop it to the size I needed.


The first step is to etch the glass block.  The block is hollow, so instead of etching the outside surface I used dip'n etch, another of my favorite products, from b&b etchall to etch the inside.  Dip'n etch is easy to use and I love the fact that it's REUSABLE!  Gently pour about a 1/4 cup of the dip'n etch liquid into the glass block.  TAKE CARE - this is etching liquid and it will etch any type of smooth surface, so you won't want it to splash onto your granite counter top, porcelain sink, or on the outside of the glass.  The etch is permanent.  Being careful that the liquid doesn't spill out of the opening, gently lay the block onto its side, so the liquid covers the inside flat surface completely.  If you added too much dip'n etch, use something to prop up the open end.


BTW, complete directions are on the product so read and follow them carefully.  After 20 mins, I carefully turned the block upright again, then placed it onto its other side to etch that too.

While the glass was etching I printed my photo onto the Décor Attitude film, then cut it to size.  Pour the dip'n etch liquid back into the jar to be used again, then thoroughly rinse and dry the block.  Peel the backing from the Craft Attitude film then place it printed side down onto the glass surface.  If there are words in your photo, don't forget to flip your image horizontally before printing, or use the "print mirror image" setting on your printer.  Although the film clings well to the glass, I covered the surface lightly with a glue stick.  Check out the Craft Attitude website for all kinds of videos and tips on how to work with the film on a whole variety of surfaces. 


I positioned my photo with the opening in the block at the bottom so I could place it over an LED tea light at night.  I also glued the bow and embellishments to the top with a 3D glue dot, making it easy to remove at a later time.


This project only took a little over an hour to complete and makes a great holiday accent for your home!  Plus it's a great hostess gift!  So put a little "attitude" into your next crafting project to make it truly personal!


Don't forget to check out these other projects from the hop. 


This project is also featured here:
Blog Hop Button Show & Tell: What Are You Crafting For Christmas?

Enjoy!  Y'all come back now..........

Yours truly,
Julie :)


KEEP CALM AND CARRY ON CRAFTING!

Tuesday, November 26, 2013

Etched Glass Snowman

It was cold and frosty outside this morning..... brrr!  Made me think of the holidays, christmas trees, twinkling lights and snowmen!  Love snowmen... they're full of personality and they seem to go with all kinds of decorating trends.  Snowmen are eternal - unless of course they're real and the sun comes out.

I was browsing the other day, looking for nothing in particular, when I found this little, round glass jar with a screw top lid.  It reminded of a particular brand of jam my mum used to buy.  Didn't really have any plans for it, but picked it up anyway.  I happen to like glass and I particularly like etching glass, so I'd figure out what to do with it later.  Later, however, happened sooner than I thought.  I'd been working on some projects for the CHA trade show that's coming up in January and I had some half balls of Smoothfoam lying around on my workbench.  I'd also been etching something else, which you'll see on Monday, and suddenly the penny dropped.  I knew exactly what I wanted to do with my little roly poly jar!  Look!  Isn't he sweet!


And these are the supplies I used to make him happen, plus a few odds'n ends: 


First of all I removed the lid and filled the jar with etchall® dip'n etch™ being very careful not to let the etching liquid splash onto my granite counter top.  I didn't really want to etch the counter top again... LOL   While the dip'n etch was working its magic,  I cut a 2" Smoothfoam ball in half and glued one half to the top of the lid using a cool temp glue gun.  
    •  His nose is one half of a teeny tiny clothespin.  Remove the spring and you have the perfect shape for a nose.  The ones I had were colored, but if you have plain ones, paint or color it orange.  Use the tip of a pencil to make a pilot hole where you want the nose to be, then push the wide end of the half clothespin into the hole.  
    •  I used a cotton swab to rub pink powder blush on his head for cheeks.  
    •  His eyes and mouth are black, adhesive back acrylic jewels.  
    •  To make his ear muffs I cut about a 3" length of red chenille and pinned the ends at each side of his head by pushing a straight pin thru a small red pom pom into the end of the stem into the head.  You could glue it too I s'pose.  
    • His scarf is a 1/2" wide strip of felt which I glue around the rim of the lid.  
    • I also added adhesive jewels to the front of the glass for buttons.


The inside of the jar is now etched (it takes about 20 mins - please read the directions), then very carefully pour the dip'n etch back into the bottle!  This product is REUSABLE, yes, that's right you get to use it again, and again and again!  I said it was magical.  Thoroughly rinse the inside of the jar then dry it with a soft cloth.  Fill with your favorite candy, or bath salts, or anything you like for a one of a kind gift - an LED votive candle would look cool too!   

You could etch the outside of the glass of course, but I like the frosty look of the inside being etched and the glass still shines on the outside. 


Are you itching to etch?  Click on the "etchall" link in my sidebar for a whole range of etching products!  Enjoy........ y'all come back now!

Yours truly,
Julie :)

KEEP CALM AND CARRY ON CRAFTING!