
“Ihr Kinderlein rief die Mama,
steh auf der Oster Haas wahr da!”
I loved being in Germany during Easter! It was always so festive and families even had an Easter Tree decorated to the hilt with eggs, bunnies and chicks! It's a tradition I've continued for my children and grandchildren and each year it's always fun to create something new to hang on the branches.

Creating multiples of anything can be time consuming, but with my Cricut Maker it's quick'n easy and I can be oh so creative in no time at all! Kunin recently sent me a large selection of their felt to work with, so this year I added some felt ornaments. I created a design with some intricate cut outs in the shapes, something I could never have accomplished with scissors!
Here's what you'll need:
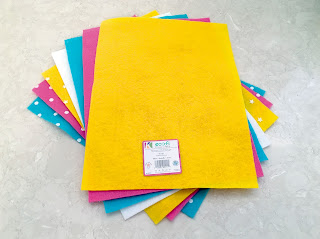
- Kunin Classics™ Felt 9”x 12” – Candy Pink, Lagoon & Yellow
- Kunin White Dot Coordinates - Candy Pink, Lagoon & Yellow
- Kunin Premium Felt 9” x 12” – White
- Joy® Embroidered Iron-on Baby Monogram Letters - White
- Joy® Embroidered Iron-on individual letters to spell E A S T E R
- Fabric, or tacky glue
- ¼” Ribbon – White
- Needle and thread (to make hangers)
- Assorted embellishments - buttons, adhesive jewels, baby ric rac trim, etc
- Misc supplies - toothpick, craft stick, tweezers, wax paper, etc

Instructions:
1. Upload both egg shapes into Cricut Design Space.


3. Adjust the height of the egg shape to 3" then cut 2 of each of the white dot coordinate colors of felt using the "default" pressure setting.
4. Upload the egg shape with cut out design, adjust the height to 3" then cut 2 of each color. Remove the felt from around the shapes. Note: thinking ahead, I also cut some bird designs for another project while I had yellow felt on the mat.
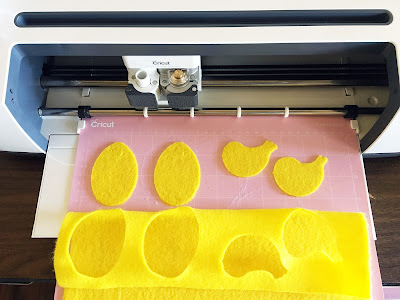
5. Using the weeding tool, carefully weed each shape while still on the mat. Set the small pieces aside - DON'T THROW THEM AWAY. Gently remove each shape.

6. You will now have 6 white felt shapes, 2 of each color of the white dot coordinates and 2 of each color of classic felt plus all the little pieces you weeded out.

7. Working with one egg shape at a time on a firm surface, fill each of the openings with the tiny, coordinating pieces weeded from each egg. I used pink and blue shapes to fill the yellow egg, blue and yellow to fill the pink egg and pink and yellow for the blue egg. Press each piece firmly into the opening. If you misplace the teeny dot that's under the tulip shape at the top of the egg, no worries, you can use a small jewel embellishment in that spot.

8. Use a craft stick to spread an even layer glue on top of each white egg shape, position then press a colored egg shape on top. Let dry then glue a white dot coordinate shape on the other side. Add an iron-on letter at the center.

9. Decorate the center of the shape on the other side with your choice of embellishments. I used ric rac, small Joy embroidered letters, buttons and adhesive jewels. Add a small bow and a loop of thread for a hanger at the top.

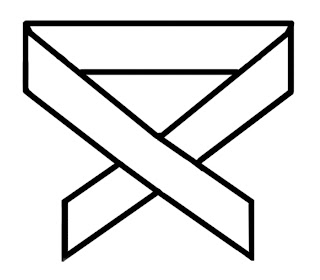
10. To make a simple bow, cut about 4" of ribbon. Cross the ends as shown, pinch together at the center where they cross then wrap tightly with thread. Tie to secure then knot the ends of the thread together.
11. Thread the ends of the thread onto a needle then sew the bow to the top of the egg with a simple up/down stitch. If your thread is long enough, you can tie the ends together to make a loop for a hanger. Voilà, you're finished....!
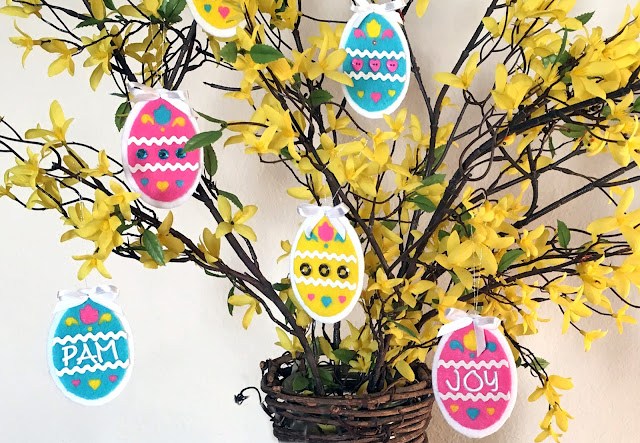
Felt Easter eggs are fun to hang on an Easter tree. You can also use to decorate baskets, make a banner, or create a "Peek-a-Boo" bunny wreath like this one:

The instructions for the wreath, including a free pattern download for the bunny are on the Creating with Joy blog.
Have a happy and blessed Easter.... y'all come back now....
Yours truly,
Julie
KEEP CALM AND CARRY ON CRAFTING!
No comments:
Post a Comment