Wednesday, May 6, 2015

String Art for Paper Crafters - Instructions

These are string art embellishments and this is where you'll learn how to make them!


If you came here from the Craft Paper Scissors blog, welcome!  If you didn't, you might want to hop over there first so you'll have a better idea of what's going on here http://www.craftpaperscissors.com/string-art-paper-crafting/

This post is essentially part two of my post about string art embellishments for paper crafters.  I shared a little history in my post on the Craft Paper Scissors blog, but this is where we get down to the nitty gritty of the "how to".

1.  You need shapes.  The most popular shapes are round, but they can be any shape as long as they have a notched edge.  You can purchase "Spirelli" punches at Ecstasy Crafts for punching round shapes from lightweight cardstock, cut shapes with decorative edge scissors, or, if you have a digital die cutting machine, you can use the shapes I designed.  These shapes are in jpeg format and you can find them under the tab "String Art Instructions" right here on my blog.  Drag each shape onto your desktop, then upload to your cutting software.  I uploaded the jpegs to Cricut Design Space then cut them from medium weight cardstock on my Cricut Explore.  The shapes were sized after being uploaded.  The large ones are 2.5" diam and the small ones are 1.5" diameter.  Ideally you will need small - 1.5", medium - 2", and large - 2.5" shapes for layering.  The sizes can be any size you like, but for layering you will need graduated sizes.


2.  You need thread:  I have an assortment of spools of thread in lots of different colors and thicknesses.  The shapes are wrapped with thread to create your embellishment.  Please see the wrapping instructions under the "String Art Instructions" tab.


3.  Layering:  As you can see in the samples above, I wrapped small, medium and large shapes with one layer of thread.  For a different effect you can also wrap one shape with 2 layers of the same color of thread like the ones below:


You can also use more than one color of thread on one shape.  For the sample below I started by wrapping with blue thread, separated by 8 petals, then silver thread separated by 6 petals and finally with green thread separated by 4 petals.


You can also layer different sized shapes like this.  I used a brad at the center to secure them:


Here's an example of layering using 3 shapes.  Note, only 2 of them are wrapped:


This is an example of a flower shape on top of a square, matted with a plain square:


Once you've mastered the art of wrapping, which takes about 3 minutes, it's fun to cut lots of different shapes in different sizes from different colored cardstock.  I will usually place an adhesive jewel at the center of the top shape, or punch a tiny hole at the center and insert a brad.  I layer the shapes using 3D glue dots, or small, adhesive foam pads for a little extra dimension between the layers.

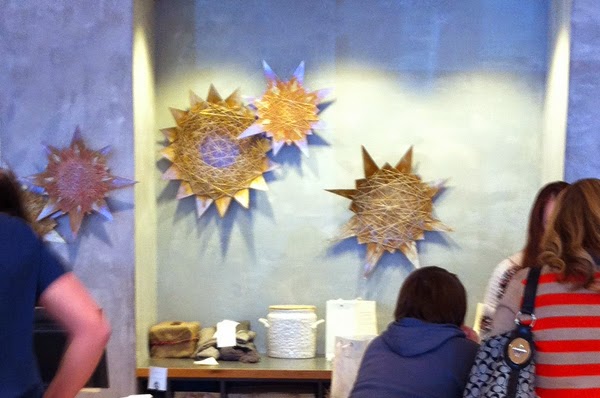
Finished embellishments can be used on scrapbook pages, cards, bookmarks, even wall art.  (If you saw my earlier post this year on String Art, you can see a photograph I took of this type of embellishment on the wall of my local Anthropologie store.) 

Here are a few samples for inspiration:


The most exciting thing about these embellishments however, is that they are fun, easy to make and, dare I say, very addictive.  

I hope you enjoy this string art technique as much as I do.  Please let me know in the comments if you do and I'll post more ideas and shapes for you to use.  Enjoy!  Y'all come back now......

Yours truly,
Julie :)

 KEEP CALM AND CARRY ON CRAFTING!

Sunday, May 3, 2015

iRock Sparkle!

I've been Spring cleaning and in one of the boxes I uncovered, I found some inspirational projects from the time when I was demonstrating the Fiskars Ultra Shape Express and templates for fabric.  I had ironed adhesive stabilizer onto the back of a variety of fabric and was using the heart template to cut out some hearts.  I then layered the hearts and ironed them onto T-shirts, aprons, pillows and the brim of  a denim hat.  It didn't take long for my grandaughter to claim the hat as hers.  "But Nana", she explained,  "it needs some sparkle.  Can we put some jewels on it, pleeeeeze?" I'd also found an iRock, battery operated adhesive jewel setting tool and some jewels, so we set to work.  This is what the fabric hearts originally looked like:


With the jewel setting tool I outlined the inside of each heart with clear crystals then added a single strand of Connie Crystal jewels around the edge of crown. EZPZ......  fit for a princess.

And here's my granddaughter rocking the sparkle like only a 6, almost 7 yr old can......


In case you haven't already guessed, the Designer Crafts Connection theme for this month's  First Monday post is - All About Bling.  Use the DCC logo in my sidebar to hop thru our webring and see what other designers created.  Enjoy!  Y'all come back now.......

Yours truly,
Julie :)

KEEP CALM AND CARRY ON CRAFTING!

Thursday, April 23, 2015

Decorative Trimmings Blog Hop!

Who doesn't like trim!  You can use it to update, upcycle, refresh and renew within minutes....  For example, I bought a cute dress for Easter Sunday - my daughter politely informed me it would be okay to wear over leggings, but even though I wore mini skirts in the 60's (as in the 1960's) it might not be quite so cool for a mum IN her 60's..... hmmmm.  Guess I need to get some lace (wide lace) and sew it around the bottom...

In the meantime I received a box of trim from Decorative Trimmings for this month's Designer Crafts Connection blog hop.  Designers love to play with new product and I am no exception.  Unfortunately I received white lace trim in my goodie box - I needed black to lengthen my dress, but at least I now know where to get some!

Spring is wedding season and nothing says "wedding" like lace, so I pulled some additional supplies together and set to work.


Weddings + lace + candlelight = romance, so I pulled out some tall and short LED candles and simply wrapped them with the lace.  There was additional narrow trim in my goodie box, so I wrapped that around the top edge of the lace on the tall candle, added a bow and a flower and voilĂ , a quick'n EZ candle decoration fit for the church and/or wedding reception.


I wanted to do something a little different with the shorter candle, so I added the narrow trim around the neck of a glass container I found at the dollar store then placed the shorter candle inside.


Simple, elegant and made in a jiffy.......  I think it looks great just like this, but you could also put it in the center of a floral candle ring.


Outdoor weddings are also popular this time of year and I've noticed a lot of burlap being used for that "country feel", so here are some additional ideas using the same lace and trim.


I covered a rectangular shaped glass container with burlap then added the lace and the trim along the top edge of the lace.  The table number is also burlap, decorated with the trim (and a little lace brad at each corner that I found in my stash of stuff).  I attached the burlap to a piece of acrylic (from an old frame I think) with double sided tape and the iron on number at the center with glue dots; (quicker than getting my iron out).  This was then glued to a bamboo skewer and placed between the flowers.  You could also prop it up against the container.


There are lots more ideas to look at.  Use the blue, DCC logo in my sidebar to hop thru the webring to see them all, then don't forget to check out our post on the DCC Blog.   Enjoy!  Y'all come back now....

Yours truly,
Julie :)

KEEP CALM AND CARRY ON CRAFTING!

Monday, April 6, 2015

Designer Crafts - Flowers

April showers may bring May flowers, but Designer Crafts Connection members are bringing them to you in April for their DCC First Monday project.

Flowers are everywhere, and not just in your garden.  You don't have to look too far for flower themed projects, especially now that Mothers' Day is right around the corner (May 10th, in case you need a reminder).  You can easily find ideas for paper flowers, painted flowers, molded flowers, fondant flowers, etc, etc......  but my flower project is all about magnetic flowers......


I usually visit the Dallas Gift Market in winter and summer and one of my favorite showrooms is Demdaco.  I think I could spend the whole day browsing their creative displays.  One of the companies they represent is "Embellish Your Story" by Roeda.  This company has designed a whole line of metal frames, boards and embellishments for every season and family celebration you can possibly think of.  You can imagine how delighted I was to see that this company was a new exhibitor this year at the CHA trade show in Anaheim.


I've been dying to work with their product and the representative offered to send me a few samples to play with.  Each item is already perfect, but, what can I say, I'm a designer and, like everyone else, I can't resist adding my own personal touch.  Here's what I received:


2 large magnetic boards - one black chalkboard and one aluminum
2 sets of 4 small flowers (yellow and teal) and
a set of green magnetic flower frames.

As you can see from their booth photos, this is just a smidgeon of what they have to offer.

Since our theme this month is flowers, I started with the chalkboard.  I have 3 grandchildren, so I was immediately drawn to the flower frames (I used the stock photos that came with the frames for this project), but needed to add just a little touch of my own.  It had to be quick'n EZ, so I added brush handle dots around the edge of each frame.


To make the dots, you need a paintbrush with a small handle and some white craft paint.  Squeeze some of the paint onto a disposable plate, or piece of wax paper, then, holding the brush straight up and down, dip the end of the brush handle into the puddle of paint.


Lift then place a dot of paint onto the edge of the frame.  Dip the handle into the paint each time you want to make a dot, so all your dots will be the same size.

I also wanted to add a touch of white to the small, yellow flowers.  Using the same technique, I placed a dot at the outer edge of each petal, but instead of lifting the handle up again I dragged it toward the flower center to create a short line.  You can also do this with a toothpick if you want a narrower line.


Once I had all the embellishments embellished, I used chalk to to draw straight lines and leaves for flower stems on the chalkboard, added my saying, lines around the edge and it was done.  It was so easy!


Chalkboard art and lettering is very forgiving and it's supposed look as if it was made by hand, so no one can go wrong here - and if you do, wipe it off with a damp cloth and start again.

I created something completely different with the aluminum board.  I love photography and am fascinated by the look of photos on metal.  I don't have whatever it is that one needs to print directly onto metal, but I have the next best thing.


My sister took this photo of my daughter and granddaughter, so I printed it onto Craft Attitude™ a printable film for inkjet printers that is perfectly clear and adheres to any surface.  I also have a Cricut™ Explore™ digital die cutting machine, so I used that to cut out the title in vinyl and added it to the bottom together with a thin black strip to underline.  I'm sure you can do this with any die cutting machine that will make intricate cuts.  There are tabs on the back of each board, so all I have to do now is add a ribbon and hang it my room.

You can find more information about where to buy this product here: http://www.demdaco.com/Embellish-Your-Story-collection/collection-landing-embellishyourstory,default,pg.html?title=Embellish%20Your%20Story&brandId=B2C

Watch how everything clicks together here: https://vimeo.com/70141513

 Hope you enjoyed my introduction to this new "craft" product....  y'all come back now!

Yours truly,
Julie :)

KEEP CALM AND CARRY ON CRAFTING!

Wednesday, March 25, 2015

Faux Sea Glass

I love sea glass!  In fact I love anything that has to do with the beach.  My sister and I have spent countless hours collecting shells and sea glass from beaches from the west coast of the US to the east coast of England.

It's not surprising when I kinda fell in love with some sea glass vases I saw in an online catalog.  I was about to "add to cart" when I suddenly realized I could make my own at a fraction of the cost and here it is:


I've been Spring cleaning lately and discovered a box full of these little heart shaped glass bottles. I wish I could tell you where I found them, but you can use this technique with any glass.  All you need is etchall® dip'n etch reusable glass and mirror etching liquid and a plastic container slightly larger than the glass piece you want etch.  You can find an inexpensive collection of glass bottles and vases, etc at your local Dollar store, or even Goodwill.


Here's what you do:

1.  Fill the bottle with WATER then place it inside the plastic container.  Fill the container with water until the water level reaches the top of the bottle.  Remove the bottle and the water level will fall. Mark the water level on the outside of the plastic container with a marker.

2.  Pour the water out of the container and the glass jar then dry both pieces thoroughly.

3.  Fill the plastic container with dip'n etch up to the mark you made.  Fill the bottle with dip'n etch then carefully place it inside the container.  Leave for 15 minutes.

4.  Remove the bottle and pour the dip'n etch back into the dip'n etch container.  Pour the dip'n etch from the other container back into its original container to be used, again and again.  Rinse the bottle thoroughly with water.  NOTE:  I etched 3 bottles, so after removing the first one, I poured the dip'n etch into the second bottle then placed that into the liquid in the container.  After 15 minutes I repeated the process to etch the 3rd bottle.  After you have finished, return all the dip'n etch liquid to its original container.

The bottles are now etched on the inside and the outside giving each piece the look of sea glass.  Leave pieces plain or embellish with shells, charms, beads, etc - anything you like to match your dĂ©cor.  This is such an easy process and the results are fabulous.

CAUTION:  Please read directions on the container carefully before starting your project.  This is an etching product and it will etch other shiny surfaces like granite, porcelain sinks, etc.


You can find etchall® glass and mirror etching liquid and crème at www.etchall.com.  Click on the graphic below for their dip'n etch special, just in time for Easter.  Don't forget!  This product is re-usable, so you'll be able to make a lot of faux sea glass! 


Enjoy!  Y'all come back now..........

Yours truly,
Julie :)

KEEP CALM AND CARRY ON CRAFTING! 

Wednesday, March 18, 2015

Connie Crystal - Designer Crafts Connection Challenge

As with most little girls, my granddaughter loves bling.  Me, not so much.  I've never been a "blingy" type person, but I DO love to challenge my creativity with products I wouldn't normally use on a regular basis.  That being said, I was really looking forward to receiving the samples from Connie Crystal.  They have these mesh sheets of crystal rhinestones, so they can be cut apart into a variety of sizes of squares, rectangles and strips.  I received two,  12" x 1.5" (this is not the size of a full sheet) samples of crystals, one on white mesh and one on black, and went to town.


I had already purchased a marquee letter "J" for my granddaughter's "boudoir" and was ready to decorate it.  I covered the outside with gold Duck tape and the inside with holographic silver card stock.  It goes without saying that it really sparkled when lit, but it needed a little something extra to make it sparkle during the day - strips of crystals of course!


Now it looks flashy all the time....!  I still had lots to play with so I added single strips to the outside of a Deflecto acrylic frame; just the bling it needed for said granddaughter's boudoir.  The rhinestones can be glued, or stitched to just about any surface.  I used 1/8" wide tacky tape for these projects.


Using tacky tape, I also glued a border of the black mesh rhinestones around the inside edge of a wood laser frame I'd painted black and used to make a clock.


Last, but not least, I had to make a piece of jewelry; after all, these are rhinestones.  I measured my wrist then cut a piece of the black mesh about 1/2" shorter.  I attached a bar fastener to each end then added a closure with a jump ring. It took me less than 20 mins to make and most of that time was spent looking for the jewelry findings I needed....


This is such a great product for adding a little fun and sparkle to your life! Hop thru the DCC Webring (using the blue logo in each sidebar) to see what crafty goodness the other designers are rocking out.  Enjoy!  Y'all come back now.........

Yours truly,
Julie :)

KEEP CALM AND CARRY ON CRAFTING!

Sunday, March 1, 2015

National Craft Month - String Art

March is National Craft Month so Designer Crafts Connection (DCC) members are sharing tips on how you can "make it yourself".   I can't begin to tell you how many times I've walked into a store, found something I like then thought, "I can make that".  If I end up buying it, it's usually because either, A I don't have time to make it, or B it would cost more to buy the supplies I don't already have.  Let's face it, I'm a frugal crafter.....

Pinterest is continually inspiring people to make it themselves, but you can also find inspiration on TV, in magazines and even from store displays.  For example, I love Anthropology for their unique store designs.  I snapped a photo of their string art display in December 2013 and, since I saw a lot of string art at CHA, I thought I'd share a few ideas on how you can make some of these yarn wrapped stars yourself - on a smaller scale of course.


These large stars would make great decorations for the holidays.  Cut some large, multi pointed stars from poster board then wrap with metallic yarn.  You can find string art instructions on a separate tab here on my blog.  They're for smaller shapes, but the technique for wrapping is the same. 

In the late 90's I used to teach classes on Spirelli, which is basically string art for paper crafting.  You can use punches, or dies for the shapes, but I cut mine on a digital die cutting machine.  You can always cut around the edge of circle shapes with decorative scissors to create the notched edge.  The technique has been around for years.  It's fun, easy and quite addictive.  Here are some of my projects featured on the cover of Paper Creations magazine with a close up of a layered Spirelli piece and a couple of samples on scrapbook pages.


 Technically, string art is a little different and usually thought of as a children's craft, but it popped up in a number of places at CHA as a home dec item.  Here are some of the photos I took on the trade show floor.  I can imagine you'll see some turning up in your local craft stores in the not too distant future.


What's not to love, right.....    and here are a couple of designs from a collection I created for a manufacturer a few years ago.


You can find inspiration everywhere, so next time you see something you like take the bull by the horns and "Make it Yourself".....   Enjoy!  Y'all come back now......

Yours truly,
Julie :)

KEEP CALM AND CARRY ON CRAFTING!