I lived in Germany from the mid 1960's thru mid 1970's and enjoyed discovering lots of new ideas and craft supplies during my time there. One of my favorite Winter crafts was creating Snowflakes from lunch bags.
Lunch bags were available in both white and brown and very inexpensive; a definite plus back then. Now you can find these paper bag designs all over the internet. Almost 55 years later and they're still fun to make. All you need is a pack of lunch bags, glue, or double stick tape and a good pair of sharp scissors.
Lunch bags are pretty big, about ll" long, so your finished snowflake will be about 22" in diameter, but a pack of 100 from Walmart is $2.28 so they're good to practice the technique. You may want to look for a pack of these white mini bags from Hobby Lobby (16 for $1.99) to make smaller, white snowflakes. the technique is exactly the same. You can also make snowflakes from sheets of regular paper, but I'll add those instructions a little later.
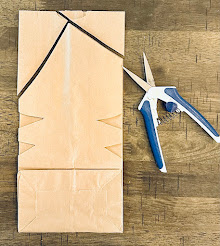
1. Start with one paper bag and create your pattern as shown below. Keep it simple to start with. Make cuts along one side making sure you don't cut past the folds (on the inside of the bag) then cut the top as shown. You can make the top cut exactly the same on both sides, but cutting this way makes it look more "interesting".... Fold the bag in half to make the same cuts on the opposite side.


