Thursday, October 25, 2012

Christmas Laser Frames

Still 7 weeks + to Christmas, but it's never too early to start working on Christmas decorations and projects.  As you know, I'm in love with the wood laser frames at Michaels and now they have 3, yes 3 new ones especially for the holidays.  So here's one of the new projects I just posted on Pinterest.  I'll post the others in a few days.  Let me know if you have any questions.


You will need:
Laser Frame
DecoArt® Americana® Acrylic paint:
    Bittersweet and Hauser Med. Green
Creatology™ Adhesive Foam Sheet - 5 ½” x 7 ½”
Black Cardstock
Paper Raffia (or strips of brown plastic from a grocery bag)
Elmer's Tacky glue
Small Sea Sponge, or round sponge pouncer used for stencilling
Sponge Brush
12” Twig
Brown Paper Lunch bag

1. Thin the brown paint with a little water then use to “stain” the front of the frame.
2. Tear the bottom off the lunch bag then tear down the seam to create a flat piece of paper. Tightly crumple the paper to create lots of creases then pull apart and flatten slightly.
3. Dampen the sea sponge slightly then dip into green paint.  Lightly whisk the sponge across the top of the creased paper, so the ridges pick up the paint color.  Let dry.
4. With the painted side up, lightly press the painted paper onto the adhesive side of the foam sheet.  Trim the edges of the paper even with the foam then glue behind the opening in the frame.
5. Use a die cutting machine to cut a seasonal image or trace an the outline onto black cardstock then cut out.  Glue to the center of the frame.  You can also use a wooden shape painted black. 
6. Hang the frame from the twig with raffia as shown.

Enjoy!  Y'all come back for instructions for this frame:

Yours truly,
Julie :)

Monday, October 22, 2012

Halloween Crafts

The weather is very "fallish" this week and windy, so the grandkids and I thought it would be fun to have some ghosts flying from the trees for Halloween.


Not a reason to make a long trek to the store though, so we gathered up some supplies from around the house:  Coat hanger, 4" Smoothfoam™ Ball, Tall Kitchen Bag, black permanent marker (I use Painter™ markers), string to hang, plus scissors and pliers. (I used my hubby's, but you can borrow from anyone if you need to.)


 Step 1 :  Straighten out the coat hanger hook.

 Step 2 :  Lay the trash bag flat.  Then cut slits about 2" wide from the bottom upwards.  Stop 15" from the top!  Place the coat hanger inside the top opening.


 Step 3 :  Gather the trash bag ties around the neck of the coat hanger.  You can leave them like this, or carefully stuff the ends to the inside.


 Step 4 :  Cut ONE LAYER of each strip about 4"-6" from the top.  Alternate cutting from the front and the back of the loop.  Think about this before cutting!  You don't want to cut them off, but by cutting one layer you'll make them longer.


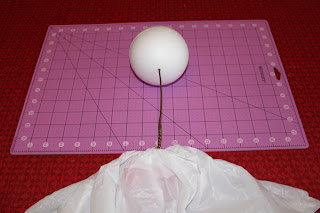
 Step 5 :  Push the straightened out hook from the coat hanger into the base of the ball.  You'll know where this is because there's a little hole to guide you.


 Step 6 :  Push the ball all the way down then use the pliers to fold over the end of the wire.  Squeeze tightly together so when you loop string thru the hook, it won't come off.


 Step 7  :  Now you have to add some eyes and a mouth with the black marker, or paint.  Nice thing about Smoothfoam™ is, that it is - SMOOTH - so you don't have to prep the surface, or anything.  The kids liked doing this the best.  We have some pretty scary looking ghosts!

Now wasn't that easy!  In no time at all you'll have ghosts dancing in the wind all around the house.  Woo Hoo!


Happy Haunting!  Hope y'all make it back now!

Yours truly,
Julie :)

Wednesday, October 3, 2012

Wood Laser Frames

Love, love, love these laser frames!  Saw them at Michaels earlier this year in the seasonal wood section.  Not just for my home, I thought they'd look great on the set of Scrapbook Soup!  Of course when I went back to get more, they were gone!  So I donated mine to the studio for the set.  What can I say, they look fabulous.  I also used one of them for a project I designed for Elmer's to feature on the show.  Take a peak!  The new series of Scrapbook Soup is now airing online, so you'll be able to find all the instructions on our website.


Here I am with my co-host Julie Fei Fan Balzer and guest, Melissa Frances.   You can see the frames on the wall behind us.  I used the frames to feature photos of guests from the previous series.  I strung jute from side to side then clipped photos to the jute with small, wood clothespins.


As I said, when I went back to the store a few days later, the frames had sold out, so you can imagine how excited I was when last week I saw they were back in the store!  They are now in the wood department on a year round basis.

There are so many things you can do with the frames.  Just add paint!  You can use a spray paint, or the round, sponge pouncers available with the stencils work great!  I framed a silhouette and a pre-painted wood letter (also from Michaels) for my daughter's entryway and a wood Gecko for my grandson's room.  There are just so many possibilities, it's positively mind boggling!


 You only have to "google"  Wood Laser Frames for a ton of ideas!  Enjoy!  Y'all come back now.......

Yours truly,
Julie :)