I also love decorative painting and it was at a decorative painting show that I discovered a product that would etch glass quickly and easily - the perfect surface for decorative painting! There are a few other glass etching products available, but the products from B&B etchall® appeal to my "turn every penny over twice" Yorkshire upbringing - THIS product is re-usable, which means I can use it, put it back in its container and use it again and again and again!! And you can believe, I do! Here are a couple of plates I etched with B&B etchall® then painted with acrylic paint:
For these samples I used etching products to etch the surface of the plate to give it "tooth" so I could paint on it, but the product is far more exciting than that... with etchall® crème, or etchall dip'n etch (a liquid) you can etch designs onto all kinds of glass pieces, plus china, ceramic tile, slate and more! So, you may be wondering, how do I decide which one to use - etchall crème or etchall dip'n etch?
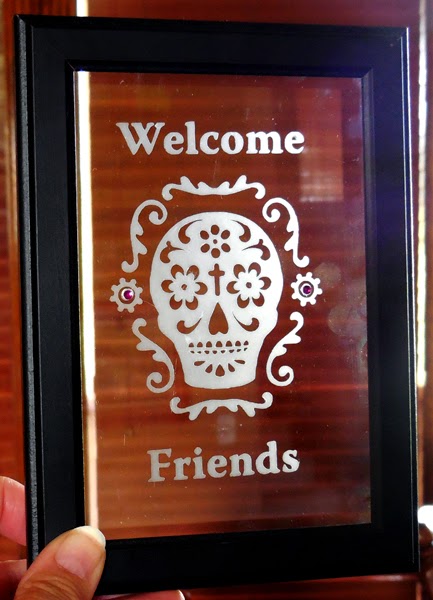
Check out these two glass projects below. The same design was used for both the mason jar and the framed glass.
I etched the design itself onto the framed glass - "positive" using etching crème, but etched the surface around the design on the mason jar - "negative" with etchall dip'n etch.
Let me show you how easy this is to do. BTW, don't be alarmed by the length of the post, I tend to write as if I'm talking...... We'll start by etching the piece of glass with etching crème.
Glass stencils are readily available for glass etching, but will only allow you to etch a "positive" design onto your surface. In case you haven't already guessed, designing is something else I enjoy. The sugar skull, which I'm using as an example for this tutorial is one of my designs. I uploaded the jpeg onto my computer, then using etchall etchmask™ stencil material and the vinyl setting, I cut two designs side by side (one with lettering) with my Cricut Explore. This setting creates what we call a "kiss cut". It only cuts through the yellow part of the stencil material - not the backing. It is this special cut which allows us to create either a positive or negative design.
Step 1: Upload the design to Cricut Design Space then follow the on-screen instructions. Place the etchmask onto the design mat then load when directed. Cut then remove the mat.
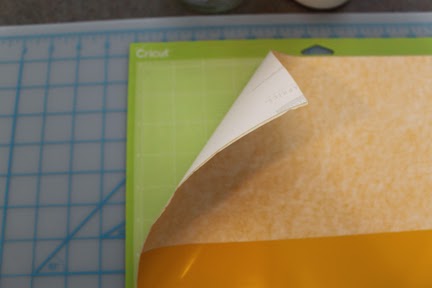
Step 2: Remove the backing from a sheet of etchmask transfer paper then place the transfer paper on top of the etchmask. Press firmly in place with the small, black Squeegee. Do this while the etchmask is still on the cutting mat.
Step 3: Carefully peel the etchmask and transfer paper away from the cutting mat.
Step 4: This design is 4" x 6" so I included a cut line around the design. Using the cut line as the guide, cut the "Welcome Friends" stencil from the sheet then carefully peel the backing from the back of the yellow etchmask. The transfer paper will hold all the cut pieces in place. With the edges of the stencil aligned with the edges of the glass, press carefully, but firmly onto the piece of glass. Use the squeegee to press in place then carefully remove the transfer paper. Set the transfer paper aside to use as a catch-all for all the little pieces you'll remove during the weeding process.
Step 5: Use the Detail Pick Tool to remove (weed) the design pieces from the glass. When removing pieces do not pick from the edge, always pick up from an area away from the edge so the edge of the design is not damaged. When working with a small, detailed design like this one, make sure that the small pieces are not accidentally removed. If this happens, use the pick tool to put them back in place. All exposed glass will be etched. I place all the pieces of etchmask I remove onto the transfer paper. This way they don't end up in odd places.
Step 6: This design was 4" x 6" so when I centered it onto a 5" x 7" piece of glass there was a space between the edge of the stencil and the edge of the glass. I did not want this to be etched so I covered all the edges with leftover pieces of etchmask. As you can see, I also placed a piece of backing paper from the etchmask and the transfer paper under the top and bottom edges of the glass. I then poured a large amount of etching crème at the bottom of the glass being careful not to let the crème pour onto the openings in the stencil. You cannot use too much crème and it is very important that you don't use too little. Don't skimp! Use the squeegee to spread the crème across the stencil. Don't drag the squeegee on the surface, stroke the crème gently across as if you were icing a cake. Pull in one direction. Do not go back and forth or side to side. Cover in one or two strokes if you can. Now set the squeegee aside and walk away for 20 minutes.
Step 7: Now scrape the crème back into the container. A plastic spoon is helpful for this part. Once you've returned as much as possible to the container, wash away the remainder and remove all the etchmask. Wash thoroughly then dry with a soft cloth.
Step 8: Return the piece of glass to the frame, then admire your etched design.
This isn't exactly a "beauty shot", but I wanted to show how cool the etched design looks! I even added a couple of adhesive "jewels" for a little Halloween bling.
Now let's learn how to use the dip. Here's a project I created recently using colored glass jars. They were so quick and easy to make. I poured dip'n etch into one jar, let it sit for 20 mins, then poured it into the second jar and so on until all the jars were etched on the inside! When all the jars had been etched, I poured the dip'n etch back into its container to be used again. I then added some jewel dangles for a little more pizazz. I love the way the glass is still shiny on the outside while the etching on the inside gives the jars a milky look.
The technique for the mason jar however, is quite a bit different.
I chose a large mason jar with smooth sides for this project because I needed a smooth area for the design.
You will need a plastic container when using the etching liquid. The container should be a little larger in diameter than the item you want to etch and a little taller if you want to etch all the way to the top. I had the perfect container - an empty soda bottle!
Cut the top from the soda bottle. Don't throw it away, you'll use this as a funnel when returning the dip to its container. You'll also need some pebbles, or a bag of dried beans or something to put inside the jar to weight it down when you place it in the liquid. I use red, glass marbles.
Step 1: Position the stencil design on the jar then remove the transfer paper. This is the same process we used for etching crème.
Step 2: This time we will remove the etchmask from around the design. For this project, the design will remain clear - it will not be etched.
Step 3: Fill the mason jar with glass beads (or whatever you are using to weight it down), then place it inside the empty soda bottle. The next steps will determine how much dip'n etch we will need.
Step 4: Fill the soda bottle around the mason jar with WATER up to the neck of the jar.
Step 5: Remove the jar and dry completely. NOTE: It is better to complete this process before putting the stencil on the glass. I placed the stencil on the jar first so the jar would be more visible inside the soda bottle for photography purposes.
Step 6: When the jar is removed the displaced water will sink to a low level in the soda bottle. Mark the water line with a sharpie then discard the water and dry the inside of the bottle thoroughly. Fill the soda bottle with dip'n etch up to the line only then carefully replace the mason jar. The dip'n etch will rise to the occasion.... Leave for 20 mins then remove the jar, rinse thoroughly, remove the stencil then dry. Remove the marbles and using the soda bottle "funnel", pour the dip'n etch back into its container.
I now have 3 mason jars ready to place in my window on Halloween. I found LED lights that change color so this is what my jars will look like in the dark of the night........ hmmm it's kinda like a traffic light....
IMPORTANT NOTE: When using these, or any products you are not familiar with, please read the instructions on the containers. For example, this product must be stored correctly at all times and you will find details on the container. It is also recommended that you may want to use gloves when handling the product and wear protective eyewear when using the dip. There is also a wealth of information, including step by step video tutorials at www.etchall.com together with a full list of the B&B etchall product line. Visit www.etchall.com via this link or by selecting the logo in my sidebar. You are also welcome to call their toll free number at any time and ask about a beginner kit - tell them Julie sent you and they'll know exactly what you will need.
Hope you enjoyed the tutorial, even if it was a little lengthy. I'll keep future projects short and sweet now that you know all the basics, so don't forget to bookmark this post......... enjoy ! Y'all come back now..........
Yours truly,
Julie :)
KEEP CALM AND CARRY ON ETCHING!


