Tuesday, November 30, 2021

Pillow Talk

Say it with a decorative pillow!  Just add embroidered letters... oh what fun!


     Personalize a decorative pillow with iron-on letters. It's quick'n EZ and the perfect decorative accent for every corner of your home!

You will need:
Joy® Embroidered Iron-on letter sheet - gold*


Fabric glue
Pillows (I found one with a fun design on one side; simple stripes on the other)


• Other colors and fonts are available so you can choose a color to match the design in your pillow.

Instructions:

1.  Remove the letters from the letter sheet for your saying then glue in place. The letters have a heat-activated adhesive on the back making it easy to iron them on.  This pillow however, was very soft and fluffy which made it hard to add the pressure needed which is why I used glue. 

2. Create the apostrophe used in this saying by snipping the shape from a letter not being used. The curved part of the letter "B" was used here.  Save what's left, you might need the extra pieces for another project. Let dry then flip the pillow over.


3. Position the letters on the pillow,  remove the backing then press in place. The letters are adhesive, so no need to iron them on, but ! Look how "nice" this is.... and it only took minutes to make. 


Enjoy!

Yours truly,
Julie 💝

KEEP CALM AND CARRY ON CRAFTING!


You find more quick'n EZ ideas on our Facebook page video here.

Friday, November 26, 2021

Holiday Star

It's always a starry night when you decorate with foil stars for the holidays!

You will need:

  • Rinea® Paper Foil - Starstruck silver
  • Scissors
  • Adhesive

Instructions:

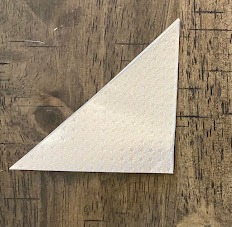
1. Cut a 4"x 4" square of foil then fold in half diagonally.  Fold in half again along the fold.


2. Starting at the two, folded edges, make 4 cuts about 3/8" apart, parallel to the long, cut edge. Cut to within 1/4" from the thicker, folded edge.  Gently open up the folded square.


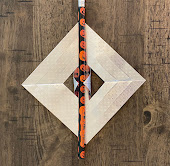
3.  Starting at the center, gently pull the center tabs upwards, overlap the points and glue in place.  This is row 1.  Since these tabs are small, it is helpful to lay a pencil along the fold line and fold the tabs over the pencil.  Repeat with row 3. 


4. Turn over then repeat the process with rows 2 and 4.


5. Make 5 then glue the bottom points together to create a star! 

There are two types of Rinea paper foil. Starstruck is available in a variety of colors. It has an all-over embossed design and is the same on each side.  Rinea glossy paper foil is slightly thicker. It is colored on one side and gold on the other. Sapphire and gold is shown below.  Each style is available in two sizes: 4" x 6" and 6" x 12" online at Rinea's online store.
 

Enjoy your starstruck holiday home!

Yours truly,
Julie 💝

KEEP CALM AND CARRY ON CRAFTING!

Tuesday, November 23, 2021

Christmas Towel Ring

 Not just for embroidery, a wooden hoop is great for wreaths and even a guest towel ring for the bathroom!


You will need:
  • Joy® Embroidered letter sheets - Gold, Silver and Classic white monograms
  • 8" Embroidery Hoop
  • Tulip Color Shot - Gold, or other gold paint
  • Drop cloth* or small piece of tightly woven fabric - 12" x 12"
  • 1/4" Gold RicRac trim 
  • Craft iron
  • Glue gun & Lo-temp glue sticks
  • Small paint brush
  • Christmas greenery
  • Small Zip ties
  • Assorted ribbon & trims
  • *a drop cloth can be purchased at the hardware store for a few dollars, providing fabric for multiple banners and much more. 
  

Instructions:
1. Remove the small monogram letters from the sheet. Spray gold color shot onto a piece of wax paper, or paper plate, then using a small paint brush paint each letter - hold letters in place with a toothpick.  Let dry.


2. Cut a piece of drop cloth fabric about 12" x 12".  Iron to remove wrinkles. Separate the embroidery hoop then place the inner hoop on top of the fabric. Carefully remove gold and silver letters from the backing sheet then position on the drop cloth using the hoop as a guide for placement. Remove the hoop, cover the letters with a pressing cloth then iron in place.


3. Fold the top and bottom edges under, iron then position on top of the inner hoop. Place trim along the top and bottom edges. 


4. Push the outer hoop over the top then tighten the screw to hold in place. Trim excess fabric from the back of the hoop.


5.  Glue rope trim around the outside edge of the hoop. Measure then cut the length needed. Glue one end in place at the top, pull the rope tightly around the hoop then glue the opposite end in place.


6.  Attach greenery to the top of the hoop with small zip ties and gold ribbon loops/bow at the center.


7.  Add additional embellishments if desired. Small snowflake and adhesive jewels shown here.


8.  Use as is, or hang in the bathroom with a small towel for your guests!


May your holiday season be filled with love and joy!

Yours truly,
Julie 💝

KEEP CALM AND CARRY ON CRAFTING!

Thursday, November 18, 2021

Sugar Plum Christmas Garland

 When visions of sugar plums dance in your head….. it’s almost Christmas1 


You will need:
  • Kunin® Classic™ 9” x 12” Craft Cuts – 1 each Lemon Frost, Baby Pink & Minty
  • Kunin® Premium 9” x 12” Craft Cuts – White
  • Joy® Embroidered iron-on letter sheet – White


  • Cricut® Maker™ with Rotary blade (optional. Shapes can also be cut with scissors.)
  • Cricut® Easy Press Mini, or iron
  • Mod Podge® Ultra – Matte
  • Crystal glitter
  • Glue gun & lo-temp glue sticks
  • Mini pom-pom trim – 3 yd spool
  • Bag of small craft pom-poms, or cut from pom-pom trim
  • Tacky glue or large, extra strength glue stick
  • Needle and thread
  • Scissors & wax paper

                    Instructions:

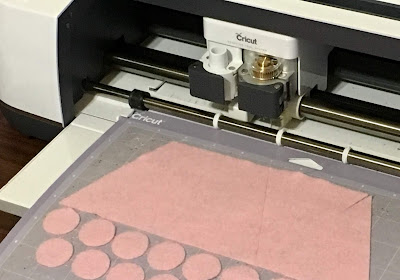
                    1. Using the “shapes” feature in Cricut Design Space, create:
                    ·               4” x 3” triangles - 5
                    ·               ½” circles - 15 
                    ·               ½” x 11” rectangles  - 3


                    2. Cut one set of shapes from each piece of felt - Lemon Frost, Baby Pink and Minty felt as follows: 
                                Place the felt horizontally across the top of the mat. Insert “Felt” in the “Browse all Materials” tab, then select “Felt Acrylic”.  Use the rotary blade to cut. After cutting is complete, pull the felt surrounding the shape from the mat, then carefully lift the shapes. Increase the size of the triangles to 4 ½” x 3 ½” then cut the shapes from white felt.


                    3. Place the colored triangles onto a piece of wax paper.  Spray with Mod Podge Ultra then sprinkle liberally with glitter. Allow to dry then shake off excess glitter.

                    4. Cover one side of each white felt triangle with glue then, with top edges aligned, center a colored triangle on top.  Press firmly in place.  Tip: Use a craft stick to spread an even layer of tacky glue on the felt, or use a glue stick. Premium felt is stiffer and an extra strength glue stick also works extremely well. *HAPPY (or MERRY) CHRISTMAS requires 14 pennants.


                    5. Cut the colored felt strips into ½” squares. For 14 pennants you will need 28 squares of each color. Alternating colors, loosely thread the squares, two of each color and one pom-pom onto a length of thread.  Stitch the end of the thread to the tip of the pennant to secure then glue a felt circle over the end at the back. Use a different color felt than the felt on the pennant for contrast.


                    6. Remove the letters needed for the garland from the embroidered letter sheet. Alternating pennant colors, iron one letter to each pennant. Position letters right side up, cover with a pressing cloth then iron in place. 


                    7. Place the pennants in order on a flat surface then use lo-temp glue to adhere the mini pom-pom trim across the top of all the pennants.  Leave a small space between each one and make sure to add extra trim at each end to hang your garland!


                     ENJOY AND HAVE YOURSELVES A VERY MERRY CHRISTMAS!

                    Yours truly,
                    Julie 💝

                    KEEP CALM AND CARRY ON CRAFTING!

                    Sunday, November 14, 2021

                    Fall Splendor

                     Bring the colors of Autumn into your home with a quick'n EZ floral arrangement...


                    You will need:
                    • Joy® embroidered, iron-on letter sheet - GOLD
                    • Fall leaves and silk flower piks
                    • Mason jar (or other glass container)
                    • Glitter tulle - brown
                    • 2" Burlap ribbon - rust
                    • Zip tie
                    • Raffia
                    • Iron
                    • Cardboard roll (from paper towel)
                        

                    Instructions:

                    1. Cut a length of burlap ribbon long enough to wrap around the mason jar with an additional 1" to overlap.  Remove each embroidered letter from the sheet then position at the center of the burlap.
                    Suggestions:  F A I T H   H O P E   P E A C E   L O V E   J O Y   F A L L  and more! 

                    2. Following manufacturer's directions on the back of the package, cover with a cloth and press the letters in place.


                    3.  Place the cardboard tube in the jar, trim to correct height, then push the tulle into the jar between the tube and the glass. Option: You can also fill the area between the tube and the glass with yellow, or colored corn.


                    4.  Wrap raffia around the top of the jar and the burlap around the glass.  Mark where the burlap band overlaps, remove then secure with a staple at the top and bottom.  Slide the band back onto the jar.


                     5. Bundle a variety of silk flowers and leaves together. Secure with the zip tie then place inside the cardboard roll with the bottom layer of leaves resting on the rim.  Trim the stems if needed.


                    Enjoy!

                    Yours truly,
                    Julie 💝

                    KEEP CALM AND CARRY ON CRAFTING!