Thursday, July 30, 2015

Etched Glass Seashell Frame

Sand, sea, sun and seashells - all the ingredients of perfect summer memories captured forever in this photograph and frame....


 My sister took this awesome photo of our grand children at the beach this summer. It's definitely one of my favorites and needed a special frame.
 
This is what I used:
etchall® Glass & Mirror Etching Creme
etchall® etch mask and transfer paper
Pik tool
Squeegee
Sponge brush
Double Glass frame
    *etchall® products for me to use were provided by B&B products.

Note:  Before starting the project, remove the pieces of glass from the frame and wash each piece thoroughly.

1. I drew artwork for the shells and starfish then re-sized and arranged them to create the border design to etch on the double glass frame.  I then uploaded my design to Cricut Design Space and cut the design from etch mask on the Cricut Explore.  The glass size was 8" x 10" so I sized the cut line round the edge of the design to measure 7" x 9". 


2.  After cutting, remove the outer border from around the edge then cover the etch mask with transfer paper.


3.  Remove the etch mask and transfer paper from the Cricut mat, then remove the backing sheet from the back of the etch mask.  Center the etchmask on the glass. There will be a 1/2" border of glass around the etch mask on all 4 sides.  Press securely in place with a squeegee, or old credit card. 


4.  Remove the transfer paper from the top of the etchmask then, using the pick tool, remove etch mask from the design areas to be etched. Set the transfer paper aside to use later; do not discard.

5.  Weed all areas around the edge of the etch mask.


When weeding make sure to pull the etch mask from the center of the piece, not the edge.


6.  Place strips of transfer paper around the edge of the etch mask to protect the exposed glass edge.


7.  Pour etching creme onto the center of the etch mask then spread thickly over the design areas around the edge. 


8.  Leave for 15 minutes.  etchall is re-usable, so scrape the creme back into the container.  Further instructions are available on each container and at www.etchall.com

9.  Thoroughly rinse the remainder of the creme from the glass, then remove the etch mask and transfer paper.  Use a scraper if necessary to remove any remaining small pieces. Dry the glass.

10.  Assemble:  Place the etched piece of glass in the frame then the wooden spacer.  Attach the photo to the center of the second piece of glass then place it in the frame at the back on top of the spacer.  Cover with a solid piece of cardstock (I used dark blue) then secure with the frame tabs to finish. 

I enjoy creating my own designs to etch, but there are lots of stencil designs available at www.etchall.com as well as your local arts & crafts retail store.  Enjoy!  Y'all come back now......

Yours truly,
Julie :)

KEEP CALM AND CARRY ON CRAFTING!


Thursday, July 23, 2015

Christmas Crafts!

Christmas is coming!  In 155 days!  Are you ready?  I never am.  Each year I tell myself I should start earlier and be more organized, but it hasn't worked yet.......  This year I'm getting an early start by participating in a Christmas in July blog hop with the Robin's Nest and Smoothfoam..


I received Smoothfoam shapes and product from the Robin's Nest for their Christmas in July blog hop with DCC members. Our challenge was to create something fun. 


 and this is what I made.... 


Okay, I admit, this isn't quick, but it is pretty easy and it's different.  I love LED lights and my goal was to create something that would light up our home for the holidays.

There's also a giveaway, so if you'd like to win some Robin's Nest and Smoothfoam product and get a head start on your holiday decorating, all you have to do is comment on the participating blogs  - one entry per comment, so the more you comment, the more chances you have to win!

These are the products I used:
Large Smoothfoam Snowflake
6" Smoothfoam Disc
Christmas papers and DewDrops from Robin's Nest
PLUS
Tacky glue
Paper glue
Clear crystal glitter
Craft Knife and/or sharp paring knife
Paper Trimmer
Stylus
Versa Tool (Walnut Hollow)
Battery operated string of 20 LED mini lights

1. Coat the top surface of the snowflake with glue, then sprinkle with glitter.  Set aside to dry.
2. Mark 20 dots about 1" apart around the disc about 1/2" from the edge then use the tip of the blade holder in the heat tool to make holes in the ring for the lights.


Quickly push the tip straight up and down and work on a tempered glass surface. The tip will not go all the way thru the disc, so turn the disc over and open up the holes from the opposite side.


3. Cut a 4" circle from the center of the disc to create a ring, 1" wide.  Use a slow up and down motion when cutting for a smooth cut edge. Use a regular craft knife, hot wire foam cutter, or the knife blade in the Versa Tool. This is a HOT knife so use with extreme caution. Tip: A fabric softener sheet is great for cleaning up small crumbs of Smoothfoam on your work surface after cutting.


4. Glue a 1" wide strip of card stock around the outside of the ring.  Tip: Use a rubber band to hold in place until the glue is dry.
5. Glue dew drops on top of the ring to decorate.  Let dry.


Make a Rosette for the center:
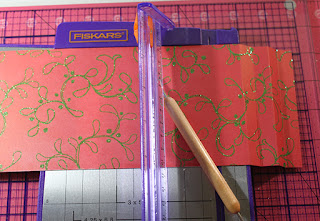
1. Score a 4" wide strip from 12" card stock at 1" intervals. Tip: I use my paper trimmer and score along the cutting channel with a stylus.


2. Cut the strip in half to create two, 2" x 12" strips.  Accordion fold each strip then glue the ends together to create a circle.


3. Squish the folds together and push down in the center to flatten. Glue a 1.25"circle of card stock over the center on each side of the rosette to secure. Decorate the circle on one side with dew drops, or a star shape.  This is double sided paper, so you can display either side.


Assemble:
1. Push each LED bulb into a hole in the ring from the back.  If the hole is a little large and the bulb doesn't fit snugly, shim with a small strip of card stock inside the hole. To keep the wire straight, leave 4 or 5 holes between each bulb.


2. Secure the ring to the center of the snowflake, making sure the wire and battery holder/switch are at the back of the snowflake.  Smoothfoam is very dense, so I secured the ring by pushing quilt pins diagonally thru the inside of the ring into the snowflake.


The holder can be left loose at the back, or you can glue half a 6" disposable plate at the back to create a pocket to hold it in place.  It's important to be able to reach the switch to turn the lights on and off if there isn't a timer setting. 


3. Push the rosette into the center of the ring to finish.

 
Look for more projects from DCC designer members by hopping thru our webring using the blue DCC logo in the sidebar on our blogs.  You can also see a full selection of projects from The Robin's Nest design team on the DCC blog and the Robin's Nest blog.  Enjoy! Y'all come back now........ 

Yours truly,
Julie :)

KEEP CALM AND CARRY ON CRAFTING!

Wednesday, July 8, 2015

Vacation Crafts

A vacation isn't a vacation unless we go to the beach.... I love the sea, sand, sunshine and shells.  I rarely leave without a pocketful.  When I get home, I wash and store them carefully in a shoebox.  I've been collecting shells for over 60 years and love to create with them, but more often than not, I end up using special shells from the craft store.  One day I'll make a Sailor's Valentine with my collection, but doubt that will be any time soon.

Here's one of my recent projects that hangs in my craft room.


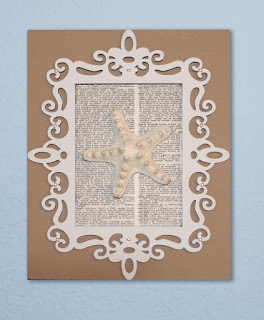
It is really quick'n EZ to make.  I cut a piece of Smoothfoam™ the same size as the 5"x7", wood laser frame purchased at Michaels then, using a sponge brush, I painted it with light brown acrylic paint.  I used Smoothfoam because its smooth surface is easy to paint without any kind of prep and it's lightweight.

The laser frame was painted white.  I wanted to feature the Helmet starfish at the center, but needed some kind of backing.  Spring cleaning to the rescue.... I had saved an old dictionary, so I tore out the page with the definition of "Starfish" and trimmed it to fit the frame opening.  It was then glued to the center of the painted Smoothfoam and the frame glued on top.  I glued the starfish to the center and a few sea pearls to the frame to finish.  It only took about an hour, including drying time.  Now I don't feel so bad when I look up and see stars......  LOL

You can find more projects on the Smoothfoam blog.  Enjoy!  Y'all come back now........

Yours truly,
Julie :)

KEEP CALM AND CARRY ON CRAFTING!